
Interior Build: Restore and Reinstal wall to wall rugs,belts and seats


Thread Starter
|
MOTM Mod


Joined: May 2013
Posts: 5,503
From: Nebraska

Okay, taking a little break from the work on the Monte today, but only for a few minutes.
For the past 2 weeks I have been working on the interior and trying to get it all ready for an upcoming Car show. So I removed all of the seats and then the Carpet. The Carpet was not the desired color to coordinate with the seats and trim.
So I have taken a few trips to the Salvage yards over the last few years with the intention of finding a fairly nice leather interior.
I have been successful in that.
So finally got home from being gone for 8 months to Iowa. Now I think it is time to retire and enjoy some home stuff.
Over the Christmas time I was able to redo the Door panels on both sides and Create a new trim where the Carpet was on the lower section of the door.
I was able to find a Budweiser Dale Jr. leather Jacket that was damaged and I repurposed it to make the trim for that door.
There will be more to follow as soon as I get time to put up some more details.
1. Removed all the seats ( take a photo so you know how it looked.

2. Remove the belts and the interior trim as well.

For the past 2 weeks I have been working on the interior and trying to get it all ready for an upcoming Car show. So I removed all of the seats and then the Carpet. The Carpet was not the desired color to coordinate with the seats and trim.
So I have taken a few trips to the Salvage yards over the last few years with the intention of finding a fairly nice leather interior.
I have been successful in that.
So finally got home from being gone for 8 months to Iowa. Now I think it is time to retire and enjoy some home stuff.
Over the Christmas time I was able to redo the Door panels on both sides and Create a new trim where the Carpet was on the lower section of the door.
I was able to find a Budweiser Dale Jr. leather Jacket that was damaged and I repurposed it to make the trim for that door.
There will be more to follow as soon as I get time to put up some more details.
1. Removed all the seats ( take a photo so you know how it looked.
2. Remove the belts and the interior trim as well.
Thread Starter
|
MOTM Mod
Joined: May 2013
Posts: 5,503
From: Nebraska
Okay so then I got all the seats out and the seatbelts and finally down to the old Carpet. Back seat here was easy to remove I have had it out before.
I was fortunate enough over the last 3 years to acquire a fairly complete interior, in Gray Graphite leather. But in the process I have lost a couple of things one is the passenger side Visor and 2 pieces of seat trim?? I have done everything but sent out a search party? Looks like I will just need to go the Salvage yard and find the same ones and bring them home.
At one time some one spilled a Pepsi or Root Beer in the back seat??

Looking into the trunk from the inside of the Car.

Once that was out I worked to get the console out and finally down to the old Carpet.

Then try to pull this whole cabin rug out
I was fortunate enough over the last 3 years to acquire a fairly complete interior, in Gray Graphite leather. But in the process I have lost a couple of things one is the passenger side Visor and 2 pieces of seat trim?? I have done everything but sent out a search party? Looks like I will just need to go the Salvage yard and find the same ones and bring them home.
At one time some one spilled a Pepsi or Root Beer in the back seat??
Looking into the trunk from the inside of the Car.
Once that was out I worked to get the console out and finally down to the old Carpet.
Then try to pull this whole cabin rug out

Monte Of The Month -- January 2016

Joined: Feb 2013
Posts: 2,293
From: Pacific NW
That's gonna' be nice when you get 'er done Dale. I'm slowly moving in that direction on the current project car. What color carpet are you going with, and where did you by from? I'm doing the trunk liner too. Thanks for sharing picks, looking forward to seeing more as you progress.


Thread Starter
|
MOTM Mod
Joined: May 2013
Posts: 5,503
From: Nebraska
Kinda fun to do some work on this thing, but it takes a bit of time to complete. The wife has been sick so she hasn't gotten to irritated yet but it's a mood on the horizon for sure.
so these are what it looks like underneath all that Carpet. The Factory Rug is rubber backed and molds down to all the contours of the cabin pan.
This Car has absolutely no rust which is amazing for being in Nebraska, but I washed it underneath regularly when I drove it in the weather and it was always in the Garage unless I was overnight somewhere.
1. The interior metal Pan with the wiring exposed.

2. The interior metal pan in the rear.

3. The interior with no carpet allows you to see the AC vent tube routing

4. A new seat I was trying out but there were no tracks for mounting.


")

Then somewhere I dropped the little U shaped key that holds the shifter handle on, and it must have scurried off down a Hole in the pan. So when I made the trip to get more stuff at the Salvage yard I was able to get another. Whew...
so these are what it looks like underneath all that Carpet. The Factory Rug is rubber backed and molds down to all the contours of the cabin pan.
This Car has absolutely no rust which is amazing for being in Nebraska, but I washed it underneath regularly when I drove it in the weather and it was always in the Garage unless I was overnight somewhere.
1. The interior metal Pan with the wiring exposed.
2. The interior metal pan in the rear.
3. The interior with no carpet allows you to see the AC vent tube routing
4. A new seat I was trying out but there were no tracks for mounting.
Then somewhere I dropped the little U shaped key that holds the shifter handle on, and it must have scurried off down a Hole in the pan. So when I made the trip to get more stuff at the Salvage yard I was able to get another. Whew...


Thread Starter
|
MOTM Mod
Joined: May 2013
Posts: 5,503
From: Nebraska
That's gonna' be nice when you get 'er done Dale. I'm slowly moving in that direction on the current project car. What color carpet are you going with, and where did you by from? I'm doing the trunk liner too. Thanks for sharing picks, looking forward to seeing more as you progress.
Then when you take out the old one use it as a template for all the areas that need to be cut open for AC Vents and seat belt bolts and seat blots as well Trim to fit inside the Car. and you are good to go. This one layed down nice and I couldn't be happier.
I am a perfectionist when it comes to this stuff. So pleased is the word.
1995-1999 CHEVROLET MONTE CARLO CARPET - ANY COLOR
Thread Starter
|
MOTM Mod
Joined: May 2013
Posts: 5,503
From: Nebraska
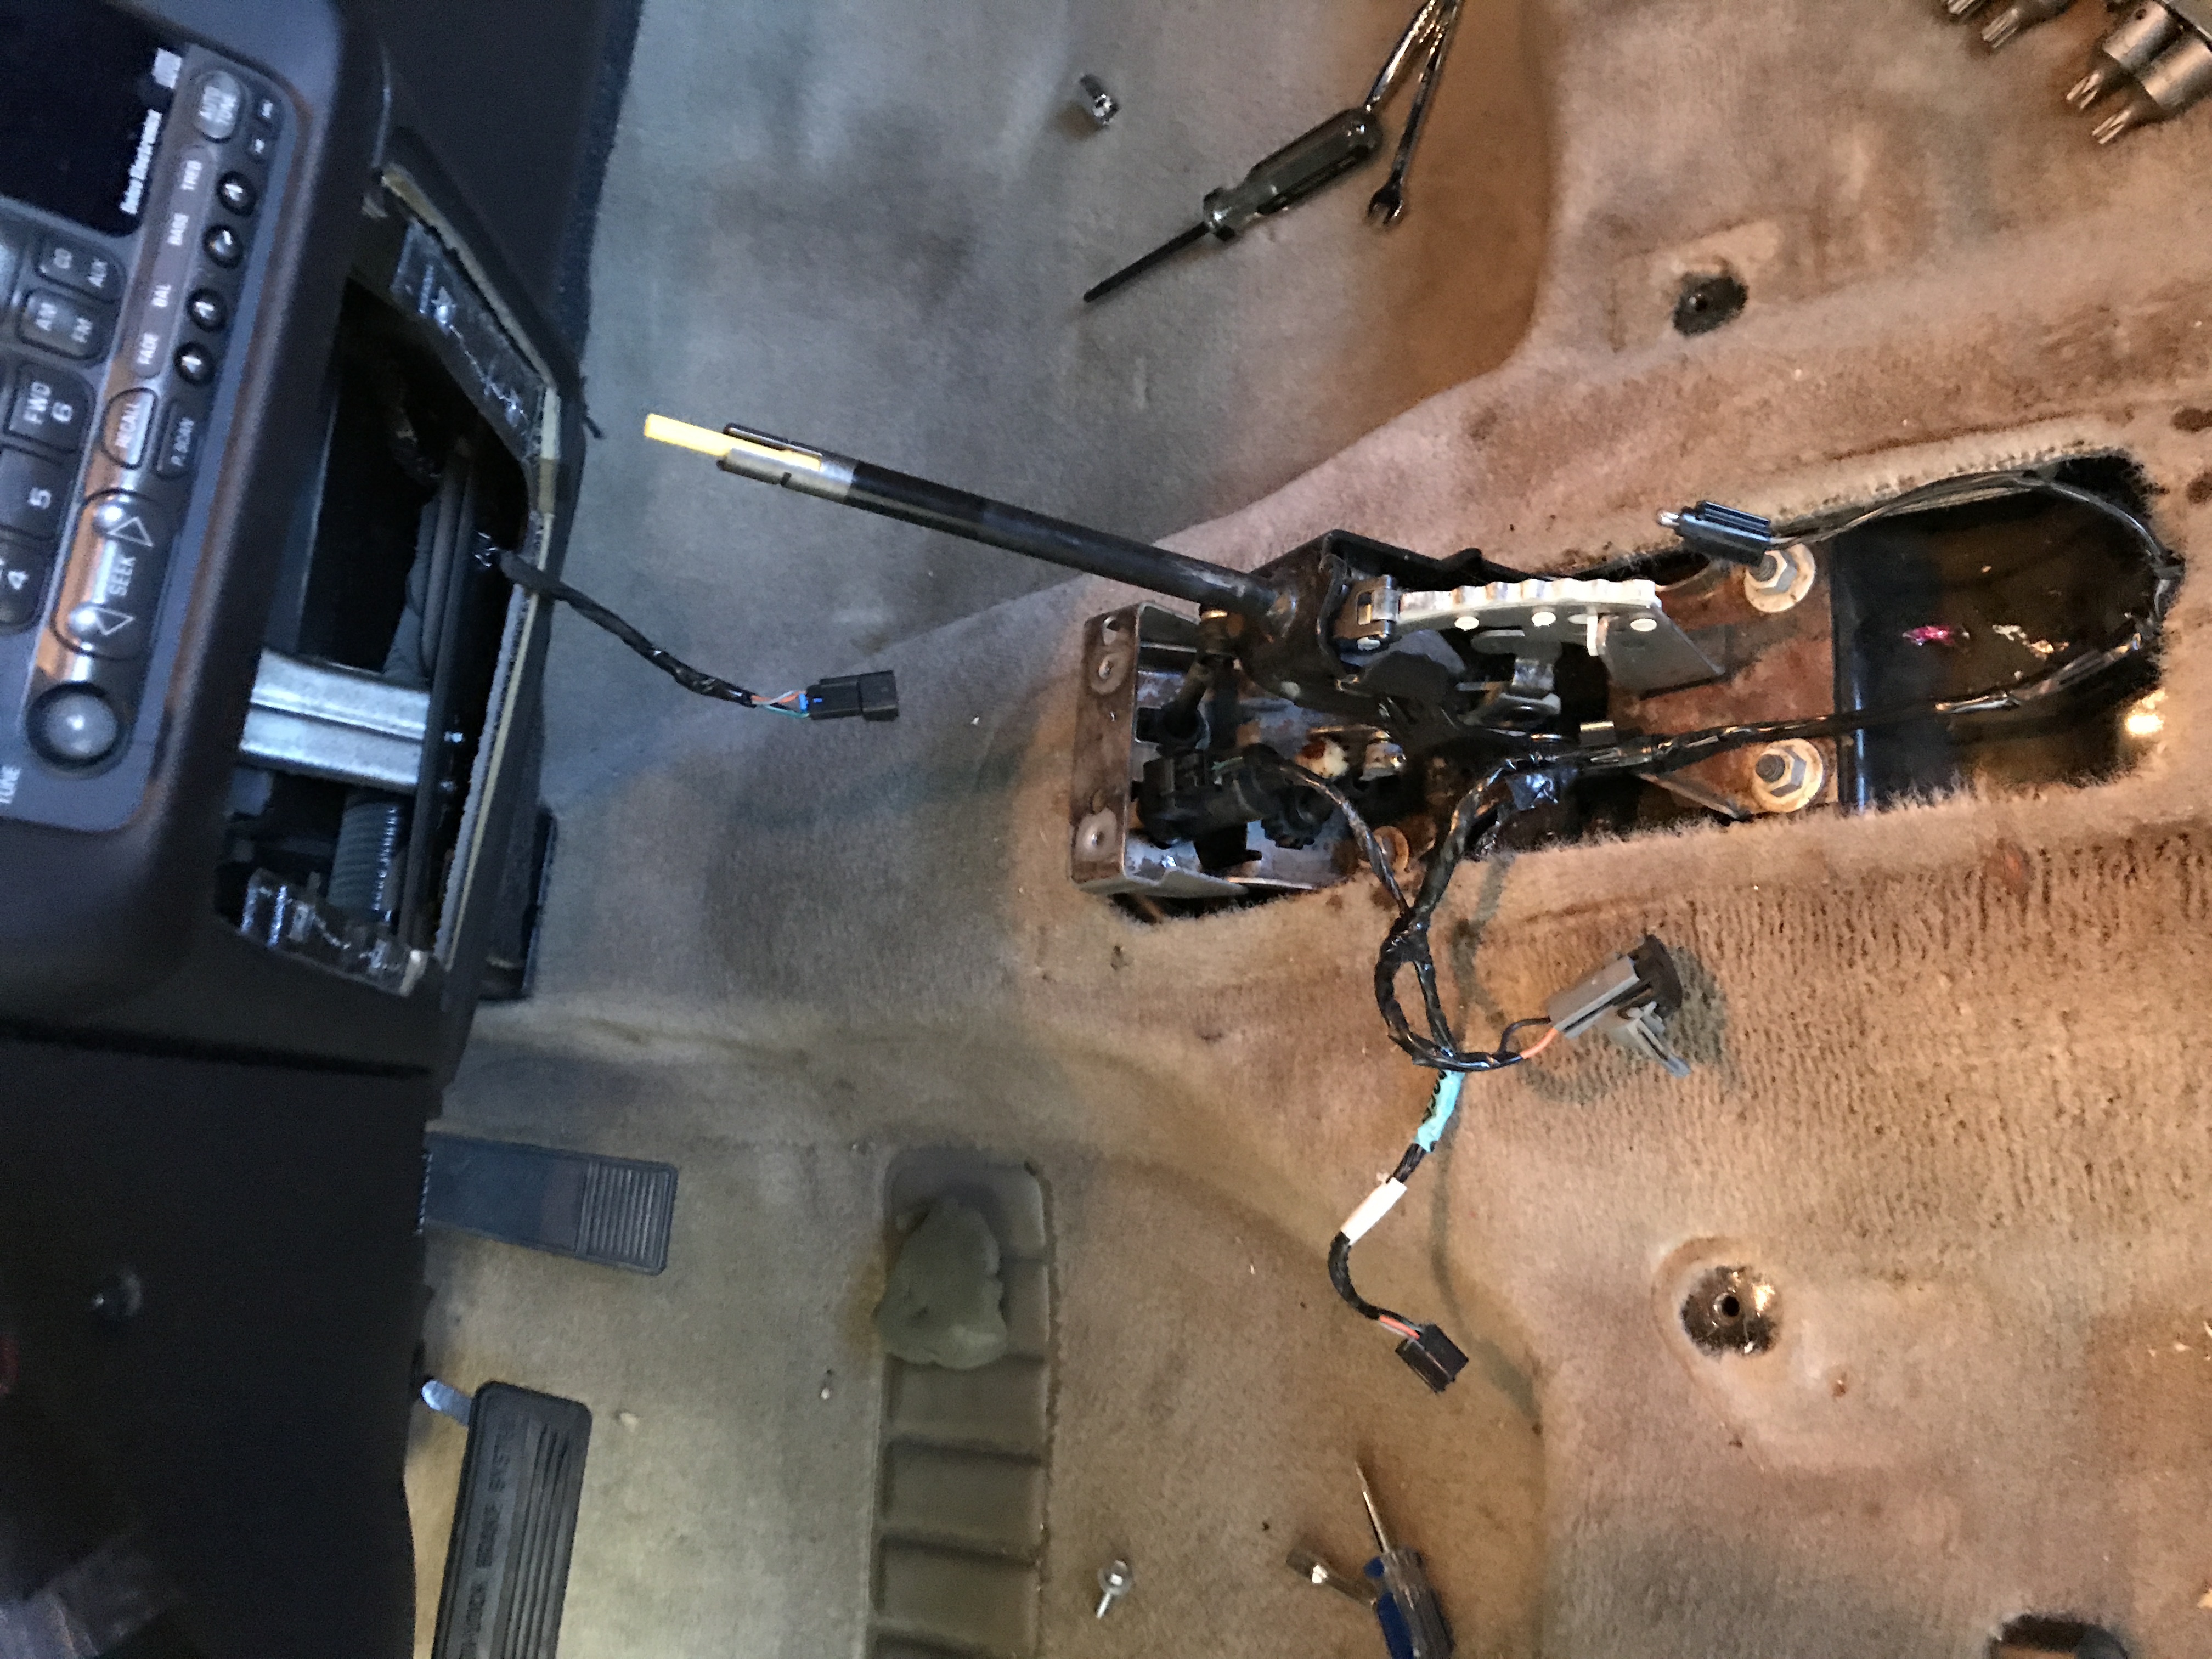
I can't say this enough (take pictures when to take it apart and that will make it easier to put back together when you are ready.
Took photo's of the way it was wired to make sure I got is right when it goes back.

Console could be the trickiest on removing and replacing.

Took photo's of the way it was wired to make sure I got is right when it goes back.
Console could be the trickiest on removing and replacing.


Monte Of The Month -- January 2017

Joined: Apr 2015
Posts: 322
From: Papillion, NE
Heh -- looks like you can just ask Taz where everything goes in your MC's cabin. Always hanging from the rear-view mirror, he sees everything!
It is pretty interesting to note a few things, like those "rear seat air ducts" that sit right under the front seats. I'm sure they do a great job heating and cooling the rear passengers' shoes!
Then there's the airbag control module (with the yellow wire) under the carpet. On the '95s at least, it sits above the carpet.
By the way, driver3, might your console lid be one of the rare unbroken ones?