
My high beams won't go off.


Thread Starter


Joined: Jun 2012
Posts: 22

03 SS. I was out a couple nights ago and flipped on my high beams and now I can't get them to go off. From what I can tell, I'll have to take off the steering wheel to get to the switch. Is that right? And, is there anything I need to know before i get started?


Joined: May 2011
Posts: 97
i have the same problem with my 04 ss. this is a common problem on these cars. i asked the forum a couple days ago and no one responded.rockauto has the exact part for $166.00.and from what i've seen on this website, yes the wheel has to come off.still hoping space or chibi can help us out.
Thread Starter
Joined: Jun 2012
Posts: 22
i was able to get a friend who worked at a parts store to get me one at cost. i was able to swap it out without taking the sterring wheel off. only tool i had to buy was a E6 socket (reverse torx). it wasn't easy though. i had to hold a 1/4" T25 with some needle nose while i turned it will an open ended wrench. that took a month of sundays, but i got it done in about 2 hours.


Monte Of The Month -- March 2013

Joined: Jun 2010
Posts: 8,442
From: michigan
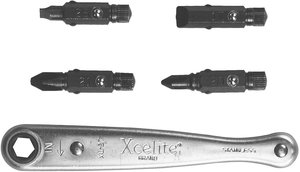
You do not have to take the steering wheel off. I have a small ratcheting handle that takes bits. Ill post a pic later when i get to a computer. Its a little tricky but like graggk said its do able. My washer sprayer don't work because of the little tab is broke but I don't want to replace my whole switch just for the plastic insides.
Here is the tool i was referring too.
EDIT LINKhttp://www.fastenal.com/web/products/detail.ex?sku=0210388
Here is the tool i was referring too.
EDIT LINKhttp://www.fastenal.com/web/products/detail.ex?sku=0210388
Last edited by lougreen03; Jul 30, 2012 at 08:04 PM.
Thread Starter
Joined: Jun 2012
Posts: 22
I found this write up on here... i searched for ever to find it. it's spot on except the one screw i was talking about. i think this person was talking about the tool lougreen was talking about when they said "angled screwdriver". and then the E6, you can't fake that one either. There is also a youtube video showing how to get the dash apart that is done really well. watch that a couple times too.
***Here's what you'll need:
Angled ratcheting screwdriver. It may be possible to do this without the angled ratcheting screwdriver, but I wouldn't want to. These can be picked up, often with an assortment of bits, between $20 and $40.
An Assortment of Bits: They should fit whatever sort of angled ratcheting screwdriver, or universal screwdriver handle, you have. These should also be the kind you can grab with a � inch wrench, because later on in the process, you'll be grabbing one with a � inch wrench, and there's absolutely no way to get around that fact. That step is the key difference between taking the steering wheel off and not taking the steering wheel off.
Phillips head bits (#2)
Torx bits (T20, T25, and T30)
Star socket (E6)In order to use this, you'll need one of those adapters which slides into the screwdriver handle, and then has a � inch socket adapter on the other end.
A small set of snips, to cut through some wire ties
A small needlenose pliers (to pinch a wire harness)You can get away with using the snips to do this, if they aren't super sharp)
� inch wrench (open ended)
5/16 inch wrench
Throughout the instructions I'm going to provide, I think it is important to note that I got this car used, and it is possible that some screws are missing. Use common sense, and look around for extra screws if something is giving you a hard time. Just because I had to take out 3 doesn't mean you won't have 4.
Prepare:
Using a 5/16 inch wrench, remove the ground terminal from your battery. You're going to be working around the wiring for the airbag system, so this is a precaution. Remember: if you see a big yellow wire that goes into a yellow plug, that's airbag. I don't think it's possible to overstate how dangerous screwing around with airbag components can be. Don't do it. Throughout this process, you'll never have to touch any airbag components.
Remove Interior Panels:
Just above the pedals, there is a black plastic piece that covers the top of the foot well. There were no screws, just two tabs where it meets up with the steering column filler. Remove that bit.
Remove the Steering column filler. Now that you took that black bit off, which name I don't know, you've exposed two screws on the steering column filler. Take them out, and then pop off the filler.
Now, you'll need to take off the front trim. It's a big piece, and a bit annoying. There is one screw along the bottom edge, exposed by removing the filler. Take off the fuse panel covers on either end, and you'll find a single screw on each side. Two screws can be located above the instrument cluster. Five screws total, then it pops off. Not easily, though. You'll need to have the parking brake applied, because you're going to have to put the shifter into 2 or 3 to make room. Also, tilt the steering wheel to a good place. Somewhere around halfway worked well for me. The Hazard switch is pretty deep. For me, it was a white plug in a large green socket. Get that unplugged, and then gently go about working the panel off and away.
Expose the Multifunction Switch:
Coming from the bottom of the steering column, you need to remove the screws holding the top and bottom half of the cover that surrounds the multifunction switch and the gear shifter. I only had one screw, but I'm pretty sure there could be as many as three.
Once that's all separated, you can pop the bottom half away from the top half. But, here we run into a snag. The bottom half can't be completely removed, because of the tilt control lever. The top can't be budged at all, because it is still screwed down in two places.
Look at the back of the two halves. You'll see that they are connected with a sort of hook mechanism. Wiggle and mess with the bottom half until you can unhook the two connections. This will buy you bundles more wiggle room on the bottom half.
Get your star socket handy, because the two screws that hold the top half down are star-headed, which is pretty annoying. The one on the drivers side of the column is easy to see, and in fact goes right through part of the multifunction switch. The other one is pretty much where you'll expect to find it, and will be hard to reach if you don't have a nice long screwdriver handle, or an extension for your angled ratcheting screwdriver. But, once you get it, the top pops right off, and you can see all the good stuff that used to be hidden, including the multifunction switch.
Remove the Multifunction Switch:
There are two Torx screws holding the multifunction switch in place. The first one is on top, and easy to get to. Take that out.
The second is where you are going to use the bit only, and the � inch wrench. This will take time, and probably be frustrating. But, it will work. Stick the Torx bit into the screw, and then brace it with a finger or two of your right hand, sort of wedging your finger(s) between the Torx bit and steering wheel. Then, grasp the bit with � inch wrench, and turn as far as you can. You'll be doing a lot of repositioning, and adjusting. It will come. When this starts to irritate you, just think about which you'd rather do: this, or remove the airbag, and pull the steering wheel. I'll take a 10 minute screw removal any day.
There are three plugs that need to be undone. As you work down the wiring harness, you'll need to snip out a couple zip ties, and negotiate a plastic loop used to route the wiring. You need to squeeze closed the 'hook' part of it using the needlenose pliers (or dull snips), and then push it out. Once you see it, it's pretty self explanatory.
The first plug is about 12 inches or so down the wiring. The part that belongs to the multifunction switch is the female port. You'll need to pry up the latch, and separate the plug out.
The second plug is pretty easy to do, but hard to find. There are two wires, green and some strange tan, that go up and over the steering column. The plug is on the passenger side of the steering column, up pretty high. Just follow the wires away from the main multifunction switch wire harness.. It will split away right near where you unplugged the first plug. If you aren't already, you should be upside down in the driver's seat. Recline it all the way back, and lay on your back, with your head and shoulders where your feet would be. You'll never be able to see or reach anything if you don't do this.
Third and last is an interesting one. There is a huge plug with a white handle. You'll need to squeeze tabs on either side of the box, which will allow you to rotate the handle down towards you, then all the way back around. Once that's done, push away on the plug while pulling out. It comes pretty easy, so if you're pulling really hard, try wiggling it. It does NOT just pull straight out; you do have to push back on it a little bit.
That's it! Now, just pull the switch out, and it's time to reinstall.
Reinstall the Multifunction Switch:
This is pretty easy; everything you just did, but in reverse. Thread the wiring harness down through where it belongs, and then plug things in.
The big plug goes first. It will go in as easy as it came out. Then, just rotate the handle back, and it's locked in place. Route the wiring up and over the steering column, and then plug in the small plug with just the two wires. Plug the last connection together, and then snap the harness into that plastic loop we opened up earlier.
Now, as you go to put the multifunction switch in place, take a look at something. This is important. If you've got the switch facing you, there is a small bronze switch on that face there, which can be pressed in and will bounce back. This is where you make the connection to the clockspring, and you must take care to keep that pressed in while maneuvering the multifunction switch into place.
Screw the Torx screw into the top first. Snug it down. This will help line up the other Torx screw. Now it's time to get that second one back in. Again, this will take some time, but once it's done, the hard stuff is over.
End Game:
Now it's just a matter of putting everything together. Start with screwing the top half of the steering column cover back down. Once that's tight, hook the top and bottom together again, and then snap the bottom back into place. Take care to get the rubber boot for the gear shifter into place.
Snap the trim back into place. You will need to put the gear shifter into 2 or 3 again, and tilt the column appropriately. Plug the hazard switch in, and then twist and convince the switch to get back in there where it belongs. Then, bit by bit, just encourage it back into place.
You'll need to take a flat bladed tool to pry the rubber flashing around the ignition switch back into place. I used a normal (flat-headed) screwdriver bit.
Screw the five screws back in. One low, one on each end, and two above the instrument cluster
Next comes the steering column filler. Easy peasy.
Then that black piece of plastic, whose name I still don't know.
All done! Go for a ride, make sure everything works. This is a great project, and could save you hundreds, compared to having it done by a mechanic.

Thread
Thread Starter
Forum
Replies
Last Post
6th Gen ('00-'05): Low Beams inop, have high beams...
svzpt71
Monte Carlo Repair Help
2
May 11, 2015 06:30 PM
MonteCarlo579
General Monte Carlo Talk
0
Jul 6, 2014 11:46 AM