INTERIOR TRIM PAINTING


#22
 02-07-2011, 02:22 PM


Join Date: Oct 2010
Location: British Columbia, Canada
Posts: 1,715
 ... I think I still have my Red touch up pen... I'll give it a shot... If something goes wrong, what can I use to remove it that won't hurt the finish?... Thanks,
#23
02-07-2011, 02:34 PM

Join Date: Sep 2008
Location: Southeast PA
Posts: 25,136
Just get it off while it's still wet and make sure you have some leather conditioner / cleaner so it doesn't dry out after you use the cleanser on it.
#24
02-07-2011, 03:29 PM
Join Date: Oct 2010
Location: British Columbia, Canada
Posts: 1,715
#25
03-21-2012, 12:59 PM


how did you cover the vents? I used painters tape but it got through so now i've got yellow spots on some vents. I'm going to have to retry this. I bought a extra dash from the wreckers for almost nothing just in case i messed it up :P


#28
03-24-2012, 11:50 AM


i cant wait to get into mine and do this im gonna do some things in white havent really decide what i am gonna do but im thinking underneath parts not the dash and the part on the door that if you paint kind of would make an s....dont know yet but also thinking the bottom part of center consol white too...whats a good paint i can buy in a can??????
#30
04-07-2012, 02:51 AM

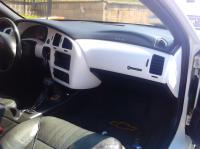
you talking something like i have here?

If this is what your talking about yes there are certain steps to take to make it stay there for a long time. And not flake off in a few months in the summer time.
1st. our dashes and center council's have a rubber coating on them it has to be removed. to do this you need to ether sand it off or use thinner to help you eat it off Once it is gone you should have a smooth surface.
2. VERY IMPORTANT STEP!!! USE WHAT THEY CALL ADHESION PROMOTER FOR PLASTICS. I WIPED MINE TWICE TO MAKE SURE I GOT EVERYTHING REAL GOOD ALLOW TO FLASH OFF AND WIPED WITH TACH CLOTH THEN SHOT IT.
3. sand the surface of the part with at least a 8oogrit papaer for the final. I started mine with a 400 and then went to 600 on it after the primer was done then i went to a 800 wet dry sand paper for wet sanding. then i would shoot wet sand shoot wet sand
4. After you get the color and the primer the way you want it let it dry real good for at least as long as your directions on the can say before shooting Clear on to it. Then start over wet sand clear wet sand clear. I have 5 coats of paint and 7 of clear on my dash each one is wet sanded and then the final was wet sanded with 1000grit paper and then buffed up with a buffer to get the shine in to it.
The more clear the deeper the shine. Also it will help to have more coats of clear on it to help absorb the abuse So it wont flake on you if something should hit.
some tips for you to use.
Make sure the area your shooting in is ventilated real good
Use a good product not the krylon out of the can if you want it to last. Most paint shops can load it in to a rattle can for you.
Also TACH CLOTHES ARE YOUR FRIEND'S!!! USE THEM!!!!
 One day I will make that step

Thread
Thread Starter
Forum
Replies
Last Post
GoBucksBeatBlue
Paint/Body Work/Exterior
18
06-14-2011 01:16 PM