
How-to Headlights


Lets just start by saying this is the first "write-up/how-to" i've really done so if it's not the greatest . . . oops.
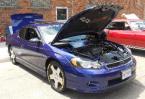
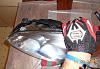
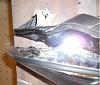
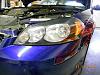
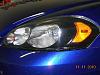
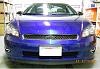
I liked the black HID and black OEM headlights for the 7th gen's but for one didn't want to pay +250 for a set, and have heard that black headlights reduce visibility pretty severely so I figured out a way to get the same idea for about $50 I took a ton of pictures to kinda help explain what i'm all doin. First the Before and After. . . . .
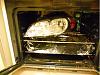
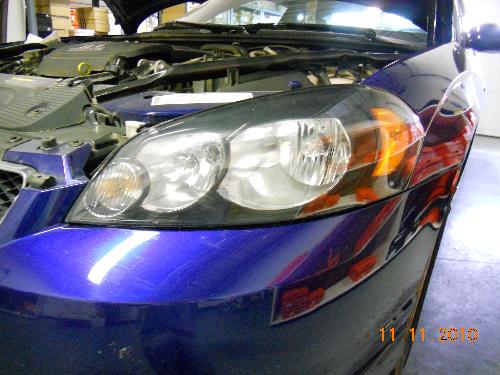
First of all, i found a set of OEM headlights on craigslist for $30 which i couldn't really pass up since this was an amazing deal and this was just a project so i didn't want to ruin the ones on my car. So i grabbed those and found out that the glue they use to seal the lens to the housing is very similar to the urethane they use to seal the windshield to the body. (very discouraging) I thought my project was screwed after because just using an exacto knife on the glue got me nowhere after about 1/2 an hour. After doing a little research, I found that you can throw the whole housing in the oven for a little while and it softens up the urethane so you can get under the lense and slowly pry it off. I set the oven to about 275 and left the lights in there for about 3-5 minutes. FYI-you're gonna wanna use some gloves because it does get pretty hot!
I picked the corner nearest the grill to start with the exacto knife because it was nice and open and the lens shape made it more rigid to pull apart there than if i started at the top bottom or other side. First, get as much urethane out of the corner and as far down on the lens as possible. Now, if you're like me, you'll probably want to put the housing back into the oven for a couple minutes to soften the urethane again and once you pull it out take a small flat screwdriver and try to get under the lens to start prying it off. GO SLOW!! for one you don't want to crack the plastic lens and for two it's stuck on there pretty damn good in the first place. Once the glue starts to give you can slowly work your way down from the corner to the middle of the housing.
I liked the black HID and black OEM headlights for the 7th gen's but for one didn't want to pay +250 for a set, and have heard that black headlights reduce visibility pretty severely so I figured out a way to get the same idea for about $50
I took a ton of pictures to kinda help explain what i'm all doin. First the Before and After. . . . .

First of all, i found a set of OEM headlights on craigslist for $30 which i couldn't really pass up since this was an amazing deal and this was just a project so i didn't want to ruin the ones on my car. So i grabbed those and found out that the glue they use to seal the lens to the housing is very similar to the urethane they use to seal the windshield to the body. (very discouraging) I thought my project was screwed after because just using an exacto knife on the glue got me nowhere after about 1/2 an hour. After doing a little research, I found that you can throw the whole housing in the oven for a little while and it softens up the urethane so you can get under the lense and slowly pry it off. I set the oven to about 275 and left the lights in there for about 3-5 minutes. FYI-you're gonna wanna use some gloves because it does get pretty hot!

I picked the corner nearest the grill to start with the exacto knife because it was nice and open and the lens shape made it more rigid to pull apart there than if i started at the top bottom or other side. First, get as much urethane out of the corner and as far down on the lens as possible. Now, if you're like me, you'll probably want to put the housing back into the oven for a couple minutes to soften the urethane again and once you pull it out take a small flat screwdriver and try to get under the lens to start prying it off. GO SLOW!! for one you don't want to crack the plastic lens and for two it's stuck on there pretty damn good in the first place. Once the glue starts to give you can slowly work your way down from the corner to the middle of the housing.


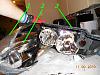
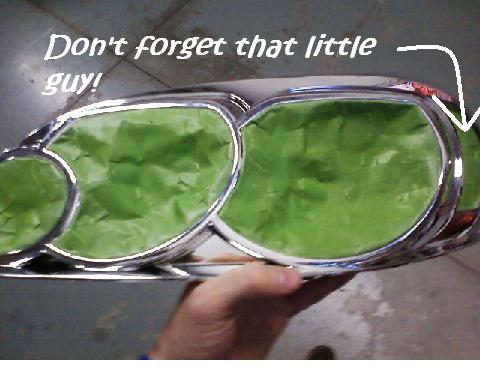
Once you get the lens off you'll notice there are three separate pieces. 1)the lens 2) the cover 3) the back
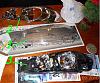
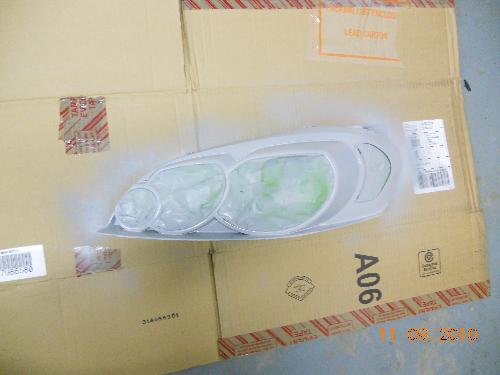
First thing i did was take the back and get the rest of the urethane out of the grooves so it's ready for the fresh urethane to go in and seal it. Next was tape, primer, paint, and clearcoat the black on the cover.
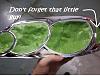

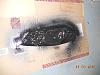


First thing i did was take the back and get the rest of the urethane out of the grooves so it's ready for the fresh urethane to go in and seal it. Next was tape, primer, paint, and clearcoat the black on the cover.

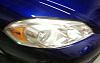
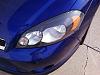
Once you've got it looking the way you want it, you're ready to put it back together. I just went to AutoGlassCenter and bought the urethane they use for glass (in caulk gun form) and used that to seal it back up--i don't know if it's exactly the same of if there's a huge difference but that's what i used and so far no fogging. Put the pieces back together the way they came off and give it one last look over before you get out the glue. I went through about 20 latex gloves because i never wanted to touch the lens with a glove that had the fresh urethane on it so i'd suggest picking up a box. Once you've got the adhesive (which i used PLENTY of) in the grove gently lay the lens over it making sure everything is in it's place so it fits right the first time (it's a sticky messy job taking it back apart) once together i took 3 ratchet straps and ran them across the entire light to get a good tight seal. After about 12 hours i took the straps off, cleaned her up a little bit and threw it in the car. DONE!

THINGS TO REMEMBER------------------------
-don't over heat the housing in the oven (it'll make the lens start to melt)
-I took the wiring out of the housing before the oven. not hard to do, just take the wires out of the harness and you'll be able so slip em right back in.
-I clear-coated the black with the tape still on because if you'd clear it with everything exposed, it'll make the chrome centers turn hazy.
-USE LATEX GLOVES FOR THE URETHANE
-make sure the metal on the ratchet straps is on the back of the housing else the metal WILL scratch up the clear plastic.
-the exacto knife is your best friend especially when you remove all the urethane on the back
-use a good painting tape for better lines around the blocked off pieces
-IF YOU HAVE ANY ?'S OR WANT MORE PICS JUST LET ME KNOW
-I'm not liable for messing up anyone's headlights, this is just how >>I<< did it and wanted to share the tip with everyone
ENJOY!


Monte Of The Month - February 2010


Joined: Apr 2009
Posts: 11,981
From: Pittsburgh, PA

06-10 Chevy Impala Monte Carlo Black Head Light DEPO
I'm getting a set hopefully by summer next year......


Thread
Thread Starter
Forum
Replies
Last Post