
2006 3.5 Fuel injector wiring fix


Thread Starter


Joined: May 2013
Posts: 15
About 4 years ago a mouse decided to make a nice little nest underneath the upper intake manifold next to the fuel injectors. While building his nest he decided to start snacking on the wires going to the injectors. My Dad took it to the dealership and they charged him 350 dollars to fix it.
Well last month during an oil change I found a nest right next to the power steering fluid reservoir. Took a flashlight and looked down there and saw the copper wiring exposed going to the injector. Car still ran fine so I put some electrical tape on the wires till I could get it fixed.
Upper intake gasket (AC Delco)
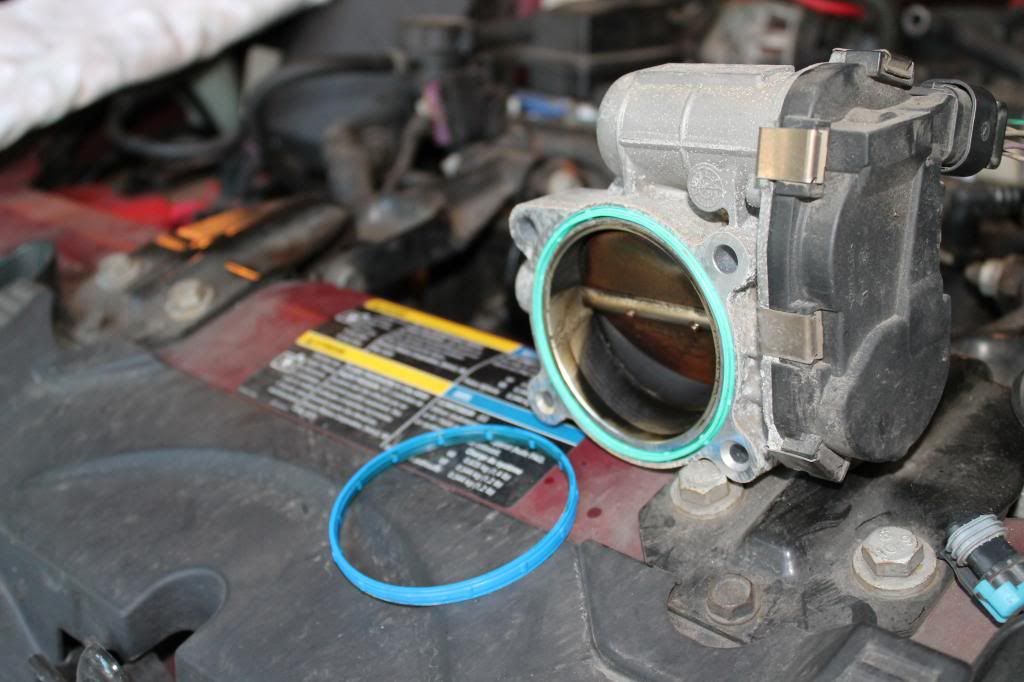
Fuel injector connector (Standard)
Throttle body gasket (Standard)
Total parts cost was $51.37 w/ a 5% discount
Step 1
Start to dismantle the throttle body connections (MAF, various vacuum hoses, and connectors). Begin with the air filter housing and work your way towards the manifold. Once the throttle body is off the gasket can be replaced.
IMG_0994_zpsd89685fb.jpg
Step 2
Remove the three front spark plug wires along with the upper intake bolts. Two bolts will be in the back by the distributor. The rest will all be on top. The bolt holding the alternator to the engine must be removed as well. The arrow near the center of the throttle body should be moved to the upper right corner of the manifold.
IMG_0957_zpsdb60d184.jpg
Step 3
Lift off the intake manifold and clean the gasket area. The gaskets came off without a problem and the residue was extremely easy to wipe off.
IMG_1003_zps50acf370.jpg
Step 4
Cut back the tape holding the wires together. Cut the wires. Unplug the connector to the fuel injector. To do this pull out the gray clip and then get a needle nose pliers. Now pull on it gently till it comes out.
IMG_1002_zps9e506ece.jpg
Step 5
Sodder the wires together and wrap them in electrical tape
IMG_1006_zps02ec04bf.jpg
IMG_1010_zpsee5c7c6b.jpg
Step 6
Put it all back together
Step 7
Find a new project
Going to paint the calipers red on my Dad's 09 Altima coupe tomorrow.
IMG_1016_zps95bb1d94.jpg
Well last month during an oil change I found a nest right next to the power steering fluid reservoir. Took a flashlight and looked down there and saw the copper wiring exposed going to the injector. Car still ran fine so I put some electrical tape on the wires till I could get it fixed.
Upper intake gasket (AC Delco)
Fuel injector connector (Standard)
Throttle body gasket (Standard)
Total parts cost was $51.37 w/ a 5% discount
Step 1
Start to dismantle the throttle body connections (MAF, various vacuum hoses, and connectors). Begin with the air filter housing and work your way towards the manifold. Once the throttle body is off the gasket can be replaced.
IMG_0994_zpsd89685fb.jpg

Step 2
Remove the three front spark plug wires along with the upper intake bolts. Two bolts will be in the back by the distributor. The rest will all be on top. The bolt holding the alternator to the engine must be removed as well. The arrow near the center of the throttle body should be moved to the upper right corner of the manifold.
IMG_0957_zpsdb60d184.jpg
Step 3
Lift off the intake manifold and clean the gasket area. The gaskets came off without a problem and the residue was extremely easy to wipe off.
IMG_1003_zps50acf370.jpg
Step 4
Cut back the tape holding the wires together. Cut the wires. Unplug the connector to the fuel injector. To do this pull out the gray clip and then get a needle nose pliers. Now pull on it gently till it comes out.
IMG_1002_zps9e506ece.jpg
Step 5
Sodder the wires together and wrap them in electrical tape
IMG_1006_zps02ec04bf.jpg
IMG_1010_zpsee5c7c6b.jpg
Step 6
Put it all back together
Step 7
Find a new project
Going to paint the calipers red on my Dad's 09 Altima coupe tomorrow.
IMG_1016_zps95bb1d94.jpg


Monte Of The Month -- August 2012


Joined: Apr 2011
Posts: 6,074
From: Seattle
Great write up! 
Here's a couple of tips to consider should you ever need to repair wiring again:
Instead of using electrical tape as an insulator slide a piece of shrink tube onto the wire before soldering them together. Then slide it over your repair and heat. Your repair will last the life of the vehicle. Electrical tape tends to lose its adhesive over time from being heated/cooled.
Rather then twisting the wires together expose a short, straight length and tin with solder. Place the wires side by side when you solder them together. This type of repair will create less resistance in the circuit. This may not seem like a big deal, but the PCM reads and adjusts depending on the amount of resistance it reads from sensors and components. If that resistance is too far off the mark it can cause drivability problems.

Thread
Thread Starter
Forum
Replies
Last Post