
TOG vs SLP/SSAC/SD Header Comparison


Thread Starter


Joined: Feb 2008
Posts: 6,478

Since I recently swapped from DPP headers (SSAC/SD/Ebay style- basically SLP knockoffs) to TOG Extreme headers, I figured I'd post up some pictures in case anyone was curious. I'll refer to the old headers as DPP for the rest of this review for consistency sake, but they're identical to the others mentioned above.
First is an image off my new (used) TOG Extremes:
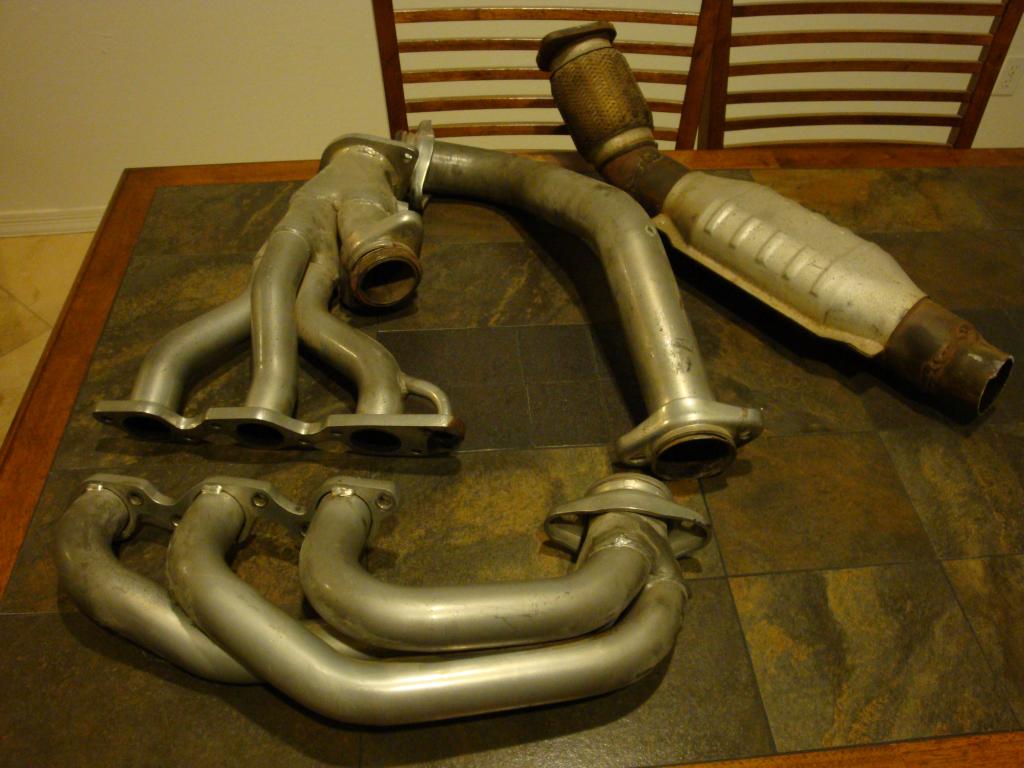
I had already removed and cleaned up my old DPP headers and had reinstalled them (before I had the radiator in, blower on, etc to make install easier). I hadn't intended to upgrade, but I came across someone selling TOG Big Dog headers (the ones with the 2" primaries that Intense had made). Unfortunately, when I got them I quickly realized they were TOG Extremes instead. The seller was good about it and gave me some money back to make up the difference, but I figured I'd go ahead and put them on as a minor upgrade (1/8" difference in primary size).
To differentiate between the two in the following pictures- the TOGs are the dull silver, and the DPPs are shiny. Keep in mind, I had just removed the DPPs to wet-sand and polish them back up. While they are stainless, they do discolor rather rapidly and turn blue/purple/light brown from regular EGT.
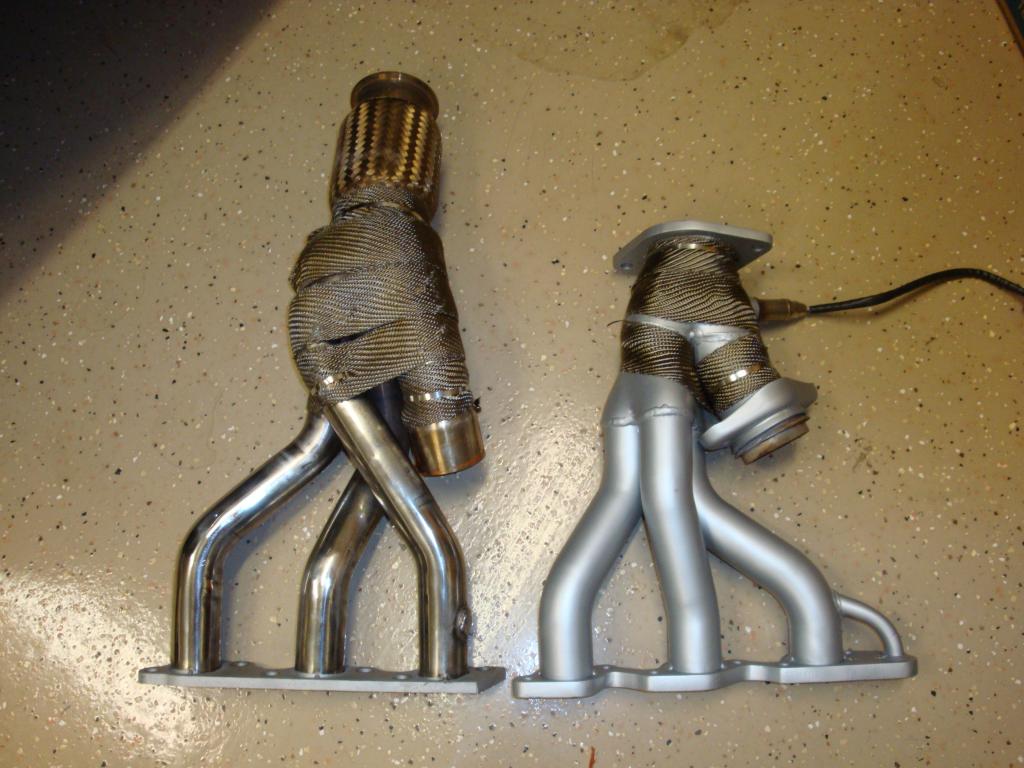
I'd like to step through the headers piece by piece to show comparisons and comments. First up is the front header:
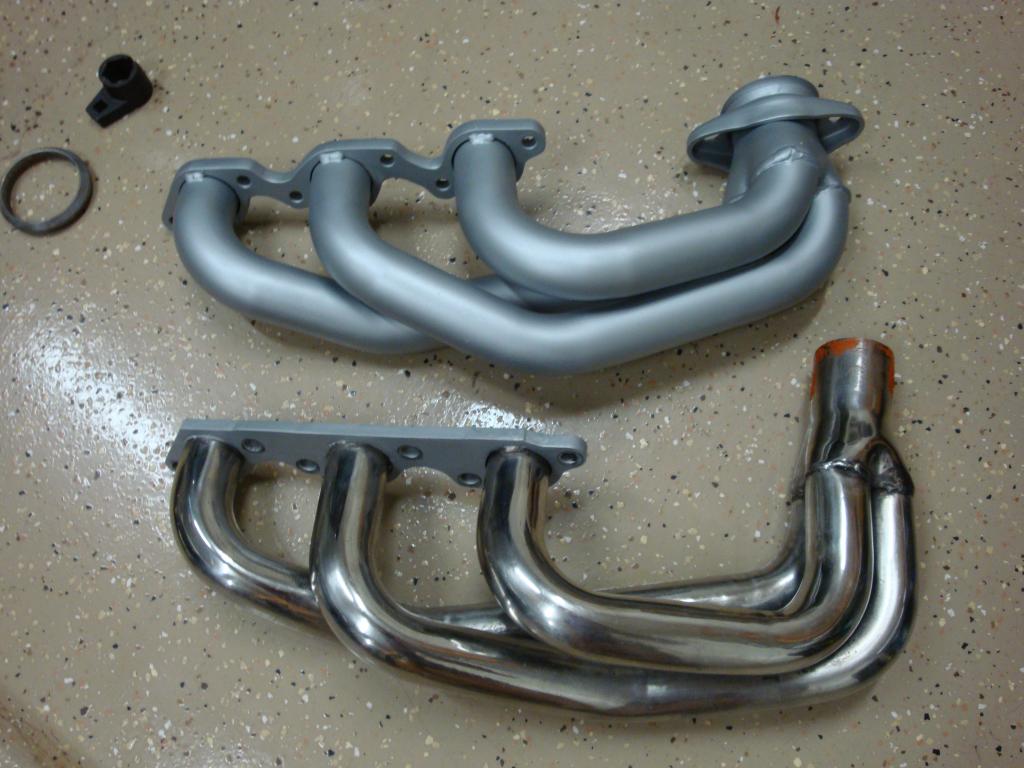
Not much to note here- both headers appear very similar with 2 notable differences:
-the crossover attaches with a two flanges sandwiching a 'donut' gasket between them on the TOGs vs the slip fit on the DPPs (you'll see a donut up in the top left of the picture)
-the primaries on the DPPs are a little bit longer on the front, the TOGs hug the engine a little tighter

From this angle, you can notice the thicker flanges on the TOGs- this is a much welcomed feature. On my old DPP's, I had leaks on both banks due to warped flanges from the factory. The front took nearly .075" to clean up! The primaries on the TOGs look much bigger due to the color (polished vs painted), actual size difference is slightly over 1/8".
Here is a shot of the flanges:
You can still see the spot on the far right that is just a couple thousandths from cleaning up on the DPPs. I didn't want to take them down too far since the flanges are already thin. It was close enough to seal, so I was happy enough.
You can certainly see how much nicer the welds are on the TOGs.
Next up is the crossover (sorry, I had them both wrapped already for the pics)- with closeups of the ends.
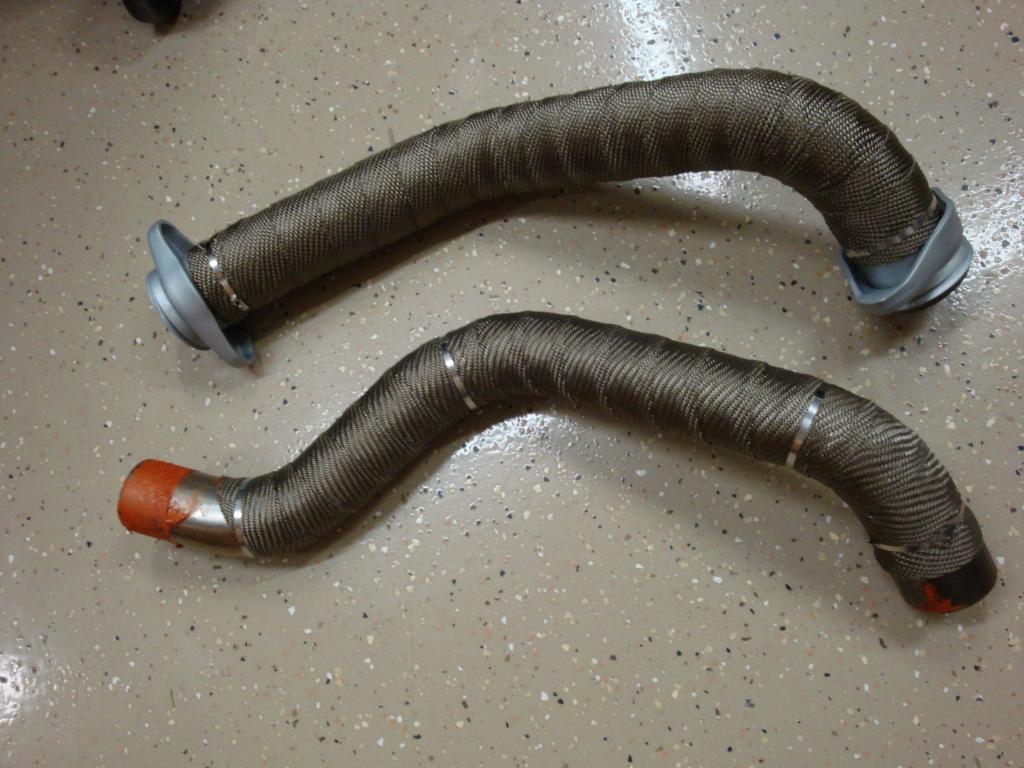
Nothing much to note here. The crossover bends a little differently on each setup- but I had no issues with either. The DPPs had out-of-round ends when I got them. After the first time running them, I had a ton of soot on the bottom of the front connection. To fix it, I put a tailpipe expander in there and opened it to get it back to round-ish. Then to install, I coated both ends with copper RTV and ran Torca accuseal clamps. This seemed to provide a leak free connection, but it certainly isn't a good fit out of the box.
I will say with the TOGs, having to use bolts/washers/nuts to hold the flanges together is a complete pain. With the DPPs, you just install the back header, slip the crossover in, and install the front header- then tighten the clamps. With the TOGs, you've got to mess with struggling to get bolts in, lined up, torqued evenly, etc. The front isn't too bad since you can get to it easily, but the back is in a terrible spot- it's so far down you're laying on the engine to reach from the top, but you also can only get 1 hand up from the bottom. The lower bolt hole on the rear connection is just plain in an awful spot to get anything on it.
To tighten the rear connection, I had to fish a 2 foot extension down from the top above the transmission for a friend to tighten while I held the bottom nut with a wrench. The DPPs are much easier- no hardware to screw with- just tighten 1 nut on each clamp and you're done.
Rear headers:
Again, you'll note the shorter primaries on the TOGs. This certainly adds clearance for 5th gen montes (I had to bang the firewall to get the DPPs in around where the primaries merge together).
You'll also see that I had EGR deleted on my DPPs (I know- the finishing job on the primary looks terrible- it's a long story with a crappy fab shop). It was good enough to be functional, but certainly not show-worthy. I didn't even bother doing this on the TOGs- I'm just running a blockoff plate to save their resale value and to save me from putting too much money into them.
One thing to note is the O2 sensor position. On the DPPs it sticks straight out the passenger side (mostly just reading the rear bank). I had to cut into the firewall to clearance this as it basically stuck through into the cabin (I had to cut the firewall anyways since it's on a 5th gen, just had to cut more for this O2 sensor). I'd strongly recommend other 5th gen people to plug this bung and weld another in somewhere more accessible before installing.
Last point on this picture- the DPPs are much longer as they include the flex and V band fitting with the rear header. This makes install terrible since it's such a long piece to wiggle down there, but once installed- getting to the Vband connection from underneath is easy.
The short TOGs make dropping them in easier, but the flange is pretty high up there (right around the area I had to cut out- around all the sharp metal edges... great). Oh, and as an added bonus- you get to deal with more nuts, bolts, washers when you go to install that! lol
The reason both headers are wrapped at the bottom of the rear header is because this gets into the area where I had to pound/cut the firewall- so I'm trying to cut down on heat coming into the cabin as much as possible.
First is an image off my new (used) TOG Extremes:

I had already removed and cleaned up my old DPP headers and had reinstalled them (before I had the radiator in, blower on, etc to make install easier). I hadn't intended to upgrade, but I came across someone selling TOG Big Dog headers (the ones with the 2" primaries that Intense had made). Unfortunately, when I got them I quickly realized they were TOG Extremes instead. The seller was good about it and gave me some money back to make up the difference, but I figured I'd go ahead and put them on as a minor upgrade (1/8" difference in primary size).
To differentiate between the two in the following pictures- the TOGs are the dull silver, and the DPPs are shiny. Keep in mind, I had just removed the DPPs to wet-sand and polish them back up. While they are stainless, they do discolor rather rapidly and turn blue/purple/light brown from regular EGT.
I'd like to step through the headers piece by piece to show comparisons and comments. First up is the front header:

Not much to note here- both headers appear very similar with 2 notable differences:
-the crossover attaches with a two flanges sandwiching a 'donut' gasket between them on the TOGs vs the slip fit on the DPPs (you'll see a donut up in the top left of the picture)
-the primaries on the DPPs are a little bit longer on the front, the TOGs hug the engine a little tighter

From this angle, you can notice the thicker flanges on the TOGs- this is a much welcomed feature. On my old DPP's, I had leaks on both banks due to warped flanges from the factory. The front took nearly .075" to clean up! The primaries on the TOGs look much bigger due to the color (polished vs painted), actual size difference is slightly over 1/8".
Here is a shot of the flanges:


You can still see the spot on the far right that is just a couple thousandths from cleaning up on the DPPs. I didn't want to take them down too far since the flanges are already thin. It was close enough to seal, so I was happy enough.
You can certainly see how much nicer the welds are on the TOGs.
Next up is the crossover (sorry, I had them both wrapped already for the pics)- with closeups of the ends.


Nothing much to note here. The crossover bends a little differently on each setup- but I had no issues with either. The DPPs had out-of-round ends when I got them. After the first time running them, I had a ton of soot on the bottom of the front connection. To fix it, I put a tailpipe expander in there and opened it to get it back to round-ish. Then to install, I coated both ends with copper RTV and ran Torca accuseal clamps. This seemed to provide a leak free connection, but it certainly isn't a good fit out of the box.
I will say with the TOGs, having to use bolts/washers/nuts to hold the flanges together is a complete pain. With the DPPs, you just install the back header, slip the crossover in, and install the front header- then tighten the clamps. With the TOGs, you've got to mess with struggling to get bolts in, lined up, torqued evenly, etc. The front isn't too bad since you can get to it easily, but the back is in a terrible spot- it's so far down you're laying on the engine to reach from the top, but you also can only get 1 hand up from the bottom. The lower bolt hole on the rear connection is just plain in an awful spot to get anything on it.
To tighten the rear connection, I had to fish a 2 foot extension down from the top above the transmission for a friend to tighten while I held the bottom nut with a wrench. The DPPs are much easier- no hardware to screw with- just tighten 1 nut on each clamp and you're done.
Rear headers:

Again, you'll note the shorter primaries on the TOGs. This certainly adds clearance for 5th gen montes (I had to bang the firewall to get the DPPs in around where the primaries merge together).
You'll also see that I had EGR deleted on my DPPs (I know- the finishing job on the primary looks terrible- it's a long story with a crappy fab shop). It was good enough to be functional, but certainly not show-worthy. I didn't even bother doing this on the TOGs- I'm just running a blockoff plate to save their resale value and to save me from putting too much money into them.
One thing to note is the O2 sensor position. On the DPPs it sticks straight out the passenger side (mostly just reading the rear bank). I had to cut into the firewall to clearance this as it basically stuck through into the cabin (I had to cut the firewall anyways since it's on a 5th gen, just had to cut more for this O2 sensor). I'd strongly recommend other 5th gen people to plug this bung and weld another in somewhere more accessible before installing.
Last point on this picture- the DPPs are much longer as they include the flex and V band fitting with the rear header. This makes install terrible since it's such a long piece to wiggle down there, but once installed- getting to the Vband connection from underneath is easy.
The short TOGs make dropping them in easier, but the flange is pretty high up there (right around the area I had to cut out- around all the sharp metal edges... great). Oh, and as an added bonus- you get to deal with more nuts, bolts, washers when you go to install that! lol
The reason both headers are wrapped at the bottom of the rear header is because this gets into the area where I had to pound/cut the firewall- so I'm trying to cut down on heat coming into the cabin as much as possible.
Last edited by bumpin96monte; Sep 28, 2014 at 11:58 PM.
Thread Starter
Joined: Feb 2008
Posts: 6,478
I forgot to mention in the last post that the O2 sensor location on the TOGs is perfect for 5th gens. It certainly won't be easy to change, but at least it clears everything...
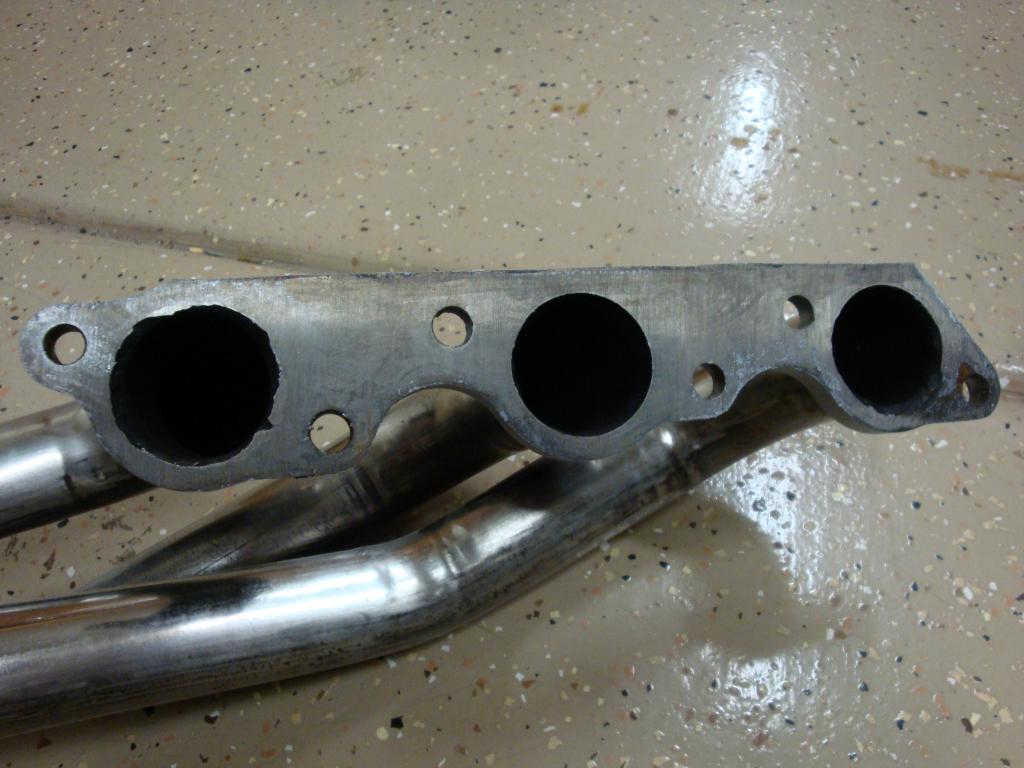
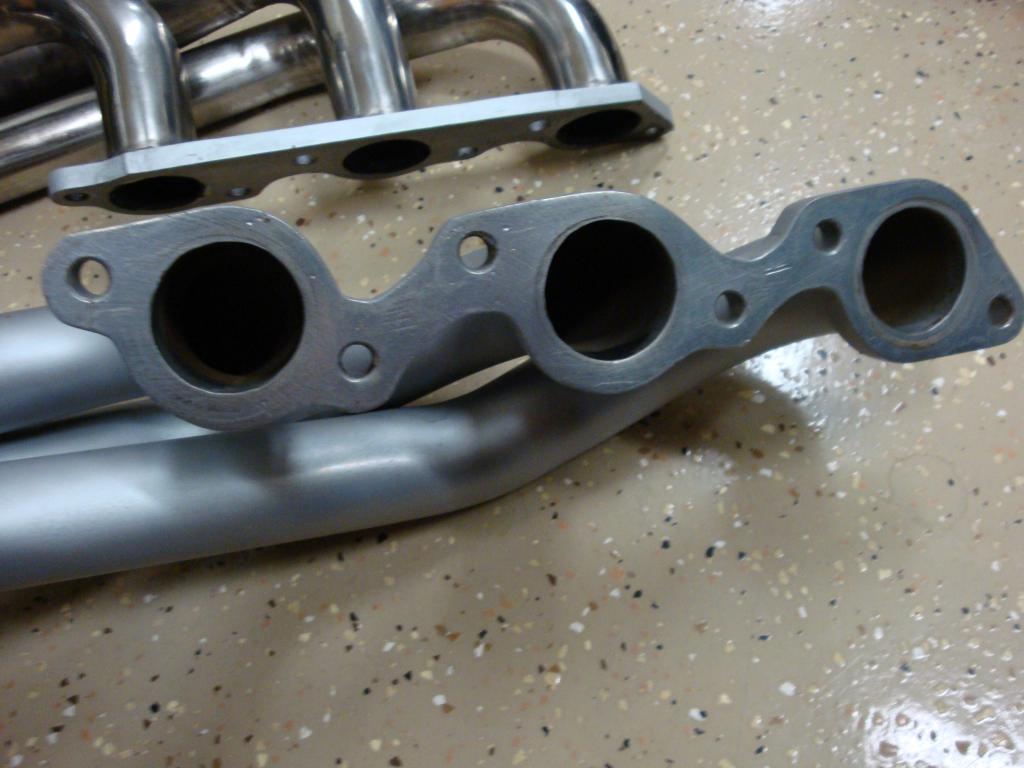
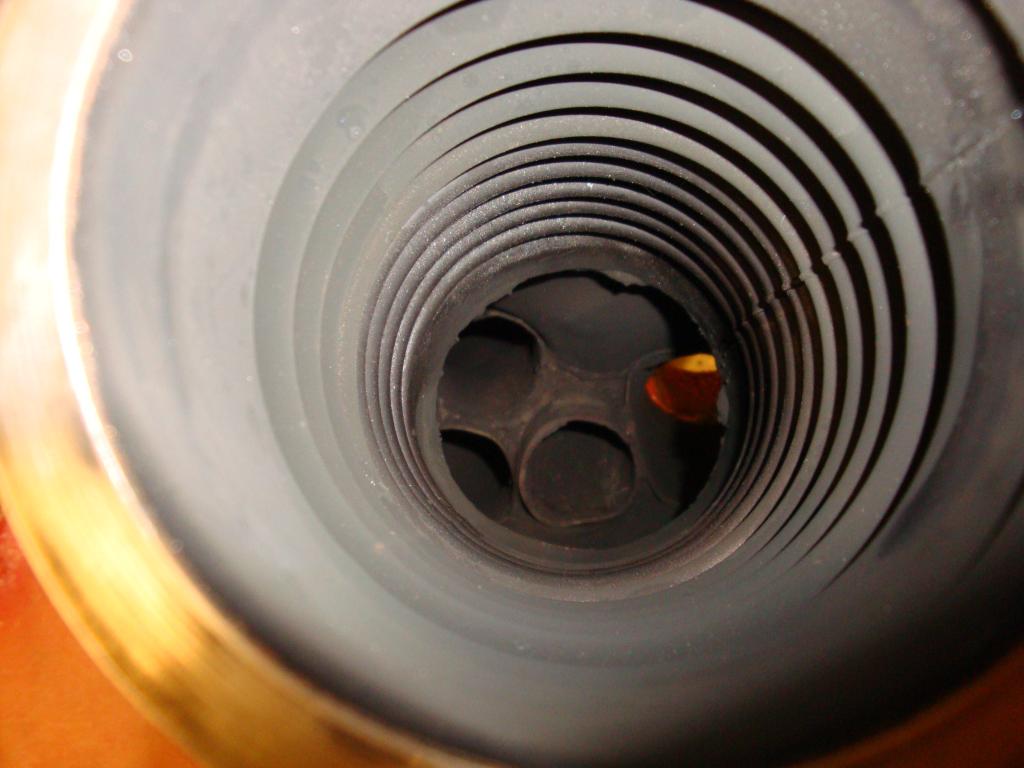
Here's a comparison pic I forgot above that should've went with the front headers- it's a shot inside where the pipes merge:
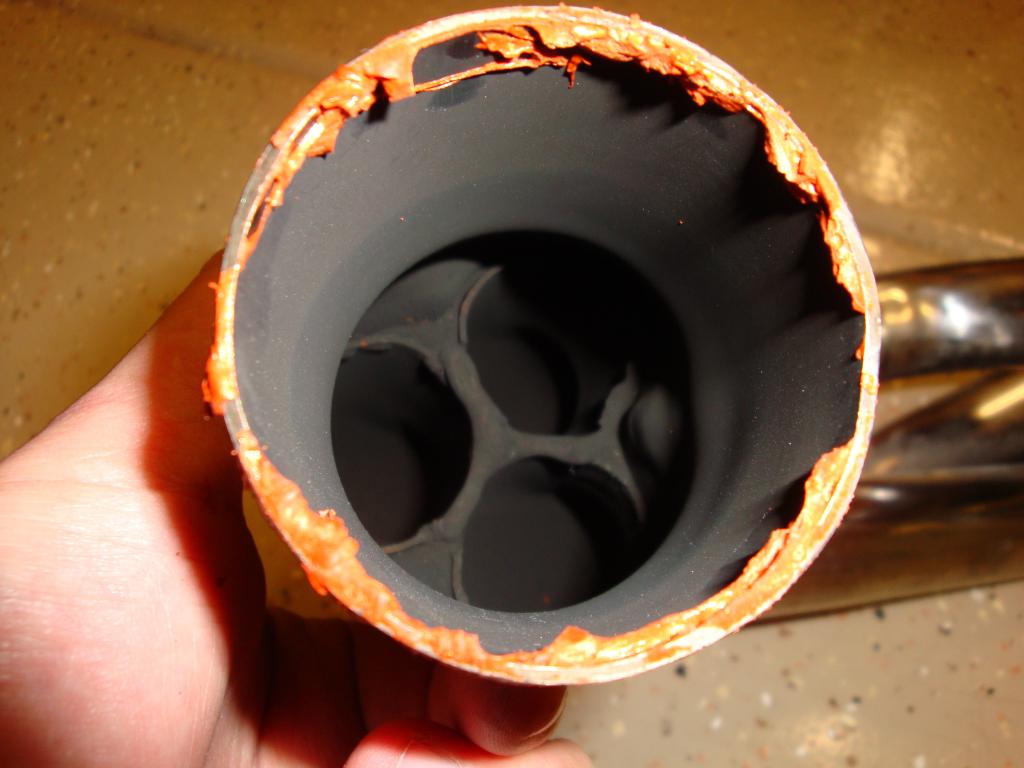
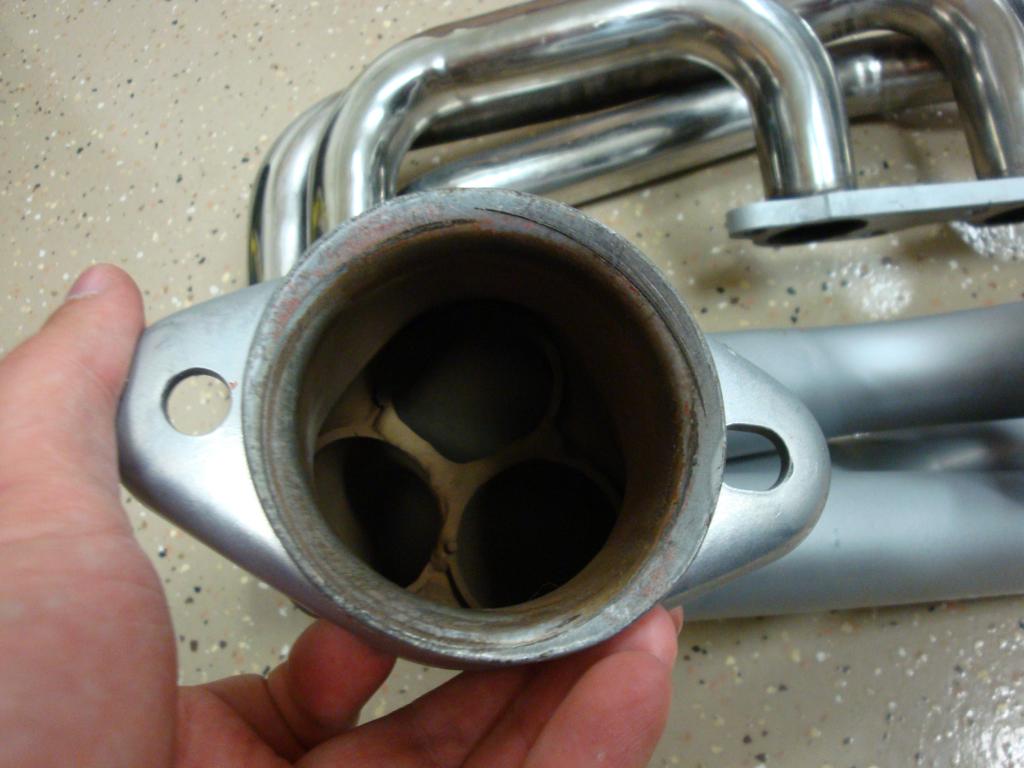
If you look closely, you can see the difference in tube wall thickness since you can see the ends of the 3 primaries.
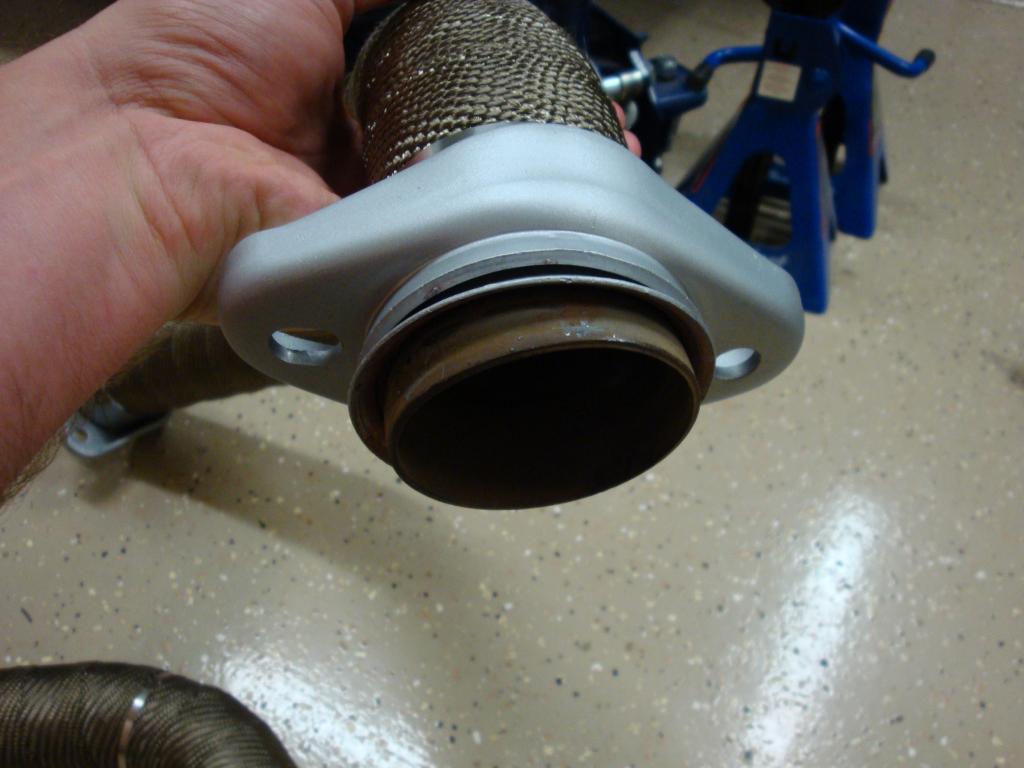
Pictures of the rear header outlets:
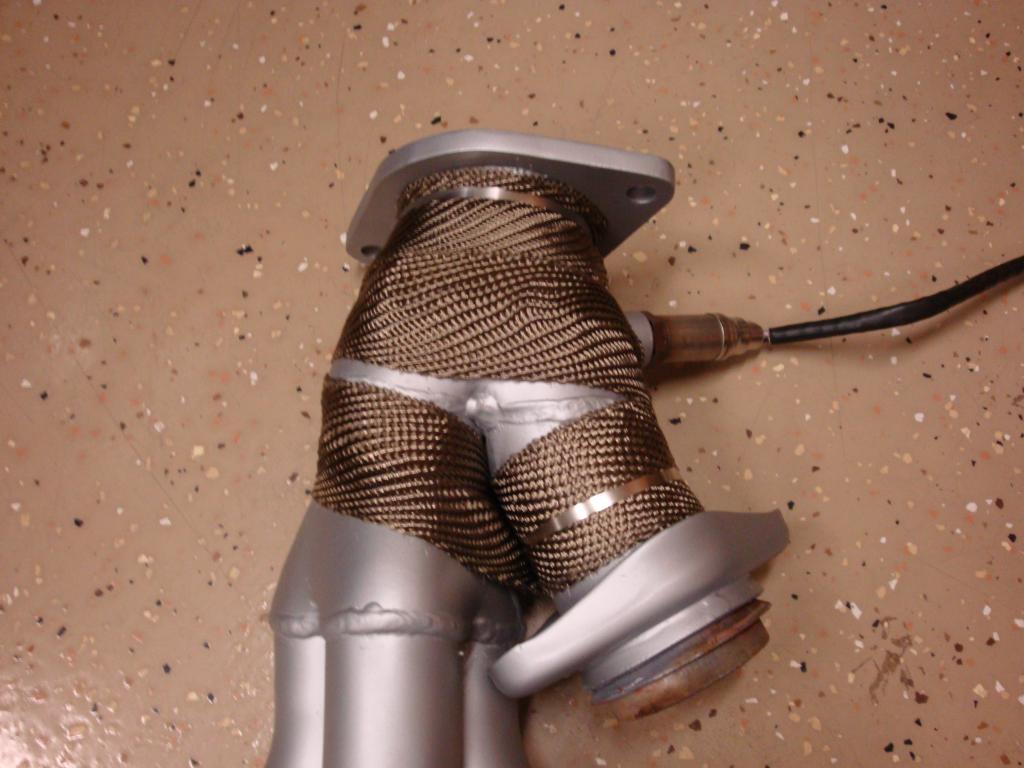
I will say, I much prefer the V-band clamp on the DPPs. Simple, and always sealed great.
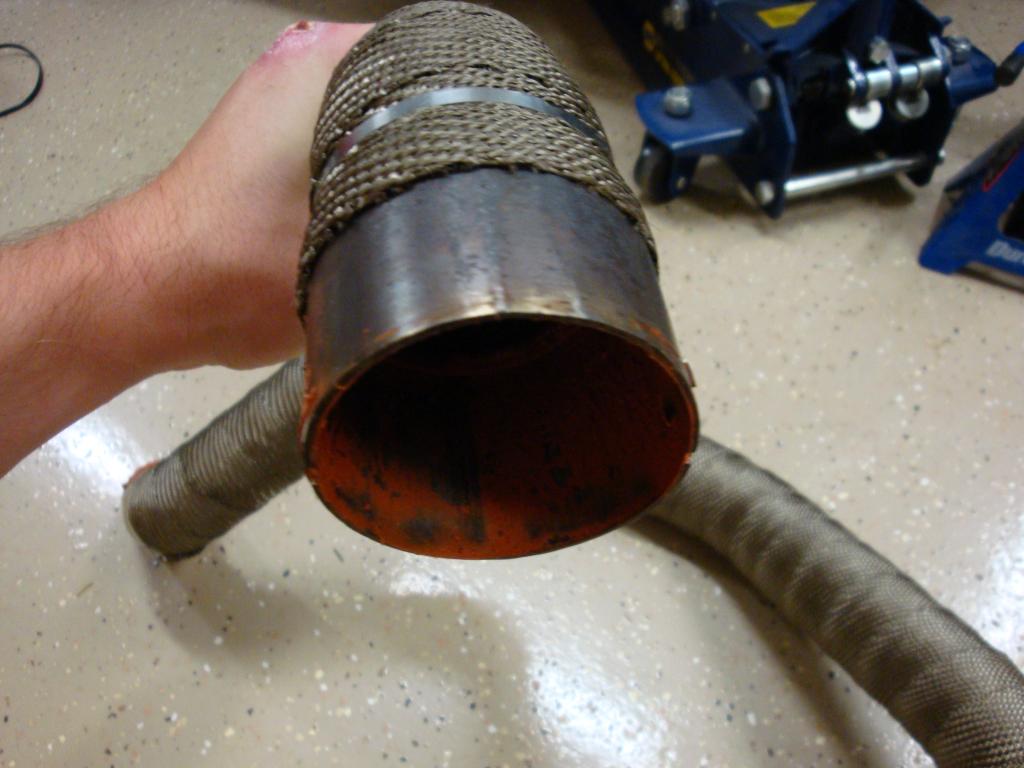
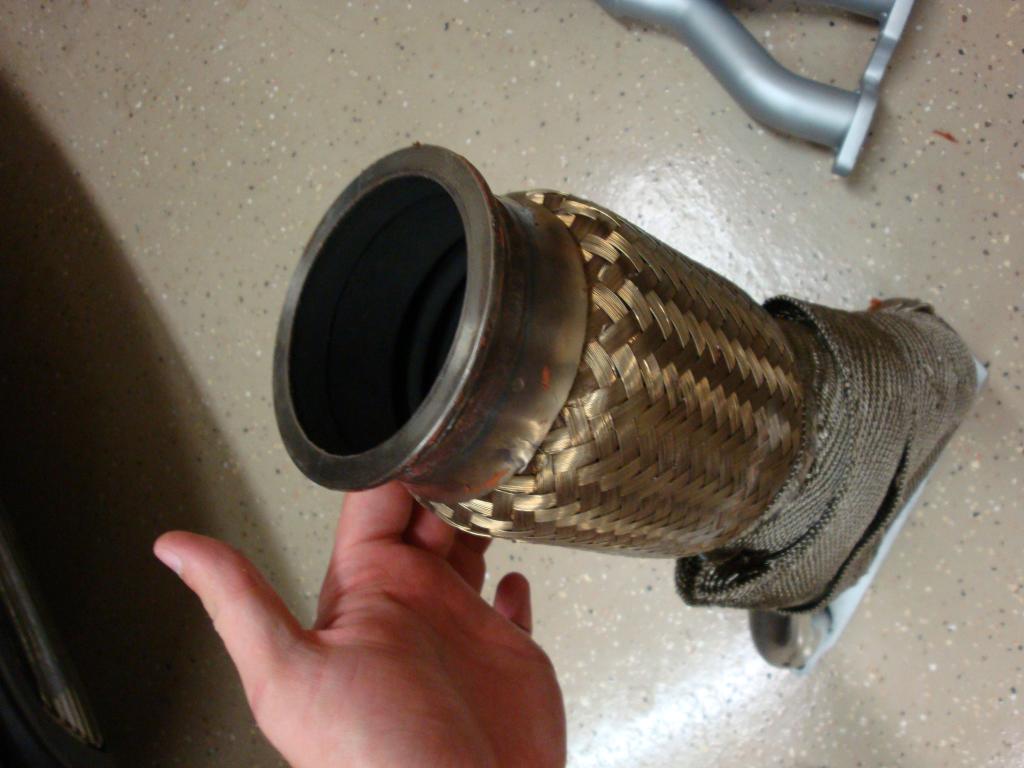
View inside the DPP rear header:
The flex section looks rock solid even after use.
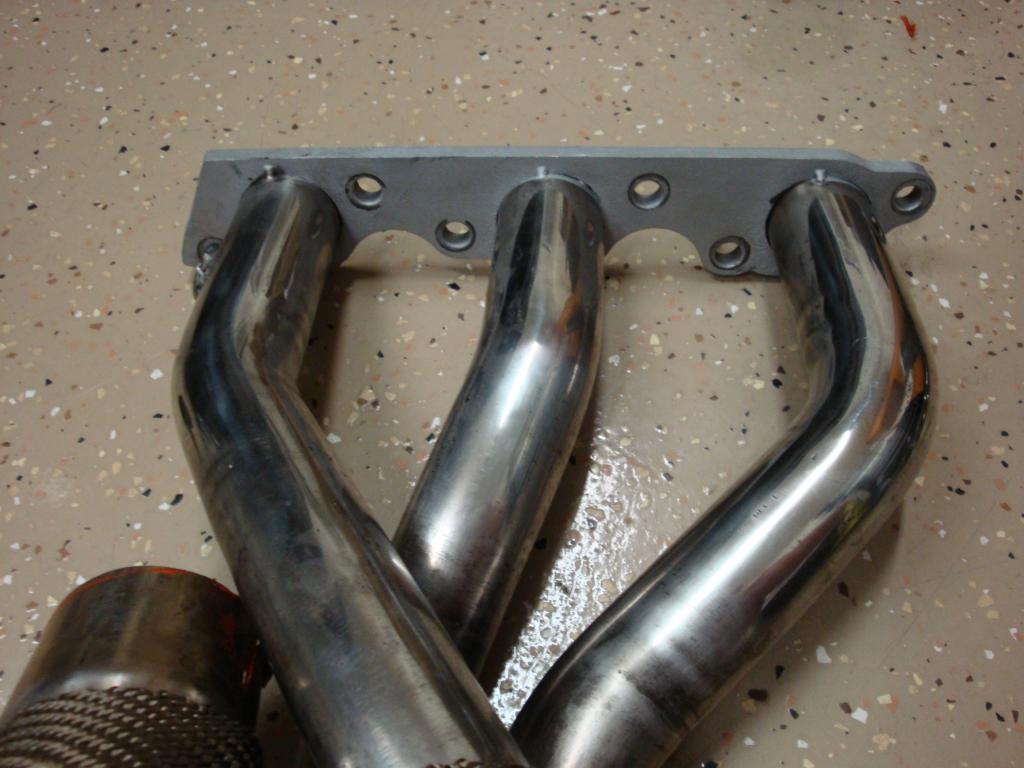
View of the rear header primaries:
Assembled DPP downpipe with 'cat delete' pipe:
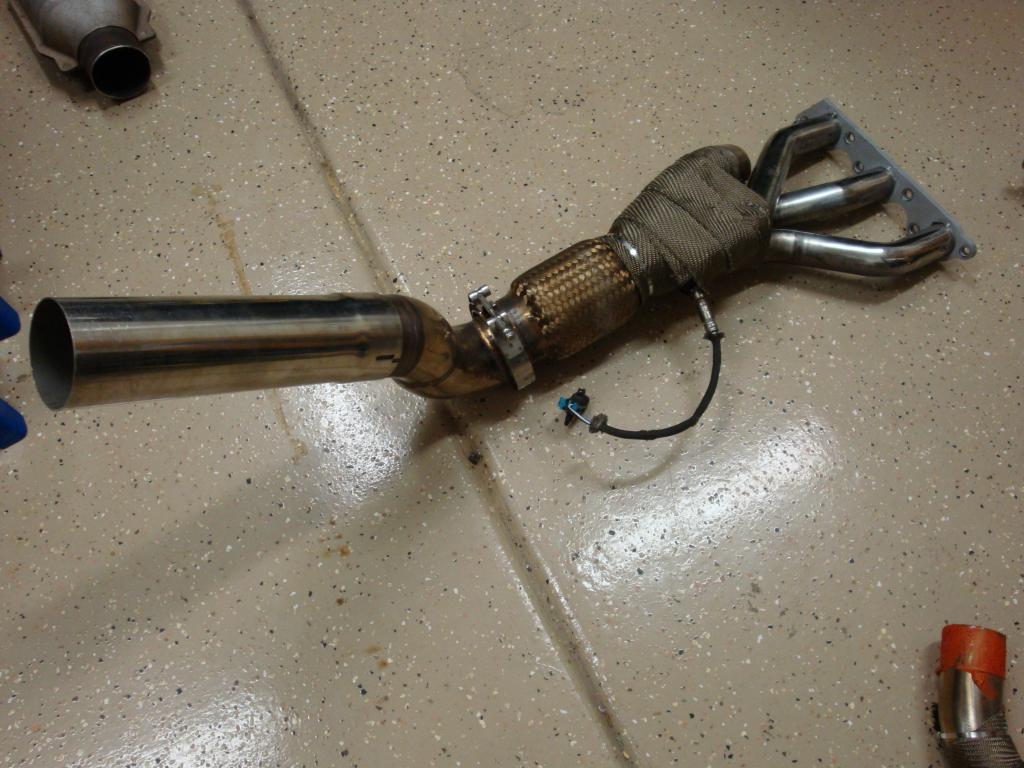
This is one of the stupid things about the DPPs is that they have this stupid U hump at the base of the firewall. I'm not sure what the purpose is, it isn't a toilet that needs a P trap...
The TOGs have a nice simple bend at the base of the firewall.
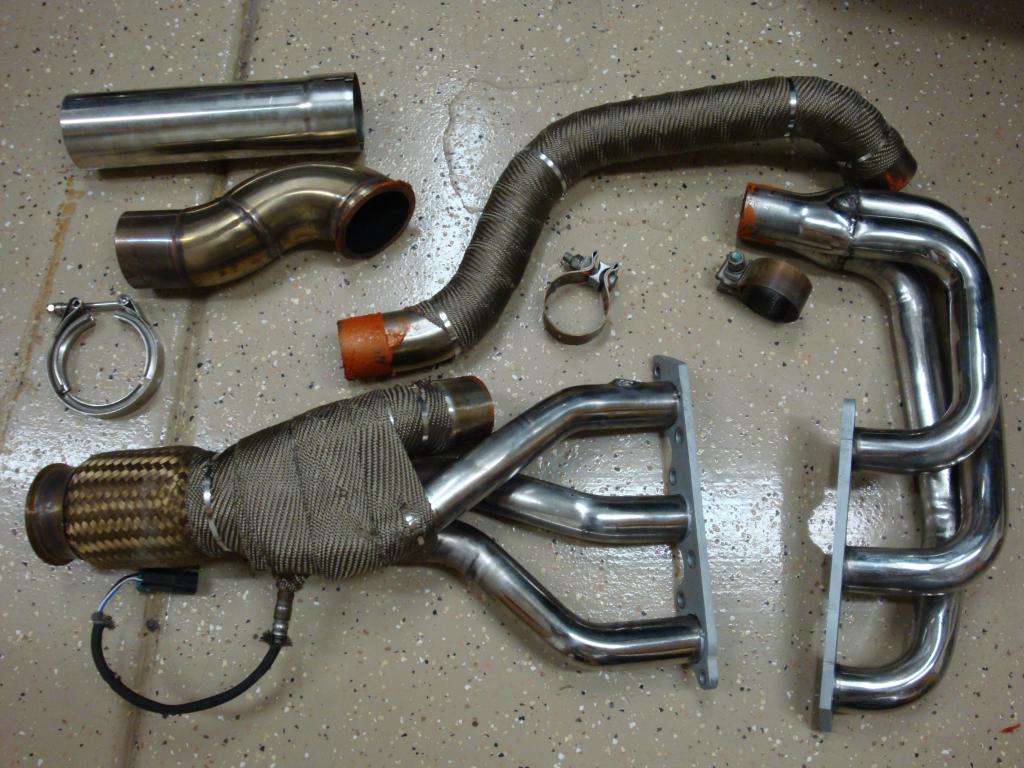
Last shot of the two systems:

Here's a comparison pic I forgot above that should've went with the front headers- it's a shot inside where the pipes merge:


If you look closely, you can see the difference in tube wall thickness since you can see the ends of the 3 primaries.
Pictures of the rear header outlets:


I will say, I much prefer the V-band clamp on the DPPs. Simple, and always sealed great.
View inside the DPP rear header:

The flex section looks rock solid even after use.
View of the rear header primaries:

Assembled DPP downpipe with 'cat delete' pipe:

This is one of the stupid things about the DPPs is that they have this stupid U hump at the base of the firewall. I'm not sure what the purpose is, it isn't a toilet that needs a P trap...
The TOGs have a nice simple bend at the base of the firewall.
Last shot of the two systems:


Last edited by bumpin96monte; Sep 29, 2014 at 12:00 AM.
Thread Starter
Joined: Feb 2008
Posts: 6,478
Final thoughts:
TOG Pros:
-Heavier duty: thicker flanges, thicker tubing, better weld quality
-Larger size (Extremes)- 1/8" larger primaries, and I believe 1/8"+ larger crossover. Outlets are the same size on both.
-More compact makes them fit better, plenty of fan clearance, plenty of firewall clearance.
-Better O2 sensor position, although it is heavily biased to the front bank.
-Ceramic coated (not sure if they all come like this now, or if it's an added option.
TOG Cons:
-Donut crossover gasket flanges add lots of extra hardware plus another failure point (both donuts were cracked when I got my used set). I got so frustrated dropping nuts into the black abyss behind the engine when I couldn't even see what I was working on.
-Location of rear crossover flange is miserable. I couldn't think of a more inaccessible spot to try and thread a bunch of hardware evenly together.
-Downpipe connection point is an odd location- it seems lower than stock, but higher than other aftermarket. Again, it's going to be tough to get my hands in there to maneuver hardware and tighten it. Also adds another gasket.
DPP/SSAC/SD/EBAY Pros:
-Cheap
-Slip fit crossover connectors are simple
-V band downpipe connection is very nice, and low enough that you can just unbolt the Vband, remove your exhaust- and run open headers if desired.
DPP/SSAC/SD/EBAY Cons:
-Crossover tubes out of round and leak (at least on mine)
-Thin head flanges are warped and leak (at least on mine)
-Stock crossover clamps are garbage, had to buy new clamps
-Head flanges rust over very quickly unlike the primaries. Not sure if they're mild steel, or if they're just a different grade stainless.
-Poor fit for 5th gens (lots of cutting and pounding)
-Thinner wall tubing, rougher bends
-Some welds look poor
IMO- for 5th gen 3800 people- I would go with TOGs, even if it's just the regular ones. The flanges are a pain in the butt, but it saves you a bit of pounding on the firewall, and you don't have to mess with fixing quality issues.


Thread Starter
Joined: Feb 2008
Posts: 6,478
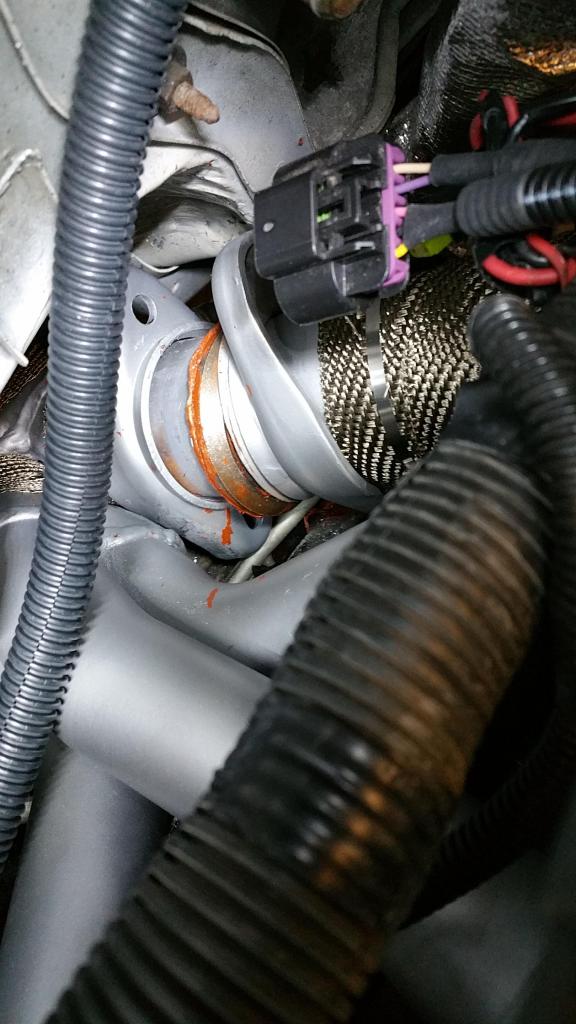
Figured I would update this thread again with some new info I found after installing the TOGs. I had originally thought I was good to go and everything was installed and ready to go. I hadn't started it up yet, so I hadn't known of any potential exhaust leaks. Well, I happened to be working on the car today and noticed a gap in the rear crossover where I could literally see into the pipe. It appears that the rear crossover flange had not seated properly.
So I went through the effort of removing the crossover (which was a massive pain since I ruined the threads on one of the front bolts somehow and had to cut it out - my fault). I figured I just had the crossover misaligned when I tightened everything down.
Well after some dry-fitting, it appears that it is not possible to install this crossover without creating a leak path in one of the two ends of the crossover. I can either have the front properly seated, and the back has a big gap (~1/8" wide at the center, open into the pipe about ~1.5" around)- or I can have the rear BARELY seated and the front has a gap. Definitely frustrating. As much as I hated the slip fit SLP style pipes, this is much more of a pain. I really don't see any way to fix it without cutting and welding something.
Honestly, I hadn't known about the issue before. I've helped install two sets of regular TOGs and they both went in rather well (one we had to remove the crossover and copper RTV the donuts to get it to seal, but at least the flange was touching the donut at least a little bit)- but neither were this far out of whack.
Here is a shot of the best case for the rear donut (ie front has a gap on it if I have it shifted this far over, and the crossover is sitting on the EGR tube):
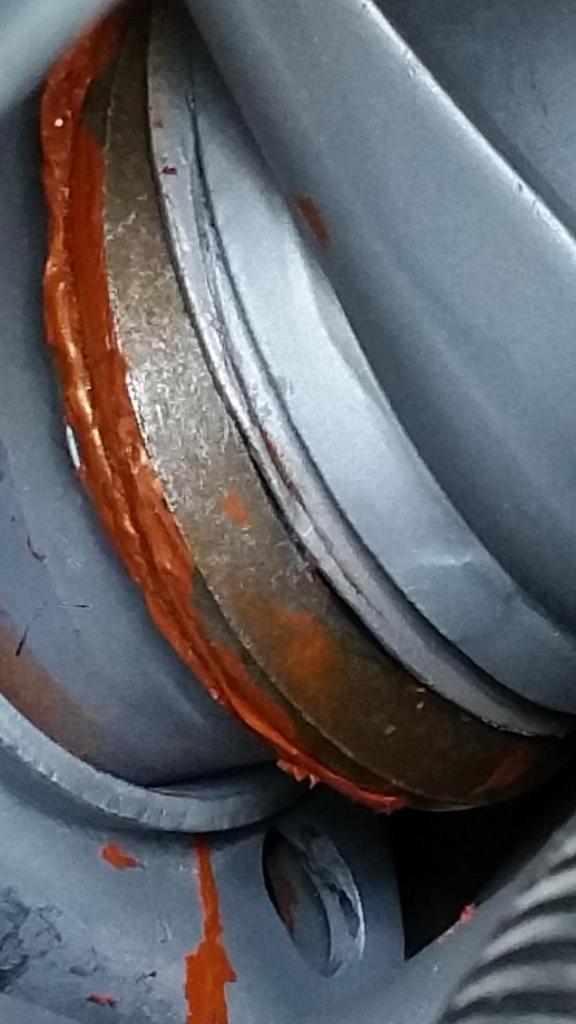
And a closeup - you can see the entire top surface of the donut is exposed on the one side and there is a super tiny gap along the middle where the crossover flange is floating above the donut.
After doing a little searching on 'TOG install problems' etc, it appears many people have had issues with the crossover. A couple of the fixes I saw were rather major (one guy replaced the front flange with a flex pipe, another guy cut half of the pipe beneath the rear header flange, bent it to fit, and then welded the cut back up).
I was definitely frustrated having to do minor tweaks to the cheapo SLP knockoff headers, but I understood that was a chance I took buying cheap junk. Saving 50% off of 'real' headers made me OK with putting some labor into tweaking parts. However, I would expect that buying the most expensive 3800 header currently on the market ($899 for TOG Extremes @ 3800performance, the next most expensive being SLPs at $799)- that these should be 100% perfect out of the box.
Don't get me wrong, I did buy these used. From looking at the donut wear on the flange, it is certain that the previous owner had the same issue to a slightly lesser extent. You can clearly see where the donut wear mark runs off the edge of the flange and is far from centered. The thing is, with the EGR tube in the way, there is just no way to rotate the crossover any more (and even if you could, your front flange would open way up).
Just figured I would update this thread with the recent developments I've had. Will have to look into my options to make this work. I'm not crazy about major surgery on them, and I definitely don't want to pull the rear header again if I don't have to (I'm not sure I would even reinstall these if I got that far). I'll update the thread when I have a solution. My gut feeling now is to either cut out the center supports so the donuts are fully floating, or to weld extra material onto the rear crossover flange.
So I went through the effort of removing the crossover (which was a massive pain since I ruined the threads on one of the front bolts somehow and had to cut it out - my fault). I figured I just had the crossover misaligned when I tightened everything down.
Well after some dry-fitting, it appears that it is not possible to install this crossover without creating a leak path in one of the two ends of the crossover. I can either have the front properly seated, and the back has a big gap (~1/8" wide at the center, open into the pipe about ~1.5" around)- or I can have the rear BARELY seated and the front has a gap. Definitely frustrating. As much as I hated the slip fit SLP style pipes, this is much more of a pain. I really don't see any way to fix it without cutting and welding something.
Honestly, I hadn't known about the issue before. I've helped install two sets of regular TOGs and they both went in rather well (one we had to remove the crossover and copper RTV the donuts to get it to seal, but at least the flange was touching the donut at least a little bit)- but neither were this far out of whack.
Here is a shot of the best case for the rear donut (ie front has a gap on it if I have it shifted this far over, and the crossover is sitting on the EGR tube):
And a closeup - you can see the entire top surface of the donut is exposed on the one side and there is a super tiny gap along the middle where the crossover flange is floating above the donut.
After doing a little searching on 'TOG install problems' etc, it appears many people have had issues with the crossover. A couple of the fixes I saw were rather major (one guy replaced the front flange with a flex pipe, another guy cut half of the pipe beneath the rear header flange, bent it to fit, and then welded the cut back up).
I was definitely frustrated having to do minor tweaks to the cheapo SLP knockoff headers, but I understood that was a chance I took buying cheap junk. Saving 50% off of 'real' headers made me OK with putting some labor into tweaking parts. However, I would expect that buying the most expensive 3800 header currently on the market ($899 for TOG Extremes @ 3800performance, the next most expensive being SLPs at $799)- that these should be 100% perfect out of the box.
Don't get me wrong, I did buy these used. From looking at the donut wear on the flange, it is certain that the previous owner had the same issue to a slightly lesser extent. You can clearly see where the donut wear mark runs off the edge of the flange and is far from centered. The thing is, with the EGR tube in the way, there is just no way to rotate the crossover any more (and even if you could, your front flange would open way up).
Just figured I would update this thread with the recent developments I've had. Will have to look into my options to make this work. I'm not crazy about major surgery on them, and I definitely don't want to pull the rear header again if I don't have to (I'm not sure I would even reinstall these if I got that far). I'll update the thread when I have a solution. My gut feeling now is to either cut out the center supports so the donuts are fully floating, or to weld extra material onto the rear crossover flange.


Thread Starter
Joined: Feb 2008
Posts: 6,478
One more update. I just today got the crossover on for the final time and it seems like it is going to work (granted I haven't started/heat cycled it yet - but everything is touching and sealed with copper RTV + the donuts).
What I ended up doing was welding a C shaped sliver of steel around the edge of the flange where the above pictured gap was. This essentially extends the potential sealing area. However, since it is a circle, my assumption was that I had a similar gap on the inside (rear header tube) facing the other direction that I couldn't see. So I also built up a little lip with weld internally on that side to extend the sealing surface to account for the piping mismatch. I'm sure this will block some flow, but it's only ~1/8 tall, and I ground it to make it as unobtrusive as possible while still extending the potential sealing area on that side.
After grinding, painting, curing the header paint on the newly welded section, I applied a very thin coat of copper RTV around the whole flange to make sure any imperfections were filled and to give me a little cushion area to tighten up against. When I went for the final install, I did a typical bead around both the front and rear donuts.
This definitely wasn't the right way to do it, but it'll get me by. Ideally I would've either had the crossover tubing re-bent slightly, or I would've cut off one of the flanges and welded it back on to account for the mismatch. However, the headers are already coated and I've already got the crossover wrapped, so I was trying to save time and be as minimally invasive as possible.
I'll try and report back once I get her running about how it seals up. I still curse the positioning of that rear flange, even on a 'good' set of TOGs. Without using some sort of trick (using a captured threaded rod, welding nuts in, etc)- it is extremely difficult to even get the bolts in, and even more difficult to tighten them. Plus, as you tighten them, you have to make sure not to disturb the critical positioning of the crossover or else you'll end up with a flange slipping slightly off a donut.
End rant for the day

Thread
Thread Starter
Forum
Replies
Last Post