
Mod Guide: L26 UIM/L67 Throttle Body Swap Guide (Pic Heavy)


Thread Starter
|

Monte Of The Month -- December 2011
Monte Of The Month -- September 2014


iTrader: (2)
Joined: Apr 2010
Posts: 12,601
From: Mentor, Ohio

Thanks Damien and Gregg!
This project sounds simple, but everything I did was hours of work. I'm very happy and proud of the outcome. I hope all the information I provided helps any other enthusiasts considering a similar swap. I know I'm far from the first to do this swap and I know a couple of the things I noted I was not the first to do, but I do believe there are a couple of porting mods and the PCV mod that I am the first to try out.
I just noticed I forgot ONE more change I made to the UIM (I'm going to add this pic to the info earlier in this thread).
You can see the tip of a screw driver at a step in the UIM. I tappered this down a lot so it's a smooth transition (I tried to carry it as far as I could to the inside of the snout).
Last edited by The_Maniac; May 26, 2014 at 09:53 AM.


Monte Of The Month -- August 2014
Joined: Sep 2008
Posts: 25,145
From: Southeast PA
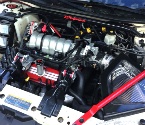
Looks damn good!! 
Now we just need to work on hiding some of those excess wires if it's possible
Also, You need to remove those mounts and paint them black. Next to the painted valve cover and UIM the brackets just look bad
Now we just need to work on hiding some of those excess wires if it's possible
Also, You need to remove those mounts and paint them black. Next to the painted valve cover and UIM the brackets just look bad

Thread Starter
|
Monte Of The Month -- December 2011
Monte Of The Month -- September 2014
iTrader: (2)
Joined: Apr 2010
Posts: 12,601
From: Mentor, Ohio
Thanks guys. I'm thrilled with how this project turned out so far. I've got a LOT of hours into it. When I began, it looked like it was going to be so quick and easy lol.
Hopefully this helps anyone looking to do this mod
Hopefully this helps anyone looking to do this mod

Looks like you did an Awesome job with it Jason  Very nice finish as well, I gave up quick after trying to polish mine haha
The way I ran the PVC lines on mine is still holding up great, yours looks a little cleaner where it's tapped into the UIM itself rather than extending the lines like I did LOL
You should consider painting those mounts like Mike previously mentioned
Oh and about the MPG's I didn't really notice a difference if any after the swap, but I wouldn't say it hurt my gas mileage at all... Then again I've never really calculated what I get to the gallon. Driving down the freeway at 70 mph gives me around 26-27 mpg going what the info center in the car gives me
Very nice finish as well, I gave up quick after trying to polish mine hahaThe way I ran the PVC lines on mine is still holding up great, yours looks a little cleaner where it's tapped into the UIM itself rather than extending the lines like I did LOL
You should consider painting those mounts like Mike previously mentioned
Oh and about the MPG's I didn't really notice a difference if any after the swap, but I wouldn't say it hurt my gas mileage at all... Then again I've never really calculated what I get to the gallon. Driving down the freeway at 70 mph gives me around 26-27 mpg going what the info center in the car gives me
Thread Starter
|
Monte Of The Month -- December 2011
Monte Of The Month -- September 2014
iTrader: (2)
Joined: Apr 2010
Posts: 12,601
From: Mentor, Ohio
Thanks frank
As for the mounts, all in due time lol
So far I am thrilled how this came together and how clean It looks.
Frank you helped in noticing the first l26 uim I had differed from yours as well as seeing how you made it all work.
The wizaird was a pain to get things together, but it came together
It also helped reading stuff from some Bonneville forums.
lol You guys helped out a lot too so don't forget that
Haha and don't even mention the Wizaired! I hate removing and installing the damn thing! I replaced the original duct with the rubber one zzp has
It's a little easier to handle and get around the TB. Our sig pics look pretty similar now haha

