
Guide: How to change cabin air filter in 7th Gen...

Thread Starter
|

Monte Of The Month -- January 2010


Joined: May 2009
Posts: 8,464
From: San Jose, CA

Hi Everyone, I thought i'd post up directions on how to change the cabin air filter on a 7th gen, with some pictures since I just did it on my Monte. I hope this helps anyone in need! 
Steps for removal of old filter:
-Put windshield wipers in UP postion (wait till they are completly up, and cut ignition)
-Remove TWO push fasteners on the hood cowl (I recomend going to the dealer and buy two new push fasteners ($.96 each), because then you don't need to worry about ruining the old ones while removing, and besides, the new ones always hold better than the used ones. )
)
-Pull back weather striping at the top of the engine bay (about half way back)
-Take the windshield washer hose out of the clips on the hood cowl, and just push out of the way.
-Now that the hood cowl is un-pinned, and stuff is out of the way, move the cowl out of the way.
-You will see another plastic deflector thing blocking the filter, pull up on the bottom of this, and the clips will slip right of the metal part.
-Now you will see the old filter, remove it.
Steps to install new filter:
-Install the new filter (it takes some wiggling of the filter, and bending of the element, but it WILL go in)
-Put the defletor back, make sure all three tabes are pushed on to the metal part, and then sit it in place
-Put the hood cowl back into place, and use the two push fasteners to secure it down. (like I said, new ones work much better)
-Push weather striping down in to place
-Put the windshield washer hose back into the clips on the hood cowl.
JOB IS COMPLETE!
Here are some picture to visualize the process:
Note the windshield wipers are in the up position, and note the weather striping i'm talking about, along with the little hose for the windshield washer fluid...

Here are the two push fasteners you need to remove. (one is in the middle of the windshield, the other is at the very corner toward the fender)


After main cowl is moved out of the way, this is the deflector you will see, and need to remove and get out of the way.

After both cowl pieces are moved out of the way, you will finally see the filter...remove it!

After the new one is installed...

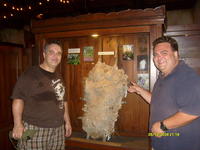
This is why you need to change your cabin air filter!

Well, I hope this helps!
Steps for removal of old filter:
-Put windshield wipers in UP postion (wait till they are completly up, and cut ignition)
-Remove TWO push fasteners on the hood cowl (I recomend going to the dealer and buy two new push fasteners ($.96 each), because then you don't need to worry about ruining the old ones while removing, and besides, the new ones always hold better than the used ones.
)-Pull back weather striping at the top of the engine bay (about half way back)
-Take the windshield washer hose out of the clips on the hood cowl, and just push out of the way.
-Now that the hood cowl is un-pinned, and stuff is out of the way, move the cowl out of the way.
-You will see another plastic deflector thing blocking the filter, pull up on the bottom of this, and the clips will slip right of the metal part.
-Now you will see the old filter, remove it.
Steps to install new filter:
-Install the new filter (it takes some wiggling of the filter, and bending of the element, but it WILL go in)
-Put the defletor back, make sure all three tabes are pushed on to the metal part, and then sit it in place
-Put the hood cowl back into place, and use the two push fasteners to secure it down. (like I said, new ones work much better)
-Push weather striping down in to place
-Put the windshield washer hose back into the clips on the hood cowl.
JOB IS COMPLETE!
Here are some picture to visualize the process:
Note the windshield wipers are in the up position, and note the weather striping i'm talking about, along with the little hose for the windshield washer fluid...
Here are the two push fasteners you need to remove. (one is in the middle of the windshield, the other is at the very corner toward the fender)
After main cowl is moved out of the way, this is the deflector you will see, and need to remove and get out of the way.
After both cowl pieces are moved out of the way, you will finally see the filter...remove it!
After the new one is installed...
This is why you need to change your cabin air filter!
Well, I hope this helps!

Thread Starter
|
Monte Of The Month -- January 2010
Joined: May 2009
Posts: 8,464
From: San Jose, CA
Yea, I think its almost the exact same...
And actually my vents are louder now when turned on full blast (probably because they are actually able to suck in clean air, LOL) It actually brought back memories about how it sounded when I first bought it new, I just never realized over time that it changed. LOL
And actually my vents are louder now when turned on full blast (probably because they are actually able to suck in clean air, LOL) It actually brought back memories about how it sounded when I first bought it new, I just never realized over time that it changed. LOL


Joined: Feb 2009
Posts: 2,483
From: lakeland fl

you know there is a interior tool thay looks like a pry bar in a way but it has a u shape at the end of it so you dont have to worry about ruining the clips but it is always a good thing to get a couple do to they have a tendency of breaking when removing them. on the bright side thanks for the post it reminds me on changing mine


Monte Of The Month -- August 2014
Joined: Sep 2008
Posts: 25,145
From: Southeast PA
Mostly... however that AWESOME plastic deflector that blocks the water from ruining your car does not exist on the 6th gen. We just have a piece of rubber weatherstripping that sucks. So if you want to rip that rubber weatherstripping off and buy the deflector that the 7th Gens have you can do that. Go to any GM Dealer and it's like a $4 part. Part#: 15794785
You will also need to look at the underside of the cowl and rip off the cloth looking blockade + cut off the plastic that held it on.


Then you can put the cowl back on and it will be JUST like the 7th Gens
You will also need to look at the underside of the cowl and rip off the cloth looking blockade + cut off the plastic that held it on.
Then you can put the cowl back on and it will be JUST like the 7th Gens
