
Project: Polished Fender braces

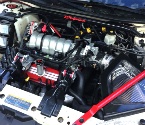

well i got one done but im disappointed  didnt do enough sanding in the first stages to get rid of the deeper scratches so it didnt come out with the shine i was hoping for lol it still looks shiny though.

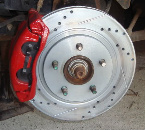
close up of the deeper scratches lol

didnt do enough sanding in the first stages to get rid of the deeper scratches so it didnt come out with the shine i was hoping for lol it still looks shiny though. close up of the deeper scratches lol


Monte Of The Month -- July 2011
Monte Of The Month -- December 2016
Monte Of The Month -- December 2016


Joined: Jan 2011
Posts: 7,524
From: St.Louis , MO.

Frank , I know what your talking about sanding in early stage..LOL
Just when You think your done , Scratches show up.. I had too sand /sand/sand/sand..
Looking Good..
Just when You think your done , Scratches show up.. I had too sand /sand/sand/sand..
Looking Good..
Thanks Justin 
yea it sucks! :p i dont care though as long as it gives some shine haha
and thanks Jerry
yea it sucks! :p i dont care though as long as it gives some shine haha and thanks Jerry


Monte Of The Month -- October 2012


Joined: Dec 2010
Posts: 2,886
From: Ames, IA
Honestly even with those scratches it still looks damn good. Did you crosshatch for the sanding? Just curious because that is the best way to yield mirror results. Going in the same direction for all grits will leave scratches similar to what you have pictured. Not saying it's bad or anything because those definitely look fantastic. And the fact that when people ask where you got them you can simply reply that these can't just be bought, they're custom. Credit must be given for that alone lol!
Anyways, those first few stages are where as soon as you think it looks good enough, keep going for 5-10 more minutes just because Keep it up.. Those are going to look badass polished up and installed!
Anyways, those first few stages are where as soon as you think it looks good enough, keep going for 5-10 more minutes just because
Keep it up.. Those are going to look badass polished up and installed!
Honestly even with those scratches it still looks damn good. Did you crosshatch for the sanding? Just curious because that is the best way to yield mirror results. Going in the same direction for all grits will leave scratches similar to what you have pictured. Not saying it's bad or anything because those definitely look fantastic. And the fact that when people ask where you got them you can simply reply that these can't just be bought, they're custom. Credit must be given for that alone lol!
Anyways, those first few stages are where as soon as you think it looks good enough, keep going for 5-10 more minutes just because Keep it up.. Those are going to look badass polished up and installed!
Anyways, those first few stages are where as soon as you think it looks good enough, keep going for 5-10 more minutes just because
Keep it up.. Those are going to look badass polished up and installed! and nope i didnt cross hatch when sanding lol i read somewhere that its better to sand in one direction only lmao

i did do some cross hatching on my mounts though, maybe thats why they came out looking better
oh well now i know for next time ")


Thanks lou
but i got the scratches problem fixed!!
turned out to be the sandpaper i was using damn pep boys sandpaper even the 2000 grit i was using was really rough! and dissolved quickly with water... since i was wet sanding by that stage lol
got some from autozone, 3M brand and started all over again :p well just from 800 grit up to 2500, also switched to mothers polish and holy cow did i get different results this time!!
i got one finished so i'll post pics in a minute
but i got the scratches problem fixed!!
turned out to be the sandpaper i was using
damn pep boys sandpaper even the 2000 grit i was using was really rough! and dissolved quickly with water... since i was wet sanding by that stage lol got some from autozone, 3M brand and started all over again :p well just from 800 grit up to 2500, also switched to mothers polish and holy cow did i get different results this time!!
i got one finished so i'll post pics in a minute
This thing looks amazing now

Mirror Finish!!
Navy sticker on my computer is for my gf, she's leaving for bootcamp in a week thats another story i dont want to get into though

Mirror Finish!!
Navy sticker on my computer is for my gf, she's leaving for bootcamp in a week
thats another story i dont want to get into though

