roof rail instalation


Figured sence im installing mine id do a step by step on how to remove the old molding & save it & install the roof rails aswell as screwing them down in place 
Step 1: pry up the very end of the old molding carefully with a screwdriver
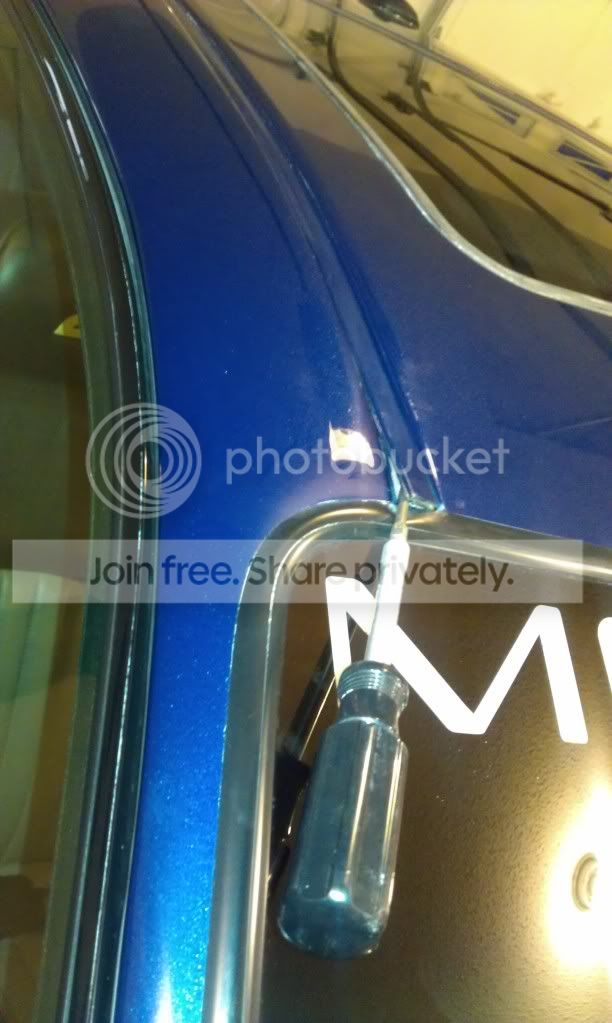
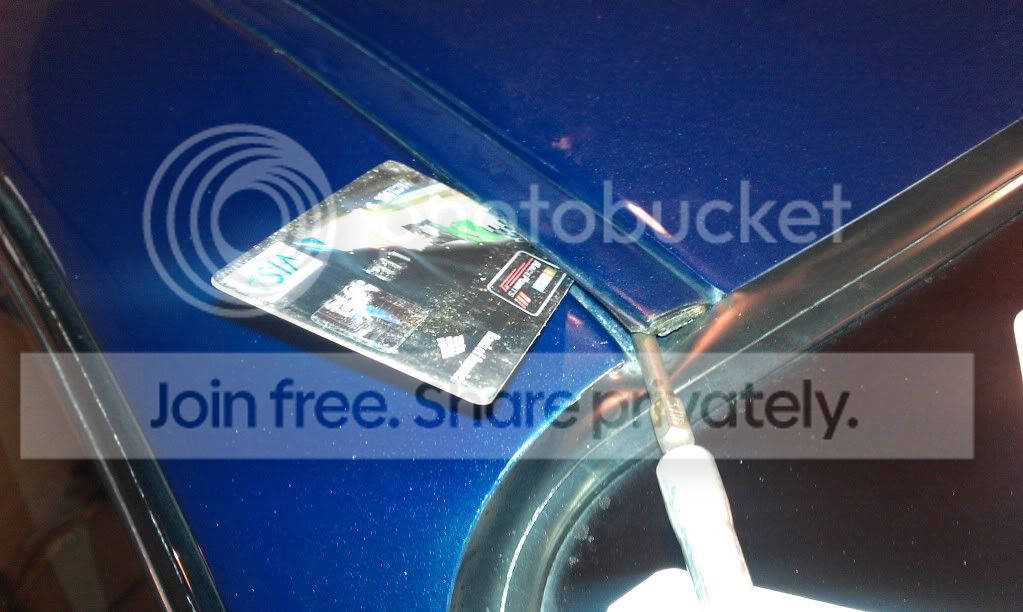
Step 2: use a credit card or any smooth fairly strong plastic to put under the moulding & slide down to the end this keeps the moldings shape in case of future use
Step 3: remove the molding carefully

Step 4: repete 1-3 for the other side & u should have two still good pieces of molding

Step 5: clean the groves out of the excess tape with goo gone or any anything of that nature


Step 6: test fit the rails


Note skip this section & goto step 20 for gluing down the rails if your not gonna screw them down
Step 1: pry up the very end of the old molding carefully with a screwdriver
Step 2: use a credit card or any smooth fairly strong plastic to put under the moulding & slide down to the end this keeps the moldings shape in case of future use
Step 3: remove the molding carefully
Step 4: repete 1-3 for the other side & u should have two still good pieces of molding
Step 5: clean the groves out of the excess tape with goo gone or any anything of that nature
Step 6: test fit the rails
Note skip this section & goto step 20 for gluing down the rails if your not gonna screw them down
Last edited by 03JGMonte; Dec 2, 2011 at 07:14 PM.
Headliner removal
Step 7: remove hangers off quarter glass trim panels by inserting a small flat bladed screwdriver & prying the pin out, do this for both sides


Step 8: remove pull handel, itll be a t20 bit, some cars may have plastic caps remove with flat screwdriver


Step 9: remove A pilar trims, be carefull they will be held in with 2 clips on the main part & 2 on the part that goes over the door id show pics of these but my clips are broke, start from the top rear of the trim over the door & work your way down


Step 10: remove push clips from rear of headliner on both sides, now there is a special tool to remove these there handy to have so id suggest getting one


& this is the tool

Step 11: remove visors there are 3 T20 torque screws, headliner will sag a lil after these are removed

After screws are out ull need to unplug the visors


Step 12: remove quarter glass trim panel on right side only ull need to remove the seat belt & pull the clips out again be carefull of breaking the clips


Step 13: unplug the harness now its tricky to get to sence its under the rear panel but u can get it

The other part is under here

Step 14: unplug mirror & remove the plastic trim covering wire

Step 15: remove visor clips, warning headliner will drop after this step, it will be a T20 bit


Step 16: remove headliner, now its tricky to get out but the best way ive found is to spin it sideways & remove it from the passenger side by taking the rear of the headliner out first, its a tight fit but be paitent it will come out,
This is everything u should have out once done

NOTE: if u have onstar it may have differnt plug ins doubt it does but just be aware to check all wires attached to the headliner
Step 7: remove hangers off quarter glass trim panels by inserting a small flat bladed screwdriver & prying the pin out, do this for both sides
Step 8: remove pull handel, itll be a t20 bit, some cars may have plastic caps remove with flat screwdriver
Step 9: remove A pilar trims, be carefull they will be held in with 2 clips on the main part & 2 on the part that goes over the door id show pics of these but my clips are broke, start from the top rear of the trim over the door & work your way down
Step 10: remove push clips from rear of headliner on both sides, now there is a special tool to remove these there handy to have so id suggest getting one
& this is the tool
Step 11: remove visors there are 3 T20 torque screws, headliner will sag a lil after these are removed
After screws are out ull need to unplug the visors
Step 12: remove quarter glass trim panel on right side only ull need to remove the seat belt & pull the clips out again be carefull of breaking the clips
Step 13: unplug the harness now its tricky to get to sence its under the rear panel but u can get it
The other part is under here
Step 14: unplug mirror & remove the plastic trim covering wire
Step 15: remove visor clips, warning headliner will drop after this step, it will be a T20 bit
Step 16: remove headliner, now its tricky to get out but the best way ive found is to spin it sideways & remove it from the passenger side by taking the rear of the headliner out first, its a tight fit but be paitent it will come out,
This is everything u should have out once done
NOTE: if u have onstar it may have differnt plug ins doubt it does but just be aware to check all wires attached to the headliner
Last edited by 03JGMonte; Dec 2, 2011 at 09:43 AM.
Gluing rails down
NOTE skip to step 20 if ur not gonna screw the rails down
Step 17: place rails on car & use tape to mark the location of where u need to drill holes, now not every rail is gonna fit the same so it up to you to figure out where u need em

Step 18: remove the rail & use a marker to mark where u want ur holes to be in the channel

Step 19: drill the holes to the size of the screw, NOTE all ull need is a 3/4in screw for these


NOTE WHEN DRILLING IT WOULD BE BEST TO USE TWO TOWELS & A BOARD TO DRILL THREW SO THE DRILL DOSNT HIT YOUR PAINT WHEN THE HOLE IS FINISHED
STEP 20: Tape edges to keep from scratching the paint & getting glue on it

Step 21: lay in your adhesive, i used a glue to hold in windows, but u can use an epoxy you want


Step 22: push down the rails securly & remove tape NOTE if not screwing down tape down tightly so it dries good in place
Step 23: get your screws & hold down fermly with one hand on the rail & shoot the screw from the bottom up into the rail straight
Step 24: clean up your roof & wait a few days to leak check before u place ur interior back in & your done & your Monte will look awesome
NOTE skip to step 20 if ur not gonna screw the rails down
Step 17: place rails on car & use tape to mark the location of where u need to drill holes, now not every rail is gonna fit the same so it up to you to figure out where u need em
Step 18: remove the rail & use a marker to mark where u want ur holes to be in the channel
Step 19: drill the holes to the size of the screw, NOTE all ull need is a 3/4in screw for these
NOTE WHEN DRILLING IT WOULD BE BEST TO USE TWO TOWELS & A BOARD TO DRILL THREW SO THE DRILL DOSNT HIT YOUR PAINT WHEN THE HOLE IS FINISHED
STEP 20: Tape edges to keep from scratching the paint & getting glue on it
Step 21: lay in your adhesive, i used a glue to hold in windows, but u can use an epoxy you want
Step 22: push down the rails securly & remove tape NOTE if not screwing down tape down tightly so it dries good in place
Step 23: get your screws & hold down fermly with one hand on the rail & shoot the screw from the bottom up into the rail straight
Step 24: clean up your roof & wait a few days to leak check before u place ur interior back in & your done & your Monte will look awesome
Last edited by 03JGMonte; Dec 2, 2011 at 07:15 PM.