
2004 Monte Carlo Turn Signal Switch Repair


Thread Starter
|

Monte Of The Month -- August 2007


Joined: Sep 2006
Posts: 5,231
My dimmer switch died on me yesterday on the way to work. It's been giving me a few problems not working right, but yesterday it quit giving me dim lights all together. That's an EXPENSIVE switch, and the labor can be up to 2 hours to repair it. GM has a list of $550 on the switch, part # 88964581. gmpartsdirect.com has them for $270.40, but has $59.49 S/H totaling $329.89. RockAuto.com has the same AC Delco switch for the same price, but only $12 S/H. You won't find it cheaper anywhere else, other than ebay, where you can get it for about $100 less.
I found one NIB in Detroit for $150, and I went and grabbed it last night. I'm going to attempt to get it put in myself today, and I'll be taking some pics as I go for a "how to" for those that want to do this yourself. I'm told it's not HARD to do, but it's not fun, either.
Thanks to Elberth for posting a "how to" for an '03 Impala:
http://www.associatedcontent.com/art...ch.html?cat=27
And a big thanks to my buddy Scott N. for giving me the confidence that I can do this one myself.
At this point all I can say is don't buy the cheap import switches, and everyone has said that to me, including the sales person at Rock Auto.
I'll keep you posted as to how it's going.


Thread Starter
|
Monte Of The Month -- August 2007
Joined: Sep 2006
Posts: 5,231
I got it fixed, with no real problems. Figuring things out, and not reading the instructions I printed from the Impala install.....anyways, all in all it went smooth. 2 hours, and I got some pics. Not enough, but a few. I had to buy 2 new sets of tools, the offset mini rachet and bit set, and a set of torx sockets. I could've used just an E6 torx socket, but none here in this little town.
I got $270 into doing this myself, but more importantly to me, I was able to get it repaired over the weekend with an impossible to get special order part, without taking a car out of storage, which meant putting insurance on it at $50 or $110 for a month minimum
This CAN be done for under $200 yourself with a Chinese part, or about $280 with an AC Delco part.
I'm going to work on pics now.
Thread Starter
|
Monte Of The Month -- August 2007
Joined: Sep 2006
Posts: 5,231
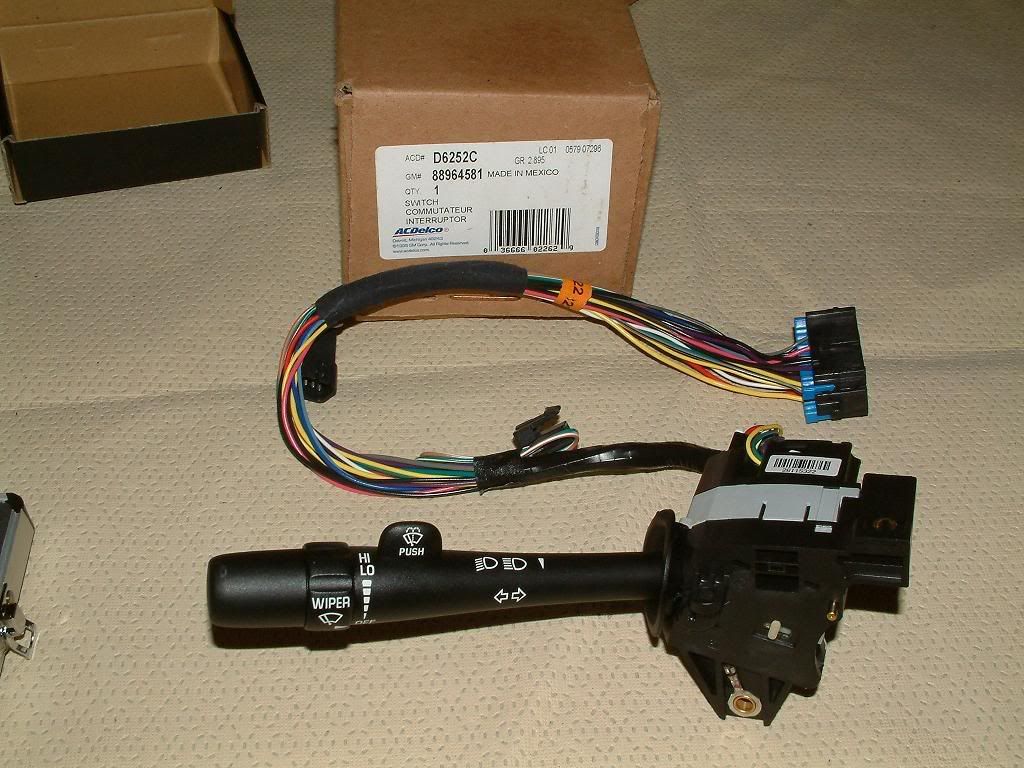
My dimmer switch died on me yesterday, and I lost my dim headlights on my �04 Monte Carlo Intimidator SS. It�s typically called a multi-function switch, but officially it�s called a turn signal switch. It�s AC Delco part # 88964581. MSRP is $550. gmpartsdirect.com has them for $270.40, but has $59.49 S/H totaling $329.89. RockAuto.com has the same AC Delco switch for the same price, but only $12 S/H. You won't find it cheaper anywhere else, other than ebay, where you can get it for about $100 less. Rock Auto also has a cheap Chinese import for $182 + $11 S/H. I found mine as an expired ebay auction for an Impala switch, and I was able to actually pick it up in person the same day. I paid $150 cash for one NIB, plus gas and my time. FYI, most auto parts stores will want between $260 and $400 for the part, and most with unknown origins. Make sure you get a genuine GM AC Delco part in an CA Delco box. The assembly is made in Mexico.
I found a web site that had instructions on how to replace this unit on an �01 Impala, and
I printed that out, and it was TREMENDOUS help.
http://www.associatedcontent.com/art...ch.html?cat=27
So THANKS to Elbereth for posting this repair, and most of this text below will be from his posting, so again, THANKS!
Instead of having the dealership or a garage switch it out for me for several reasons, I decided it would make a nice weekend project. And, it was really not that bad. I figured that if a dealer was charging me about 1 � hours to do it, it shouldn�t take me more than a week, right? LOL! I figured 2-3 hours, and it turned out closer to the 2 hour mark, and that�s taking pic�s too.
For the most part, I just took my time, and methodically disassembled things. This walkthrough will tell you how to go about it without removing the steering wheel. You may have all the tools needed, or you may need to take a trip to the hardware or automotive store and pick some up. Worst case scenario, you'll be spending about $75 in tools. If you can find a shop that will use your part, and install it for less than $75, you may want to talk to them. Of course, you'll gain absolutely no satisfaction from that. If you don't have the part, it's insanely expensive. But you can save hundreds over having a dealership or local mechanic do the job for you.
Here's what you'll need:
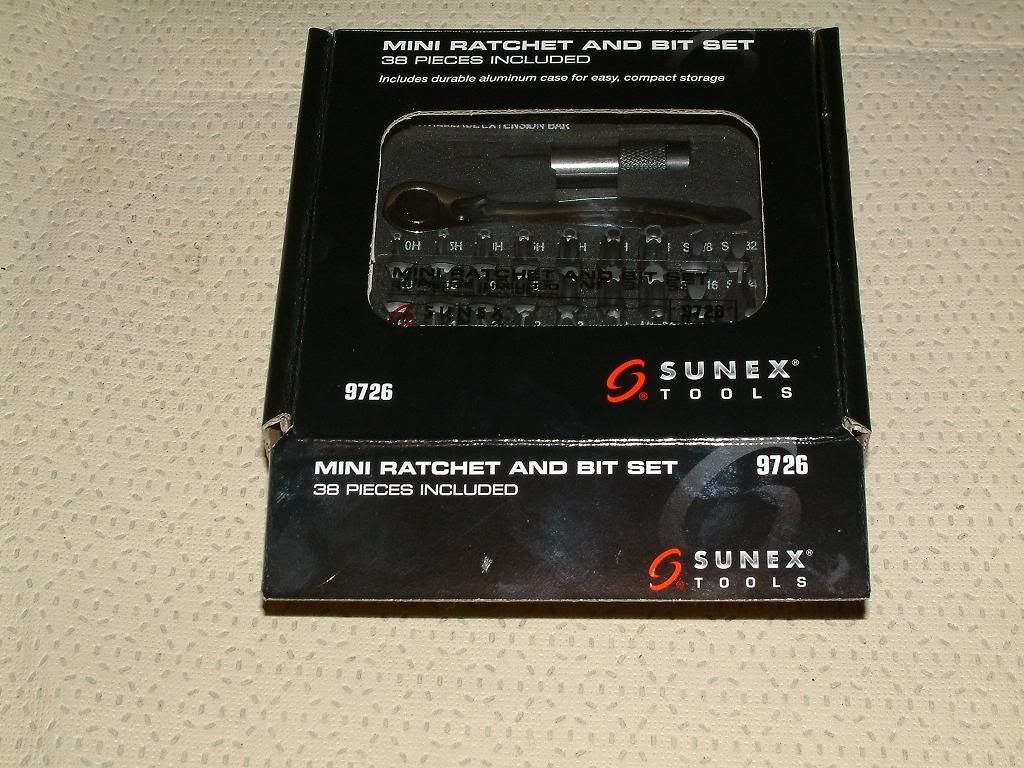
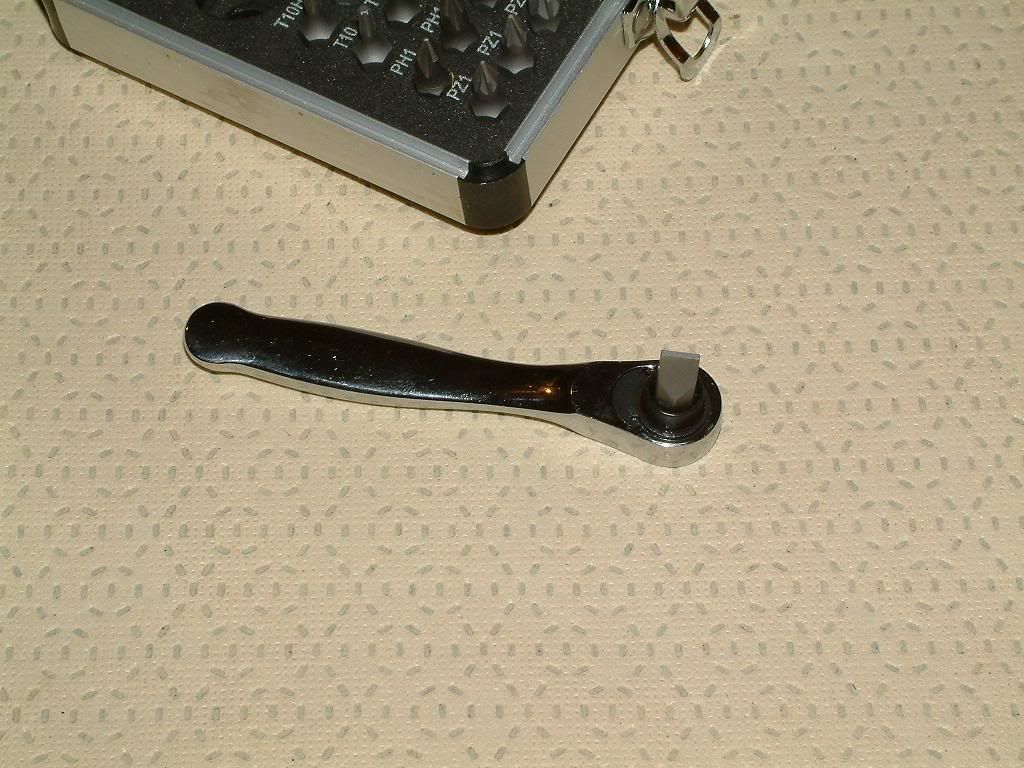
Mini Ratchet made for a �� bit. I tried to do this without it for the 1 screw you need it on, but I couldn�t. These can be picked up, often with an assortment of bits, between $20 and $40. I paid $26. If you have to buy a set, get one with torx bits. This is the key tool in the difference between taking the steering wheel off, and not staking the steering wheel off.
Torx bits T20, T25, (I think) and maybe a T30. Torx drivers are nice, also, but your still going to need the T20 or T25 bit with the mini-ratchet.
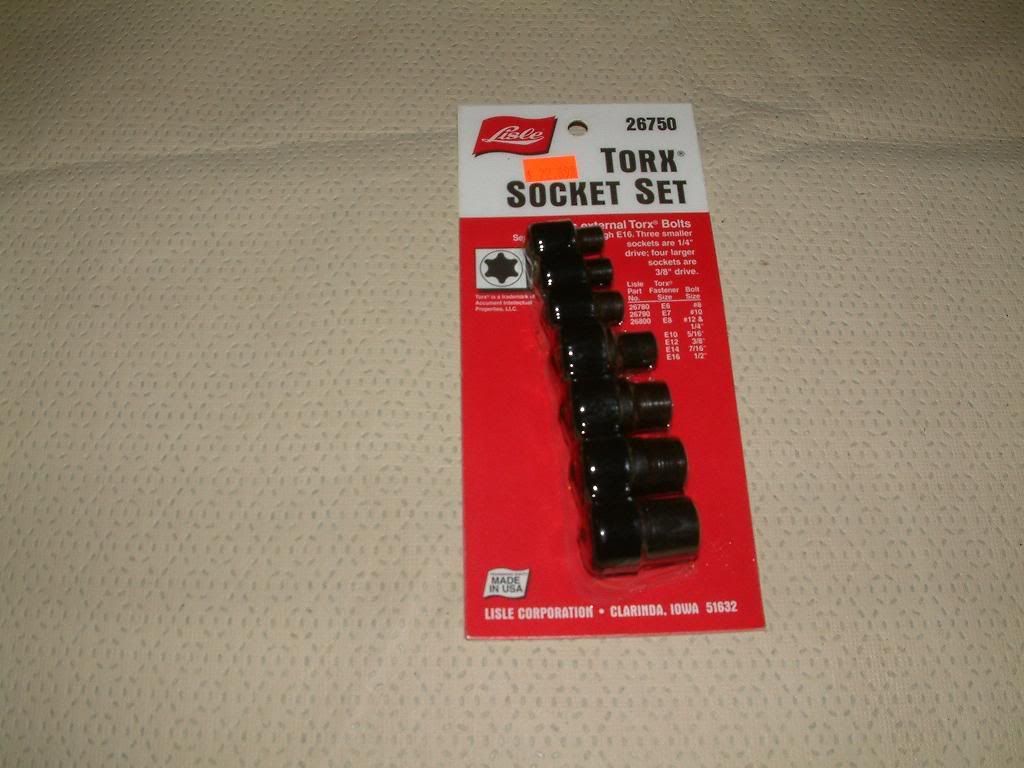
E6 Star socket, but an E5 might fit better if you have one.
�� square tipped driver handle for �� drive sockets.
http://i243.photobucket.com/albums/f...20SS/mfs15.jpg
A small set of snips, to cut through some wire ties.
3 or 4 small wire ties to replace those cut.
Needlenose pliers (to pinch a wire harness)
Small screwdriver for opening electrical connectors.
5/16� wrench for the battery.
#2 phillips screw driver or a 9/32� socket for hex nuts. I used the socket on a driver handle.
Throughout the instructions I'm going to provide, I think it is important to note it is possible that some screws are missing. Use common sense, and look around for extra screws if something is giving you a hard time. Just because I had to take out 3 doesn't mean you won't have 4.
Prepare:
Using a 5/16� wrench, remove the ground terminal from your battery. You're going to be working around the wiring for the airbag system, so this is a precaution. Remember: if you see a big yellow wire that goes into a yellow plug, that's airbag. I don't think it's possible to overstate how dangerous screwing around with airbag components can be. Don't do it. Throughout this process, you'll never have to touch any airbag components.
Remove Interior Panels:
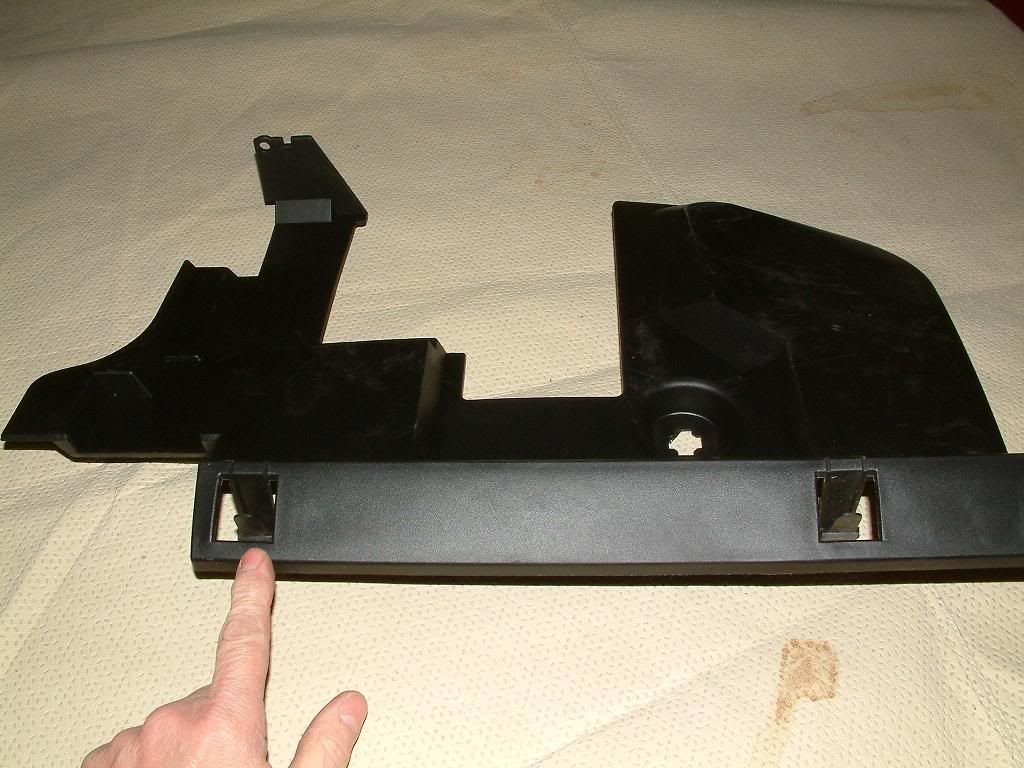
Just above the pedals, there is a large black plastic piece that covers the top of the foot well above your feet. There were no screws, just two tabs where it meets up with the steering column filler. Remove that piece. I'm pointing to one of the tabs below. Twist the courtesy light to remove it from the panel.
Remove the Steering column filler. You've exposed two screws on the bottom of the steering column filler. Take them out, and then pop off the filler. Pull it toward you, straight out. The trunk latch switch is in that panel. Use a small screwdriver to pry the clip away to unfasten the electrical connector.


Now, you'll need to take off the front dash trim. It's the big piece that surrounds your instrument cluster, radio, and heater control, and it's a bit annoying. There is one screw along the bottom edge, exposed by removing the filler. Take off the fuse panel cover on the left end, and open the glove box, and you'll find a single screw on each side. Then it pops off. Not easily, though. The ignition switch bevel needs a little prying to come off. You'll need to have the parking brake applied, because you're going to have to put the shifter into low to make room. Also, tilt the steering wheel to a good place. Somewhere around halfway worked well for me. I started pulling at the left side, and worked my way to the right side. The Hazard switch is pretty deep. For me, it was a white plug in a large green socket. Get that unplugged, and then gently go about working the panel off and away.
Expose the Multifunction Switch:
Now you�re going to have to start working from the bottom.
Coming from the bottom of the steering column, you need to remove the screws holding the top and bottom half of the cover that surrounds the multifunction switch and the gear shifter. I only had one screw, but I'm pretty sure there could be as many as three. I had to use a T20 torx bit on the �� driver handle.
Once that's all separated, you can pop the bottom half away from the top half. But, here we run into a snag. The bottom half can't be completely removed, because of the tilt control lever. The top can't be budged at all, because it is still screwed down in two places.
Look at the back of the two halves. You'll see that they are connected with a sort of hook mechanism. Wiggle and mess with the bottom half until you can unhook the two connections. This will buy you bundles more wiggle room on the bottom half.
Get your E6 star socket handy, because the two screws that hold the top half down are star-headed, which is pretty annoying. There is one on each side behind the steering wheel. I used a T20 or T25 torx driver. A torx bit in a driver handle will work. What ever you have should work. Once you get it, the top pops right off, twist it to the right, and you can see all the good stuff that used to be hidden, including the multifunction switch.
Remove the Multifunction Switch:
There are two Torx screws holding the multifunction switch in place. The first one is on top, and easy to get to. Take that out.
The second is where you are going to use the torx bit and the mini-ratchet. This will take time, and probably be frustrating. Someone to hold a light just right will help. With the mini-ratchet it went easy.
See the bundle of wiring heading into the dash? There is a cable tie right ther. Cut it.
Now you get to move the drivers seat all the way back, recline it fully, turn yourself around, and take a small screwdriver with you, the cutters, and a light, and turn yourself upside down and slide under there sall the way looking up inside. Have the new switch where you can reach it.
There are two plugs that need to be undone. Cut the remaining cable ties. There is a white plastic loop used to route the wiring. You need to squeeze closed the 'hook' part of it using the needlenose pliers, and then push it out. Once you see it, it's pretty self explanatory.
The first plug is about 12 inches or so down the wiring. The part that belongs to the multifunction switch is the female port. You'll need to pry up the latch, and separate the plug out. Easy.
The last is an interesting one. There is a huge plug with a white handle. You'll need to squeeze tabs on either side of the box, which will allow you to rotate the handle down towards you, then all the way back around. Push the connector towards the floor board and it will come off the hangar. Use your small screwdriver and pry gently on the top side of the connector. There is a small latch on either side, but you need to pry the edge of the connector up, not just a latch. Once that's done, push away on the plug while pulling out. It comes pretty easy, so if you're pulling really hard, try wiggling it. It does NOT just pull straight out; you do have to push back on it a little bit.
That's it! Now, just pull the switch out, and it's time to reinstall.
Reinstall the Multifunction Switch
This is pretty easy; everything you just did, but in reverse. Thread the wiring harness down through where it belongs, and then plug things in.
The big plug goes first. It will go in as easy as it came out. Then, just rotate the handle back, and it's locked in place. Put it back on the hangar Route the wiring up and over the steering column. Plug the last connection together, and then snap the harness into that plastic loop we opened up earlier. Use a couple of cable of ties and make it look like it did before you turned yourself upside down.
Now, as you go to put the multifunction switch in place, take a look at something. This is important. If you've got the switch facing you, there is a small bronze switch on that face there, which can be pressed in and will bounce back. This is where you make the connection to the clockspring, and you must take care to keep that pressed in while maneuvering the multifunction switch into place. Hook the top right side on first, and drop the handle side down.
Screw the Torx screw into the top first. Snug it down. This will help line up the other Torx screw. Now it's time to get that second one back in. Again, this will take some time, but once it's done, the hard stuff is over.
Check it out right now before you go any further to make sure everything is working properly.
Re-assembly
Now it's just a matter of putting everything together. Start with screwing the top half of the steering column cover back down. Once that's tight, hook the top and bottom together again, and then snap the bottom back into place. Put the 2 torx head bolts back in. Snap the dash trim back into place. You will need to put the gear shifter into 2 or 3 again, and tilt the column appropriately. Plug the hazard switch in, and then twist and convince the switch to get back in there where it belongs. Then, bit by bit, just encourage it back into place.
You'll need to take a flat bladed tool to pry the rubber flashing around the ignition switch back into place. I used a normal (flat-headed) screwdriver bit.
Screw the 2 screws back in the ends.
Next comes the steering column filler. Easy. Then that black piece over your feet that just snaps in. Put the fuse panel cover back on.
All done! Go for a ride, make sure everything works. This is a great project, and could save you hundreds, compared to having it done by a mechanic.
Pictures will be added tomorrow. It's late, and I have to get some sleep. They are edited and uploaded to my photobucket account.
http://s243.photobucket.com/albums/f...imidator%20SS/
I found a web site that had instructions on how to replace this unit on an �01 Impala, and
I printed that out, and it was TREMENDOUS help.
http://www.associatedcontent.com/art...ch.html?cat=27
So THANKS to Elbereth for posting this repair, and most of this text below will be from his posting, so again, THANKS!
Instead of having the dealership or a garage switch it out for me for several reasons, I decided it would make a nice weekend project. And, it was really not that bad. I figured that if a dealer was charging me about 1 � hours to do it, it shouldn�t take me more than a week, right? LOL! I figured 2-3 hours, and it turned out closer to the 2 hour mark, and that�s taking pic�s too.
For the most part, I just took my time, and methodically disassembled things. This walkthrough will tell you how to go about it without removing the steering wheel. You may have all the tools needed, or you may need to take a trip to the hardware or automotive store and pick some up. Worst case scenario, you'll be spending about $75 in tools. If you can find a shop that will use your part, and install it for less than $75, you may want to talk to them. Of course, you'll gain absolutely no satisfaction from that. If you don't have the part, it's insanely expensive. But you can save hundreds over having a dealership or local mechanic do the job for you.
Here's what you'll need:
Mini Ratchet made for a �� bit. I tried to do this without it for the 1 screw you need it on, but I couldn�t. These can be picked up, often with an assortment of bits, between $20 and $40. I paid $26. If you have to buy a set, get one with torx bits. This is the key tool in the difference between taking the steering wheel off, and not staking the steering wheel off.
Torx bits T20, T25, (I think) and maybe a T30. Torx drivers are nice, also, but your still going to need the T20 or T25 bit with the mini-ratchet.
E6 Star socket, but an E5 might fit better if you have one.
�� square tipped driver handle for �� drive sockets.
http://i243.photobucket.com/albums/f...20SS/mfs15.jpg
A small set of snips, to cut through some wire ties.
3 or 4 small wire ties to replace those cut.
Needlenose pliers (to pinch a wire harness)
Small screwdriver for opening electrical connectors.
5/16� wrench for the battery.
#2 phillips screw driver or a 9/32� socket for hex nuts. I used the socket on a driver handle.
Throughout the instructions I'm going to provide, I think it is important to note it is possible that some screws are missing. Use common sense, and look around for extra screws if something is giving you a hard time. Just because I had to take out 3 doesn't mean you won't have 4.
Prepare:
Using a 5/16� wrench, remove the ground terminal from your battery. You're going to be working around the wiring for the airbag system, so this is a precaution. Remember: if you see a big yellow wire that goes into a yellow plug, that's airbag. I don't think it's possible to overstate how dangerous screwing around with airbag components can be. Don't do it. Throughout this process, you'll never have to touch any airbag components.
Remove Interior Panels:
Just above the pedals, there is a large black plastic piece that covers the top of the foot well above your feet. There were no screws, just two tabs where it meets up with the steering column filler. Remove that piece. I'm pointing to one of the tabs below. Twist the courtesy light to remove it from the panel.
Remove the Steering column filler. You've exposed two screws on the bottom of the steering column filler. Take them out, and then pop off the filler. Pull it toward you, straight out. The trunk latch switch is in that panel. Use a small screwdriver to pry the clip away to unfasten the electrical connector.
Now, you'll need to take off the front dash trim. It's the big piece that surrounds your instrument cluster, radio, and heater control, and it's a bit annoying. There is one screw along the bottom edge, exposed by removing the filler. Take off the fuse panel cover on the left end, and open the glove box, and you'll find a single screw on each side. Then it pops off. Not easily, though. The ignition switch bevel needs a little prying to come off. You'll need to have the parking brake applied, because you're going to have to put the shifter into low to make room. Also, tilt the steering wheel to a good place. Somewhere around halfway worked well for me. I started pulling at the left side, and worked my way to the right side. The Hazard switch is pretty deep. For me, it was a white plug in a large green socket. Get that unplugged, and then gently go about working the panel off and away.
Expose the Multifunction Switch:
Now you�re going to have to start working from the bottom.
Coming from the bottom of the steering column, you need to remove the screws holding the top and bottom half of the cover that surrounds the multifunction switch and the gear shifter. I only had one screw, but I'm pretty sure there could be as many as three. I had to use a T20 torx bit on the �� driver handle.
Once that's all separated, you can pop the bottom half away from the top half. But, here we run into a snag. The bottom half can't be completely removed, because of the tilt control lever. The top can't be budged at all, because it is still screwed down in two places.
Look at the back of the two halves. You'll see that they are connected with a sort of hook mechanism. Wiggle and mess with the bottom half until you can unhook the two connections. This will buy you bundles more wiggle room on the bottom half.
Get your E6 star socket handy, because the two screws that hold the top half down are star-headed, which is pretty annoying. There is one on each side behind the steering wheel. I used a T20 or T25 torx driver. A torx bit in a driver handle will work. What ever you have should work. Once you get it, the top pops right off, twist it to the right, and you can see all the good stuff that used to be hidden, including the multifunction switch.
Remove the Multifunction Switch:
There are two Torx screws holding the multifunction switch in place. The first one is on top, and easy to get to. Take that out.
The second is where you are going to use the torx bit and the mini-ratchet. This will take time, and probably be frustrating. Someone to hold a light just right will help. With the mini-ratchet it went easy.
See the bundle of wiring heading into the dash? There is a cable tie right ther. Cut it.
Now you get to move the drivers seat all the way back, recline it fully, turn yourself around, and take a small screwdriver with you, the cutters, and a light, and turn yourself upside down and slide under there sall the way looking up inside. Have the new switch where you can reach it.
There are two plugs that need to be undone. Cut the remaining cable ties. There is a white plastic loop used to route the wiring. You need to squeeze closed the 'hook' part of it using the needlenose pliers, and then push it out. Once you see it, it's pretty self explanatory.
The first plug is about 12 inches or so down the wiring. The part that belongs to the multifunction switch is the female port. You'll need to pry up the latch, and separate the plug out. Easy.
The last is an interesting one. There is a huge plug with a white handle. You'll need to squeeze tabs on either side of the box, which will allow you to rotate the handle down towards you, then all the way back around. Push the connector towards the floor board and it will come off the hangar. Use your small screwdriver and pry gently on the top side of the connector. There is a small latch on either side, but you need to pry the edge of the connector up, not just a latch. Once that's done, push away on the plug while pulling out. It comes pretty easy, so if you're pulling really hard, try wiggling it. It does NOT just pull straight out; you do have to push back on it a little bit.
That's it! Now, just pull the switch out, and it's time to reinstall.
Reinstall the Multifunction Switch
This is pretty easy; everything you just did, but in reverse. Thread the wiring harness down through where it belongs, and then plug things in.
The big plug goes first. It will go in as easy as it came out. Then, just rotate the handle back, and it's locked in place. Put it back on the hangar Route the wiring up and over the steering column. Plug the last connection together, and then snap the harness into that plastic loop we opened up earlier. Use a couple of cable of ties and make it look like it did before you turned yourself upside down.
Now, as you go to put the multifunction switch in place, take a look at something. This is important. If you've got the switch facing you, there is a small bronze switch on that face there, which can be pressed in and will bounce back. This is where you make the connection to the clockspring, and you must take care to keep that pressed in while maneuvering the multifunction switch into place. Hook the top right side on first, and drop the handle side down.
Screw the Torx screw into the top first. Snug it down. This will help line up the other Torx screw. Now it's time to get that second one back in. Again, this will take some time, but once it's done, the hard stuff is over.
Check it out right now before you go any further to make sure everything is working properly.
Re-assembly
Now it's just a matter of putting everything together. Start with screwing the top half of the steering column cover back down. Once that's tight, hook the top and bottom together again, and then snap the bottom back into place. Put the 2 torx head bolts back in. Snap the dash trim back into place. You will need to put the gear shifter into 2 or 3 again, and tilt the column appropriately. Plug the hazard switch in, and then twist and convince the switch to get back in there where it belongs. Then, bit by bit, just encourage it back into place.
You'll need to take a flat bladed tool to pry the rubber flashing around the ignition switch back into place. I used a normal (flat-headed) screwdriver bit.
Screw the 2 screws back in the ends.
Next comes the steering column filler. Easy. Then that black piece over your feet that just snaps in. Put the fuse panel cover back on.
All done! Go for a ride, make sure everything works. This is a great project, and could save you hundreds, compared to having it done by a mechanic.
Pictures will be added tomorrow. It's late, and I have to get some sleep. They are edited and uploaded to my photobucket account.
http://s243.photobucket.com/albums/f...imidator%20SS/
Last edited by RocknSS04; Feb 15, 2010 at 08:19 PM.


Joined: Aug 2008
Posts: 722
From: Philadelphia, PA
Thanks for the writeup Wayne.
Both of my Monte's have had issues with the turn signal switch, but the first one was covered under the factory warranty.
Right now I've been having an odd issue switching back and forth between low and high beams (goes right to high in one click, have to click a few times to go back to low), and I was a bit shocked when I called the dealer for a price on the part (which was about $550).
I picked up a switch form Morad, and will be attempting this in the spring.
Perhaps this post could be made into a post in the "How-To" section for the sixth gens?
-Riggs.


Joined: Jul 2010
Posts: 2
This was indeed a nice write up in the Turn Signal Switch Repair of the 2004 Monte Carlo. The pictures really made things vividly clear on what to do and the part's function in this one. I hope you would continue to help others thru this DIY or write up in the field of car parts. Thanks!

Joined: Oct 2011
Posts: 2
Hi BiggRiggs
I know this posting is not current anymore but you just described exactly the problem switching off the bright lights in an 04 Monte Carlo I just bought, it goes to brights in one click every time but can take 30 more click attempts to go back onto the normal lights.
Was the switch the culprit or was something else the issue like a relay or something? Thanks Steve
Thanks for the writeup Wayne.
Both of my Monte's have had issues with the turn signal switch, but the first one was covered under the factory warranty.
Right now I've been having an odd issue switching back and forth between low and high beams (goes right to high in one click, have to click a few times to go back to low), and I was a bit shocked when I called the dealer for a price on the part (which was about $550).
I picked up a switch form Morad, and will be attempting this in the spring.
Perhaps this post could be made into a post in the "How-To" section for the sixth gens?
-Riggs.
Both of my Monte's have had issues with the turn signal switch, but the first one was covered under the factory warranty.
Right now I've been having an odd issue switching back and forth between low and high beams (goes right to high in one click, have to click a few times to go back to low), and I was a bit shocked when I called the dealer for a price on the part (which was about $550).
I picked up a switch form Morad, and will be attempting this in the spring.
Perhaps this post could be made into a post in the "How-To" section for the sixth gens?
-Riggs.


Joined: Apr 2010
Posts: 12,608
From: Mentor, Ohio

I have changed that turn signal stalk on my '94 Grand Am about 4 times over the years I've had that car (since '03). That doesn't count the other mid-90's Grand Ams I've done it on (I can do the job in roughly 15 minutes, maybe 20, and I know just the tools to get for it from my garage). Every time I finally broke down and changed mine, I lost the ability to click my high beams on (I could hold the wand forward to keep the highs on). But since I hardly use high beams, I did not worry until I had a bigger problem (fogs turn on, but not head lights or turn signals fail). First one I bought was $70 from a local parts store, then a warranty swap, a $10 salvage one and lastly, I just installed one I pulled from my friend's '95 when we junked it this year (his was roughly 6 months old).
Due to age and mileage, I am trying to keep the Grand Am on the road safely as reasonably cheap as I can. Next step may be to rig an auxiliary headlight switch else where.
My Monte currently has the can't click the high beams issue. Currently, at the ridiculous price places want for that part RocknSS04 mentioned), I am holding off until I have a bigger issue (or I find a cherry donor in the salvage yards). But it is truly annoying.


Mine has taken a dump, but I don't know why you guys called it a dimmer switch. Your dimmer switch is on the dash on the far left. But yeah mine won't give me brights any more, and it doesn't like to signal turns all the time. It's time to replace it but it's sooooo damn expensive.