
New Custom Fenderwell Intake! Pics!


I am so mad that I typed this thread and submitted it and it says page cannot be found lol. Anyways I got bored and decided to make a new fenderwell intake.

In the picture above is my old black plastic duct and my new aluminum duct. Also in the picture is fiberglass insulation, k&n air filter, and aluminum tape. As you can see I started wrapping the insulation around the aluminum duct and secured it with aluminum tape.

It took a while but I finally finished. I had to quit about 3 times

Next I started wrapping the insulation in aluminum tape to make it look a little better. Heres a pic with the k&n air filter installed.

After a lot of yawning and swearing I made it half way. I gave up again for a few minutes and said I have nothing better to do so I went back lol

I finally achieved what I wanted to do! It was way longer than my original plastic duct so I had to remove some insulation and push some in...

I had plenty of insulation left and tape so I decided to insulate the stock air sensor holder thingy also to get all of my money out of it. Poked a hole in the insulation for the sensor.

Heres a picture of the stock air thingy on the tb with the sensor attached. Looks tacky huh? lol. Im so glad that you cant see the coolant leaking on top of my tranny

I got the fenderwell intake all mounted up at the bottom using tie-wraps. I used extra just in case some break.

Im making progress, heres a snapshot of the intake installed.

So I then attached the two parts and decided to insulate the connector thingys also to make it look like 1 unit.

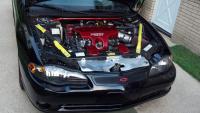
Heres my finished product! Its not the best looking fenderwell in the world but it does its job. Idle seems to be the same but when driving 30-60mph it doesnt bog as much as it did with the old fenderwell.
In the picture above is my old black plastic duct and my new aluminum duct. Also in the picture is fiberglass insulation, k&n air filter, and aluminum tape. As you can see I started wrapping the insulation around the aluminum duct and secured it with aluminum tape.
It took a while but I finally finished. I had to quit about 3 times
Next I started wrapping the insulation in aluminum tape to make it look a little better. Heres a pic with the k&n air filter installed.
After a lot of yawning and swearing I made it half way. I gave up again for a few minutes and said I have nothing better to do so I went back lol
I finally achieved what I wanted to do! It was way longer than my original plastic duct so I had to remove some insulation and push some in...
I had plenty of insulation left and tape so I decided to insulate the stock air sensor holder thingy also to get all of my money out of it. Poked a hole in the insulation for the sensor.
Heres a picture of the stock air thingy on the tb with the sensor attached. Looks tacky huh? lol. Im so glad that you cant see the coolant leaking on top of my tranny
I got the fenderwell intake all mounted up at the bottom using tie-wraps. I used extra just in case some break.
Im making progress, heres a snapshot of the intake installed.
So I then attached the two parts and decided to insulate the connector thingys also to make it look like 1 unit.
Heres my finished product! Its not the best looking fenderwell in the world but it does its job. Idle seems to be the same but when driving 30-60mph it doesnt bog as much as it did with the old fenderwell.


Its not finished yet. Im thinking about making it into a cai. Im at Home Depot as I type this looking at items...


Im still working on it, Im making the box right now hopefully I will finish tonight. So yep that means it wont be a fenderwell intake when I finish but just a homemade cold air intake if I can build it correctly.
 .
.
I cant afford to do a dyno lol. Too many bills at the moment... Sorry :L
