
Mod Guide: How To: L67 Swap


Thread Starter


Joined: Feb 2008
Posts: 6,471

Revised 3-10-2010
This walkthrough is primarily intended for 5th generation (1995-1999) Monte Carlo's and 2nd generation (1995-2001) Lumina's-regardless what engine your car came with. However there are many similarities between the 5th generation and the later 6th generation (2000-2007) so much of this guide is useful to all FWD Monte Carlos. Since I have not done a swap on a 6th gen monte, I will not be commenting on the differences in this thread. One thing to note for the 1995 people- you do not have a full obd2 setup, so I'm assuming at the least that you'll need to do some wiring at the obd port under the dash- maybe a little more inside (since you replace most all of the engine bay wiring anyways)- but since I've not done a 95 personally, I suggest you research more on them.
Also, if you already have a 3800, you may be better off doing what is called a "top swap" and putting just the supercharged top end parts on your current engine- do a search to learn more about that, this guide will only cover the complete swap.
Intro/Basic Info
What is this L67 swap everyone talks about?
A L67 is GM's series 2 3800 supercharged engine found in vehicles like the Grand Prix GTP, Regal GS, and many other vehicles. For most people it should more technically be called the L67 + 4t65HD swap since most upgrade their transmission at the same time to the heavy duty version (since more than half of the 5th gen montes came with a 4t60e, its a good idea).
Here is some basic nomenclature to familiarize yourself with terms in this thread:
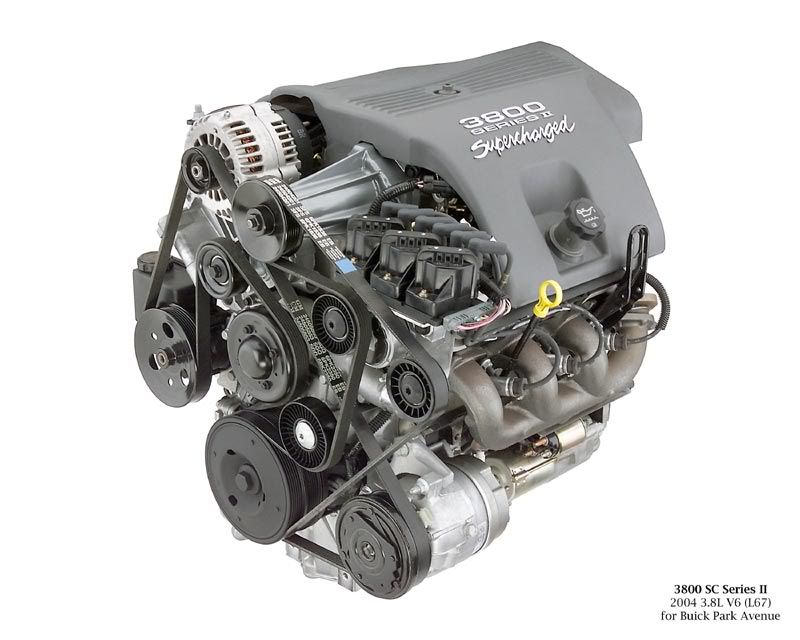
L67- supercharged series 2 3800 (240 hp)
L36- naturally aspirated series 2 3800 (200 hp)
L67 Pic
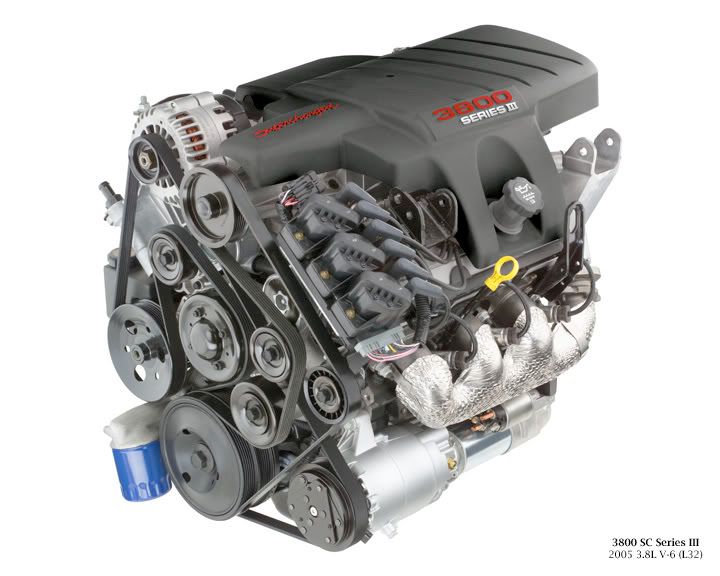
L32- supercharged series 3 3800 (260 hp)
L26- naturally aspirated series 3 3800 (200 hp?)
L32 Pic
Why swap to this engine instead of something else?
Aftermarket- the aftermarket for the 3800 engine is by far the most abundant for any bolt in GM engine (and that pretty much limits you to the 60* V6's and the 3800). You can buy everything from a stroker kit, to a turbo kit, to larger superchargers for them in bolt on form. Since practically every possible setup has already been explored, you can easily follow the blueprint of others. This also helps you know ahead of time what you can expect if you spend $1k on a swap, and another $1k in mods- etc.
Reliability- the 3800 stock bottom end has been taken all the way down to the high 8 seconds in the 1/4 mile, and up to roughly 1000 crank horsepower without failure. They also commonly achieve 200k+ miles on daily drivers as well. The engine was built tough for police and taxi service, and it shows.
Availability- the 3800 was produced so much, that even in supercharged form, they are very easy to find. It is to the point that when people mess up a tune or modding and destroy an engine, that they simply buy another used one and drop it in. Practically every local junkyard will have some 3800 powered vehicle in it.
Ease of swapping- the 3800 (supercharged or not) literally bolts in with stock engine mounts, there is no custom fabrication for it to fit. It also is 99.9% electrically plug and play (for the L67- 100% plug and play with the L36). The only thing that needs to be "custom" made, is a passenger side axle- which can be done in your garage easily with a $10 tool- because its not really all that custom, its just a hybrid of part of your old axle with part of the new axle. You're not going to get any higher power engine to just drop in place like this.
Power- I know, you're probably thinking 240hp, so what? Well- for those who wish to leave it stock, it is capable of high 14s-low 15s in a 5th gen monte; but where the L67 really shines is in its cheap aftermarket bolt ons that make big power. 13's have been done for $1000 in basic bolt ons that you can do in your driveway. The engine is extremely torquey- and that makes up for its relatively low (compared to newer variable valve timing dohc V6's) hp rating. Everyone knows that boosted cars are typically much more responsive to mods than NA cars.
What kind of performance can I expect- and how far can this swap take me?
If you're doing a completely stock swap, and if you're just a casual racer, you can expect mid to low 15s in street trim, unprepared in nearly any climate (this is pretty conservative). However, 14 second time slips *should* be attainable- but will depend on how much you track prep your car, how sticky the track is, what altitude you're racing at, etc. At the very most extreme end of modding- the current record for a 3800 FWD is 8.658 @ 158.97mph. Realistically, most of the 8, 9 and 10 second 1/4 mile 3800s are heavily track prepared and are heavily modified- and most take a large amount of money to get there. However, 11, 12, and 13 second 1/4 mile times are much more realistic and are all VERY common. There are proven mod plans to get down nearly to 10 seconds since so many L67's have been built up over the years. It all depends how deep you want to go, and how much you want to spend- but this is just an illustration that there is much room for improvement that is proven and tried. Here's a link to the curret 25 quickest FWD 3800s:
3800Pro.com Forum
Want more proof? Here are a couple of the record setting videos:
ZZP's 8.65 run
ZZP's 750 WHP dyno
Intense's 10 second turbo setup
to see what you could have more realistically, here are some vids of more normal setups (keep in mind that being able to hear that 'blower whine' is simply a $40 air filter away (who would use a stock air filter box on an engine swap anyways?):
blower whine at the track, from inside and outside (yes, a stock L67 swap with
any cone filter stuck on it will sound like this)
(blower whine with stock airbox vs aftermarket intake)
some other 5th gen montes with L67 swaps:
L67 monte vs cam'd fox mustang
L67 monte running low 13s
... ok shameless plug, this is my car Posted Image
Gathering necessary parts
You should be looking to spend anywhere from $500 to $1500 on a complete powertrain depending on mileage and condition (this is not the total for the whole swap- just the engine/transmission). If you're up in the $1500 area- you should either be getting a complete (however physically totaled) car or a VERY low mileage L67/L32. Keep in mind that KBB price for a used 1998 Grand Prix GTP- private party in 'fair' condition with 100,000 miles is currently $2500 as of February 2010, and that is for a complete, running car. So don't let people try to fool you into paying anywhere near that for a totalled one or a powertrain alone.
It is best to primarily look at 98 to 03 Grand Prix GTP's for several reasons: they're very common, they're a W-body so they mount the same, the 97s are an oddball year with screwy wiring and crack prone heads (as are some early 98s), 04+ are L32s which tend to bring a higher price and have other differences as well making the swap more difficult.
It is best to buy everything as a complete package- engine/trans/pcm/axles etc- out of a running car (or one that ran before it was wrecked) so that you know all the stuff is there. Ones that have sat in the junkyard for awhile, or ones on ebay tend to be missing minor parts that may be difficult to have to buy afterwards (especially because since you didn't remove them- you'll probably never know they're missing).
Try to find a power train under 100k miles (you don't want something too old to swap in or you'll end up in the same spot in another 50-100k miles), and I would also recommend trying to get a powertrain that hasn't been modified or raced. If you do buy a previously modified engine- at least check the pistons with a boreoscope or pull off the heads- L67s commonly chip pistons when people run too small a pulley for their modifictions.
What you'll need (parts borrowed from l67swap.com)
1. L67 3800 complete engine
2. 4T65E-HD Transmission
3. 4T65E HD Transmission Lines (at least to the rubber part)- you can use 98/99 Monte Z34 lines
4. 4T65E HD Transmission Axles* (you only technically need the innermost part of each)
5. L67 PCM
6. L36 High-Pressure Power Steering Line
7. L36 Monte Carlo or Lumina engione bay wiring harness (98-99) (much much easier to use than the harness that comes
with the L67)
8. Down pipe from a 98/99 Monte Z34- or custom aftermarket to clear firewall
9. Walbro High-Pressure Fuel Pump 255 ltr/hr (stock pump will work fine for basic bolt on applications)
10. Upper and Lower Radiator Hoses (the ones for a 98 or 99 Monte Z34 work well)
11. Heater core lines (you can buy the universal tubing, or buy it specifically formed for a
98/99 Monte Z34)
12. New Belts (probably a good idea, especially if the engine had been sitting awhile)
13. Some sort of aftermarket intake- FWI, CAI, something
14. ZZP's "L67 Swap" wiring kit (optional, all it includes is a MAP harness extension that
doesn't plug in well, and the plug for the BBV w/ 2 loose wires which are far too short; but the
BBV can operate just fine without the electrical solenoid- just cap the vac line that is supposed
to go to it). But this may be easier for first timers
15. Fresh fluids- (power steering, coolant, oil, transmission fluid)
*You can use a 98/99 Monte Z34 drivers side axle- however the passenger side axle will need to be custom made. You need to get the inner axle part from the new transmission- and you'll use your stock shaft and outer tripot to mate to it- more on this later.
Part Sources
ZZPerformance (L67 performance parts- wiring swap kit) ZZPerformance | 3800 Performance Parts | Largest Aftermarket Supplier!
Morad Parts Company (Wbody specific junkyard) Morad Parts Company Quality Used Auto Parts
Car-Part Junkyard Search (To find parts at local junkyards) Car-Part.com--Used Auto Parts Market
Ebay (online auctions, can sometimes find powertrains on here) Electronics, Cars, Fashion, Collectibles, Coupons and More | eBay
Clubgp (large Grand Prix forums with a huge classified section) Club Grand Prix! Your online Grand Prix & G8 resource (click on forums, then down to classifieds).
What kind of total cost would this bring me to?
That really depends how much you got your power train for. That will be a key determining factor. Some people get a complete engine and transmission under $500, and others have paid $2000 for a complete totaled car (and make some money back selling off other parts). You should budget somewhere in the $2000-3000 range out the door. It can definitely be done for under $2k, but the last thing you want to do is run out of money mid swap and have a non-running car.
Also, since you probably don't know the intimate history of the power train- it is possible something may be broken. It could be as simple as a bad alternator- or as bad as a blown transmission.
You just want to leave yourself some buffer room just in case. Just remember, you don't lose the extra money if you don't use it. If you come in under budget- just put the money back in the bank, or spend it on modifications for the car.
It is best to ONLY do this swap if you have another reliable car to drive. Do not attempt this swap unless you have some kind of backup transportation. No one can anticipate all the possible bugs and problems you run into- and it is possible that you may need to spend weeks tracking down bugs and such afterwards. If you have experience doing engine swaps and such, it's not as big of a deal, but for a first timer- some sort of alternate transportation is a must. Imagine the worst case scenario that you did not know how to inspect the new engine, and it happened to be seized up and you couldn't get ahold of the seller- what are you going to do? You really don't want the pressure of having no other way to get to work the next day- I reccomend this for anybody doing anything major to their engine- a cam swap, head swaps, etc- if it is your first time, have some sort of plan B.
How much time does it take?
This is highly dependent on your skill- available tools, if you have any help, and other things. People who have done this before can generally get it done in about 2 days (I could probably do a stock L67 swap in 1 very very full day flying through it, but that is really pushing it). For a first timer is would be best to budget a week, just in case. When I did my swap, it took me almost 7 days- but I was doing 99.9% of the work myself (without air tools), I was working most of those days, and my swap was far from stock- and when there was much less information available. The bad thing is, you're doing a semi-custom swap, you have a powertrain of unknown quality, and you have a lot of potentials for installer error.
If you're also installing aftermarket headers- or adding other aftermarket parts- you may need to extend that to account for the extra work. Just keep in mind that just because you get everything in and installed doesn't necessarily mean you're done, any swap can run into unforseen bugs.
What kind of tools do you need?
1. Full socket/ratchet/wrench set
2. Jack/jack stands
3. Engine hoist w/ chain
4. Screwdrivers and hammers
5. CV boot crimp pliers (if you're building your own axle)
6. Torx socket for caliper brackets (forgot the size- its a big one like a T60 or something)
7. Axle nut socket- just a large regular socket (forgot size- its like a 34mm or so)
8. Torque wrench
9. Fuel line disconnects (little circle push pieces to release clips)

10.Big breaker bar or a pipe for your ratchet- some of those suspension bolts can be nasty
11.Some sort of organization bags or something for the bolts- you'll be taking a ton of stuff
off, and you really need to watch where everything goes.
12.A fluid catch container (you'll have a lot of old fluid that will need to be disposed of).
13.Torque specs for the engine mounts and the front suspension pieces
*This job can be completed entirely without air tools- although they are very helpful, they are far from a necessity.
Step by step Walkthrough
This walkthrough is primarily intended for 5th generation (1995-1999) Monte Carlo's and 2nd Generation (1995-2001) Lumina's.
Its not 100% perfect and is not a substitute for mechanical ability. A 95 would be similar- however with it originally being OBD 1, you may have to do some modification at the OBD port to make it functional. This walkthrough does not cover the wiring specific needs unique to a 1995 Monte Carlo however this information can be found with some simple research and asking around the forums.
Also, keep in mind that as the years changed- the wiring pinout changed slightly for the C100 connector (the big plug on the firewall where the engine wiring passes into the cabin)- so you really should try and find the C100 pinout for both your year/trim and the year/trim of the harness you're using so you know what doesn't match up.
Before you start
Ensure the vehicle is in park and is cooled down.
Ensure the parking brake is engaged.
Have enough jack stands to hold the car up for extended periods (Never use a jack to hold a car)
Take off the negative terminal on the battery.
Wear proper protective clothing (gloves, eye protection, etc)
Have a fire extinguisher handy (you will be working with fuel and other combustibles)
Have containers for all of your waste fluids ready (oil, coolant, etc)
Have a friend to help ? this is optional but makes things much easier.
You really should do the modifications to your C100 plug before you start, so you can just drop it in and go later on.
For me, I cut the wires a couple inches from the plug so I could reattach if necessary, and I taped both ends well. When I got done with everything- I taped over the whole bundle before putting it back in the loom. I have a 96 LS and used a 98 Lumina 3800 police car harness, so here is what I had to do: cut the A1 (changed from IGN to change oil indicator), cut the B1 (changed from B+ to fuel gage sensor), cut the B2 (changed from 'cruise engaged' to a pcm sensor ground), cut the C2 (changed from P/N switch signal to a 5 volt reference wire), cut the J1 (changed from the trans select switch to a fuel gage signal). I don't remember doing any extra grounding or anything- and those are just based off a list I recently saw- so it may not be exactly how my car is, but that is how it should be for my car. Thats why this is important to find the C100 pinout for your car and the new one- you don't want mixed signals, and you don't want to be giving power straight to a ground. I remember blowing my PCM fuse from not cutting one of these wires.
My other suggestion is another possible piece of harness prep- take your new harness- lay it out like it would be on the new engine (use that big C100 plug as reference)- find the alternator plug, and make sure that plugs into your new alternator.
Next, find your fan plugs- and make sure those plug into your stock fans. On mine, I had to buy a new plug to solder on for my alternator, and I had to cut off and solder on my old fan plugs because none of those 3 fit on my harness (I'm assuming its because it was a police lumina- but make sure you try this first).
Lastly- look at your new engine and transmission- if there are any parts that look bad (ie water pump that looks like its been leaking, or oil pan, etc) - change that now. Also, get any cleaning done that you want done now while its still out.
Once its in the engine bay, it'll be much harder to clean so thoroughly.
C100 Modification
Here is what the C100 plug looks like:
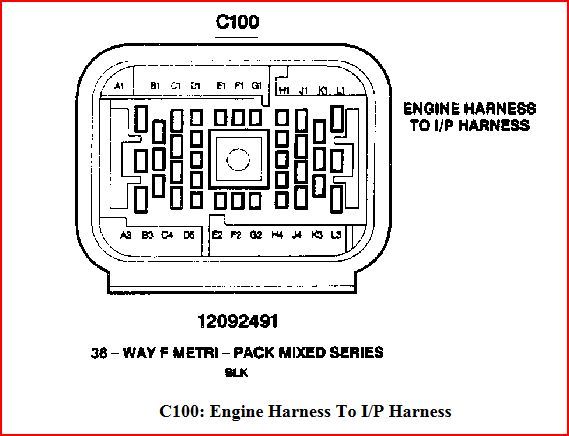
I know it is rather blurry, but it is just like playing battle ship. If you go across the top of the plug, each vertical column is labelled by a letter (starting with A on the left, and ending with L on the right). Then, each pin is numbered from top to bottom- starting with 1 at the top.
So the top left pin on the plug is A1. Just below it is A2. The bottom left pin is A3 (notice how some letter columns will have more or less numbers because the pins in each column vary).
On my swap- I went from a 96 3100 to a 98 3800 harness, and I had to change these things (all other pins were the same):
(pin #)/(what it was on my car)/(what it was on the new harness)/(what I did with it)
A1 / PNK-WHT IGN to Stoplamp Switch / GRY change oil indicator / cut it
A3 / empty / DK GRN fuel tank pressure sensor / nothing
B1 / RED B+ to fuse block / PPL fuel level sensor / cut it
B2 / WHT cruise engaged to pcm / BLK pcm sensor ground / cut and ground black wire on harness
C1 / WHT EVO feed / empty / nothing
C2 / ORN-BLK P/N switch signal / GRY 5 volt reference / cut it
J1 / DK Blue Trans select switch / ORN fuel gage signal / cut it
K3 / BRN/WHT EVO output / empty / nothing
L1 / empty / WHT evap cannister vent out / nothing
Please keep in mind that I did this based off some C100 pinouts I got after the fact, I do not remember exactly what I did, but I imagine it was similar. I cut the wires that had different functions (make sure to leave yourself some wire to resolder it in case some info was incorrect)- and left wires that were empty on one or the other harness.
It seems like each year and model has some differences- and since I have no real way of posting the information I have on the pinouts short of manually copying each line- just send me a PM with what car/engine you have now and what car/engine your harness came from (5th gen montes only).
This walkthrough is primarily intended for 5th generation (1995-1999) Monte Carlo's and 2nd generation (1995-2001) Lumina's-regardless what engine your car came with. However there are many similarities between the 5th generation and the later 6th generation (2000-2007) so much of this guide is useful to all FWD Monte Carlos. Since I have not done a swap on a 6th gen monte, I will not be commenting on the differences in this thread. One thing to note for the 1995 people- you do not have a full obd2 setup, so I'm assuming at the least that you'll need to do some wiring at the obd port under the dash- maybe a little more inside (since you replace most all of the engine bay wiring anyways)- but since I've not done a 95 personally, I suggest you research more on them.
Also, if you already have a 3800, you may be better off doing what is called a "top swap" and putting just the supercharged top end parts on your current engine- do a search to learn more about that, this guide will only cover the complete swap.
Intro/Basic Info
What is this L67 swap everyone talks about?
A L67 is GM's series 2 3800 supercharged engine found in vehicles like the Grand Prix GTP, Regal GS, and many other vehicles. For most people it should more technically be called the L67 + 4t65HD swap since most upgrade their transmission at the same time to the heavy duty version (since more than half of the 5th gen montes came with a 4t60e, its a good idea).
Here is some basic nomenclature to familiarize yourself with terms in this thread:
L67- supercharged series 2 3800 (240 hp)
L36- naturally aspirated series 2 3800 (200 hp)
L67 Pic
L32- supercharged series 3 3800 (260 hp)
L26- naturally aspirated series 3 3800 (200 hp?)
L32 Pic
Why swap to this engine instead of something else?
Aftermarket- the aftermarket for the 3800 engine is by far the most abundant for any bolt in GM engine (and that pretty much limits you to the 60* V6's and the 3800). You can buy everything from a stroker kit, to a turbo kit, to larger superchargers for them in bolt on form. Since practically every possible setup has already been explored, you can easily follow the blueprint of others. This also helps you know ahead of time what you can expect if you spend $1k on a swap, and another $1k in mods- etc.
Reliability- the 3800 stock bottom end has been taken all the way down to the high 8 seconds in the 1/4 mile, and up to roughly 1000 crank horsepower without failure. They also commonly achieve 200k+ miles on daily drivers as well. The engine was built tough for police and taxi service, and it shows.
Availability- the 3800 was produced so much, that even in supercharged form, they are very easy to find. It is to the point that when people mess up a tune or modding and destroy an engine, that they simply buy another used one and drop it in. Practically every local junkyard will have some 3800 powered vehicle in it.
Ease of swapping- the 3800 (supercharged or not) literally bolts in with stock engine mounts, there is no custom fabrication for it to fit. It also is 99.9% electrically plug and play (for the L67- 100% plug and play with the L36). The only thing that needs to be "custom" made, is a passenger side axle- which can be done in your garage easily with a $10 tool- because its not really all that custom, its just a hybrid of part of your old axle with part of the new axle. You're not going to get any higher power engine to just drop in place like this.
Power- I know, you're probably thinking 240hp, so what? Well- for those who wish to leave it stock, it is capable of high 14s-low 15s in a 5th gen monte; but where the L67 really shines is in its cheap aftermarket bolt ons that make big power. 13's have been done for $1000 in basic bolt ons that you can do in your driveway. The engine is extremely torquey- and that makes up for its relatively low (compared to newer variable valve timing dohc V6's) hp rating. Everyone knows that boosted cars are typically much more responsive to mods than NA cars.
What kind of performance can I expect- and how far can this swap take me?
If you're doing a completely stock swap, and if you're just a casual racer, you can expect mid to low 15s in street trim, unprepared in nearly any climate (this is pretty conservative). However, 14 second time slips *should* be attainable- but will depend on how much you track prep your car, how sticky the track is, what altitude you're racing at, etc. At the very most extreme end of modding- the current record for a 3800 FWD is 8.658 @ 158.97mph. Realistically, most of the 8, 9 and 10 second 1/4 mile 3800s are heavily track prepared and are heavily modified- and most take a large amount of money to get there. However, 11, 12, and 13 second 1/4 mile times are much more realistic and are all VERY common. There are proven mod plans to get down nearly to 10 seconds since so many L67's have been built up over the years. It all depends how deep you want to go, and how much you want to spend- but this is just an illustration that there is much room for improvement that is proven and tried. Here's a link to the curret 25 quickest FWD 3800s:
3800Pro.com Forum
Want more proof? Here are a couple of the record setting videos:
to see what you could have more realistically, here are some vids of more normal setups (keep in mind that being able to hear that 'blower whine' is simply a $40 air filter away (who would use a stock air filter box on an engine swap anyways?):
any cone filter stuck on it will sound like this)
some other 5th gen montes with L67 swaps:
Gathering necessary parts
You should be looking to spend anywhere from $500 to $1500 on a complete powertrain depending on mileage and condition (this is not the total for the whole swap- just the engine/transmission). If you're up in the $1500 area- you should either be getting a complete (however physically totaled) car or a VERY low mileage L67/L32. Keep in mind that KBB price for a used 1998 Grand Prix GTP- private party in 'fair' condition with 100,000 miles is currently $2500 as of February 2010, and that is for a complete, running car. So don't let people try to fool you into paying anywhere near that for a totalled one or a powertrain alone.
It is best to primarily look at 98 to 03 Grand Prix GTP's for several reasons: they're very common, they're a W-body so they mount the same, the 97s are an oddball year with screwy wiring and crack prone heads (as are some early 98s), 04+ are L32s which tend to bring a higher price and have other differences as well making the swap more difficult.
It is best to buy everything as a complete package- engine/trans/pcm/axles etc- out of a running car (or one that ran before it was wrecked) so that you know all the stuff is there. Ones that have sat in the junkyard for awhile, or ones on ebay tend to be missing minor parts that may be difficult to have to buy afterwards (especially because since you didn't remove them- you'll probably never know they're missing).
Try to find a power train under 100k miles (you don't want something too old to swap in or you'll end up in the same spot in another 50-100k miles), and I would also recommend trying to get a powertrain that hasn't been modified or raced. If you do buy a previously modified engine- at least check the pistons with a boreoscope or pull off the heads- L67s commonly chip pistons when people run too small a pulley for their modifictions.
What you'll need (parts borrowed from l67swap.com)
1. L67 3800 complete engine
2. 4T65E-HD Transmission
3. 4T65E HD Transmission Lines (at least to the rubber part)- you can use 98/99 Monte Z34 lines
4. 4T65E HD Transmission Axles* (you only technically need the innermost part of each)
5. L67 PCM
6. L36 High-Pressure Power Steering Line
7. L36 Monte Carlo or Lumina engione bay wiring harness (98-99) (much much easier to use than the harness that comes
with the L67)
8. Down pipe from a 98/99 Monte Z34- or custom aftermarket to clear firewall
9. Walbro High-Pressure Fuel Pump 255 ltr/hr (stock pump will work fine for basic bolt on applications)
10. Upper and Lower Radiator Hoses (the ones for a 98 or 99 Monte Z34 work well)
11. Heater core lines (you can buy the universal tubing, or buy it specifically formed for a
98/99 Monte Z34)
12. New Belts (probably a good idea, especially if the engine had been sitting awhile)
13. Some sort of aftermarket intake- FWI, CAI, something
14. ZZP's "L67 Swap" wiring kit (optional, all it includes is a MAP harness extension that
doesn't plug in well, and the plug for the BBV w/ 2 loose wires which are far too short; but the
BBV can operate just fine without the electrical solenoid- just cap the vac line that is supposed
to go to it). But this may be easier for first timers
15. Fresh fluids- (power steering, coolant, oil, transmission fluid)
*You can use a 98/99 Monte Z34 drivers side axle- however the passenger side axle will need to be custom made. You need to get the inner axle part from the new transmission- and you'll use your stock shaft and outer tripot to mate to it- more on this later.
Part Sources
ZZPerformance (L67 performance parts- wiring swap kit) ZZPerformance | 3800 Performance Parts | Largest Aftermarket Supplier!
Morad Parts Company (Wbody specific junkyard) Morad Parts Company Quality Used Auto Parts
Car-Part Junkyard Search (To find parts at local junkyards) Car-Part.com--Used Auto Parts Market
Ebay (online auctions, can sometimes find powertrains on here) Electronics, Cars, Fashion, Collectibles, Coupons and More | eBay
Clubgp (large Grand Prix forums with a huge classified section) Club Grand Prix! Your online Grand Prix & G8 resource (click on forums, then down to classifieds).
What kind of total cost would this bring me to?
That really depends how much you got your power train for. That will be a key determining factor. Some people get a complete engine and transmission under $500, and others have paid $2000 for a complete totaled car (and make some money back selling off other parts). You should budget somewhere in the $2000-3000 range out the door. It can definitely be done for under $2k, but the last thing you want to do is run out of money mid swap and have a non-running car.
Also, since you probably don't know the intimate history of the power train- it is possible something may be broken. It could be as simple as a bad alternator- or as bad as a blown transmission.
You just want to leave yourself some buffer room just in case. Just remember, you don't lose the extra money if you don't use it. If you come in under budget- just put the money back in the bank, or spend it on modifications for the car.
It is best to ONLY do this swap if you have another reliable car to drive. Do not attempt this swap unless you have some kind of backup transportation. No one can anticipate all the possible bugs and problems you run into- and it is possible that you may need to spend weeks tracking down bugs and such afterwards. If you have experience doing engine swaps and such, it's not as big of a deal, but for a first timer- some sort of alternate transportation is a must. Imagine the worst case scenario that you did not know how to inspect the new engine, and it happened to be seized up and you couldn't get ahold of the seller- what are you going to do? You really don't want the pressure of having no other way to get to work the next day- I reccomend this for anybody doing anything major to their engine- a cam swap, head swaps, etc- if it is your first time, have some sort of plan B.
How much time does it take?
This is highly dependent on your skill- available tools, if you have any help, and other things. People who have done this before can generally get it done in about 2 days (I could probably do a stock L67 swap in 1 very very full day flying through it, but that is really pushing it). For a first timer is would be best to budget a week, just in case. When I did my swap, it took me almost 7 days- but I was doing 99.9% of the work myself (without air tools), I was working most of those days, and my swap was far from stock- and when there was much less information available. The bad thing is, you're doing a semi-custom swap, you have a powertrain of unknown quality, and you have a lot of potentials for installer error.
If you're also installing aftermarket headers- or adding other aftermarket parts- you may need to extend that to account for the extra work. Just keep in mind that just because you get everything in and installed doesn't necessarily mean you're done, any swap can run into unforseen bugs.
What kind of tools do you need?
1. Full socket/ratchet/wrench set
2. Jack/jack stands
3. Engine hoist w/ chain
4. Screwdrivers and hammers
5. CV boot crimp pliers (if you're building your own axle)
6. Torx socket for caliper brackets (forgot the size- its a big one like a T60 or something)
7. Axle nut socket- just a large regular socket (forgot size- its like a 34mm or so)
8. Torque wrench
9. Fuel line disconnects (little circle push pieces to release clips)
10.Big breaker bar or a pipe for your ratchet- some of those suspension bolts can be nasty
11.Some sort of organization bags or something for the bolts- you'll be taking a ton of stuff
off, and you really need to watch where everything goes.
12.A fluid catch container (you'll have a lot of old fluid that will need to be disposed of).
13.Torque specs for the engine mounts and the front suspension pieces
*This job can be completed entirely without air tools- although they are very helpful, they are far from a necessity.
Step by step Walkthrough
This walkthrough is primarily intended for 5th generation (1995-1999) Monte Carlo's and 2nd Generation (1995-2001) Lumina's.
Its not 100% perfect and is not a substitute for mechanical ability. A 95 would be similar- however with it originally being OBD 1, you may have to do some modification at the OBD port to make it functional. This walkthrough does not cover the wiring specific needs unique to a 1995 Monte Carlo however this information can be found with some simple research and asking around the forums.
Also, keep in mind that as the years changed- the wiring pinout changed slightly for the C100 connector (the big plug on the firewall where the engine wiring passes into the cabin)- so you really should try and find the C100 pinout for both your year/trim and the year/trim of the harness you're using so you know what doesn't match up.
Before you start
Ensure the vehicle is in park and is cooled down.
Ensure the parking brake is engaged.
Have enough jack stands to hold the car up for extended periods (Never use a jack to hold a car)
Take off the negative terminal on the battery.
Wear proper protective clothing (gloves, eye protection, etc)
Have a fire extinguisher handy (you will be working with fuel and other combustibles)
Have containers for all of your waste fluids ready (oil, coolant, etc)
Have a friend to help ? this is optional but makes things much easier.
You really should do the modifications to your C100 plug before you start, so you can just drop it in and go later on.
For me, I cut the wires a couple inches from the plug so I could reattach if necessary, and I taped both ends well. When I got done with everything- I taped over the whole bundle before putting it back in the loom. I have a 96 LS and used a 98 Lumina 3800 police car harness, so here is what I had to do: cut the A1 (changed from IGN to change oil indicator), cut the B1 (changed from B+ to fuel gage sensor), cut the B2 (changed from 'cruise engaged' to a pcm sensor ground), cut the C2 (changed from P/N switch signal to a 5 volt reference wire), cut the J1 (changed from the trans select switch to a fuel gage signal). I don't remember doing any extra grounding or anything- and those are just based off a list I recently saw- so it may not be exactly how my car is, but that is how it should be for my car. Thats why this is important to find the C100 pinout for your car and the new one- you don't want mixed signals, and you don't want to be giving power straight to a ground. I remember blowing my PCM fuse from not cutting one of these wires.
My other suggestion is another possible piece of harness prep- take your new harness- lay it out like it would be on the new engine (use that big C100 plug as reference)- find the alternator plug, and make sure that plugs into your new alternator.
Next, find your fan plugs- and make sure those plug into your stock fans. On mine, I had to buy a new plug to solder on for my alternator, and I had to cut off and solder on my old fan plugs because none of those 3 fit on my harness (I'm assuming its because it was a police lumina- but make sure you try this first).
Lastly- look at your new engine and transmission- if there are any parts that look bad (ie water pump that looks like its been leaking, or oil pan, etc) - change that now. Also, get any cleaning done that you want done now while its still out.
Once its in the engine bay, it'll be much harder to clean so thoroughly.
C100 Modification
Here is what the C100 plug looks like:
I know it is rather blurry, but it is just like playing battle ship. If you go across the top of the plug, each vertical column is labelled by a letter (starting with A on the left, and ending with L on the right). Then, each pin is numbered from top to bottom- starting with 1 at the top.
So the top left pin on the plug is A1. Just below it is A2. The bottom left pin is A3 (notice how some letter columns will have more or less numbers because the pins in each column vary).
On my swap- I went from a 96 3100 to a 98 3800 harness, and I had to change these things (all other pins were the same):
(pin #)/(what it was on my car)/(what it was on the new harness)/(what I did with it)
A1 / PNK-WHT IGN to Stoplamp Switch / GRY change oil indicator / cut it
A3 / empty / DK GRN fuel tank pressure sensor / nothing
B1 / RED B+ to fuse block / PPL fuel level sensor / cut it
B2 / WHT cruise engaged to pcm / BLK pcm sensor ground / cut and ground black wire on harness
C1 / WHT EVO feed / empty / nothing
C2 / ORN-BLK P/N switch signal / GRY 5 volt reference / cut it
J1 / DK Blue Trans select switch / ORN fuel gage signal / cut it
K3 / BRN/WHT EVO output / empty / nothing
L1 / empty / WHT evap cannister vent out / nothing
Please keep in mind that I did this based off some C100 pinouts I got after the fact, I do not remember exactly what I did, but I imagine it was similar. I cut the wires that had different functions (make sure to leave yourself some wire to resolder it in case some info was incorrect)- and left wires that were empty on one or the other harness.
It seems like each year and model has some differences- and since I have no real way of posting the information I have on the pinouts short of manually copying each line- just send me a PM with what car/engine you have now and what car/engine your harness came from (5th gen montes only).
Last edited by The_Maniac; Feb 25, 2014 at 05:30 AM.
Thread Starter
Joined: Feb 2008
Posts: 6,471
Section 1- Old Engine Removal
1. Remove hood (2 bolts on each side- you can leave the struts on the mounts). Make sure you put a mark around the mounting flanges so you can line it back up perfectly when you go to put it back on.
2. Remove front bumper and headlights (optional, but its nice to be able to get in closer- and its less to break and get scratched). Headlights are held in by two wing nuts from the back side. The bumper is primarily held on by two nuts underneath each fender (access from the bottom of the car), there are two push clips at the top by the headlights- and a few more clips and such in the lower grille opening.
3. Break loose the front axle nuts (the big nut in the center of the wheel's lug nuts- its like a 36mm or so and its very tight). You can go ahead and remove them at this time, they just keep the axle held firmly into the hub- so they don't support anything. Also break loose the lug nuts (obviously don't remove them, the car's weight is still resting on them).
4. Jack up car, and put on jack stands under the cradle. Be careful where you put the passenger side one to avoid putting it in the way of the lower engine mount. I would take a look at your engine picker now to see where the legs are going to go, so you don't end up with the jack stands in the way. Make sure you try rocking to car to make sure it is solid before continuing- lifting an engine out of a car can easily knock it off of improperly placed jack stands.
5. Remove lug nuts and front wheels.
6. Remove cotter pin and remove nut under each ball joint (the stud sticking out of the bottom of the strut into the control arm).
7. Remove the cotter pin and nut under each tie rod end- give them a few taps from the bottom side and they should pop out- if not you may need a tie rod fork and a
hammer. The tie rod is located on the backside of the control arm. This is what the steering rack connects to.
8. Pry downward on the lower control arm enough that you can push the lower ball joint's stud off to the side so it doesn't go back into the control arm hole. This is much easier if you remove the two bolts that connect the sway bar to the control arm first.
9. Unplug the ABS plug on the backside of the hub, and un-clip the harness so it's free.
10. Push the axle out of the hub (it will compress into itself) it may take a few taps with a hammer on the end to pop it loose initially due to rust. Since the strut is almost ready to come out, unbolt the three nuts at the top, and it will drop out. It is pretty heavy, and you may need to have two people; one person to unbolt and one to catch and maneuver it out. You could leave the struts in if you really wanted to, but its only 3 nuts on the top of each holding them in place, and it makes it a little easier. If you do remove them, make sure you mark on the body where they are lined up first (draw a straight line from the strut top onto the body, so you have both location and orientation correct).
11. The axles are now ready to come out; they can be tough. They are held into the transmission by clips that need to compress to allow them to pull out. Since you can't get to the clips (because they're inside the transmission), you need to put a lot of force on them to get them out- one recommended way is to stick a pry bardirectly between the inner axle joint and trans case.
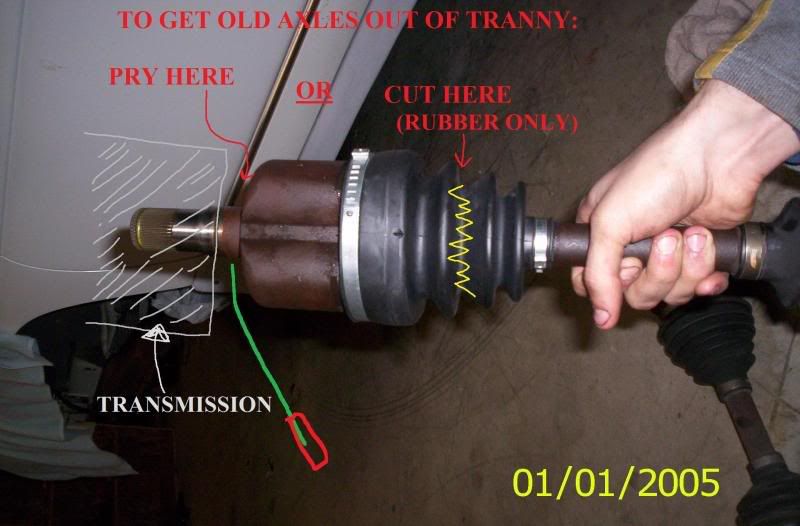
The other option- since you have to make one hybrid axle later, is to cut both inner boots with a razor, and the center shaft will slide right out of the inner tripot. The downside to this is that the grease will be everywhere which can be messy, but they slide right out once the boot is cut (this will allow you to remove the engine/trans later with just the axle nubs attached- and since you aren't reusing the tranny anyways, it won't matter). If you have a 3100/4t60- I'd probably use this method, since you can't use either axle inner. If you already have a 3800/4t65, you at least need to pry out the drivers side axle because you can reuse all of it.
I've had people ask me if they have to cut all the way through the metal axle- and the answer is NO!, all you have to do is cut the rubber boot with a razor blade all the way around, and the two axle pieces will simply slide apart. In the car they are trapped between the transmission and the hub/wheel bearing, so there is nothing keeping it from just sliding out if you cut the boot.
12. Now go back topside, we need to get some stuff removed up here-start by removing both of the diagonal braces
13. Remove the coolant overflow tank and the pcm box lid (the pcm box is the black box on the passenger side under the cross brace- the front lid comes off with 2 clips- also remove the nuts holding on the passenger side fuse box as well.
14. Remove the battery, and the windshield washer tank.
15. Next up is the wiring- you need to make sure the car is not connected to the engine anywhere. Since you're swapping to a new harness anyways (unless you have a 98/99 Z), I suggest pulling the old harness out with the engine instead of trying to unclip all the various sensors on the engine. Start at the firewall on the passenger side- this is the C100 connector- it has a torx bolt in the center keeping it plugged in- unplug it.
16. Continue to follow this harness around, unclipping it and unplugging it- there are a few
clips along the strut tower; then unplug the pcm and get the harness out of the box; make sure the passenger fuse-box is loose; unplug the coolant sensor at the top of the radiator; then unplug the fans and all the little clips holding the harness on across the lower radiator support.
17. Now remove the wiring by the battery side- the battery cables are separate, so remove them (save them though, you will need them), and any extra grounds over there. Now the wiring harness for the engine should be free. Also, take off any air intake or air-box] you may have at this point as well.
18. Unclip the throttle cable, first pry the tab back and slide to sheathing holder out of its
groove, and then unhook the end of the cable from the throttle body.
19. The transmission shifter cable has to come off of the tranny- it is connected all the way in the back under the master cylinder, on the top of the transmission. It is very simple how it is held on- its just a small hole on the end, pressed over a tiny ball on the shifter arm- you have to pry the small end clip off the tiny ball- it is a nightmare, but it will come off- you can also get at it from the passenger wheel well if you have to.

20. There are 2 bolts where the trans cable sheath connects to the tranny about 6" before the end- about under the very front of the master cylinder- undo them, and swing the trans cable out of the way
21. Remove the dogbones at the top of the engine (the upper engine mounts)
22. Go underneath the car and undo the 4 bolts holding the lower mounts in- two can be easily accessed from the drivers side wheel well- this is the tranny mount and is very visible once you're down there. The other side is more difficult, its further forward, and tucked in more- the mount actually sits in a cup of sorts, so you can't actually see it- but you can see the two bolts holding it on-just look right at the front passenger corner of the cradle. Nothing is going to fall apart by removing these, the engine's weight is still holding it in place- this just allows you to lift the studs out of their holes when you pull it.
23. Exhaust is next- you need to remove your downpipe from your engine. I simply cut mine off right behind the cradle, but you can do yours however is easiest for you

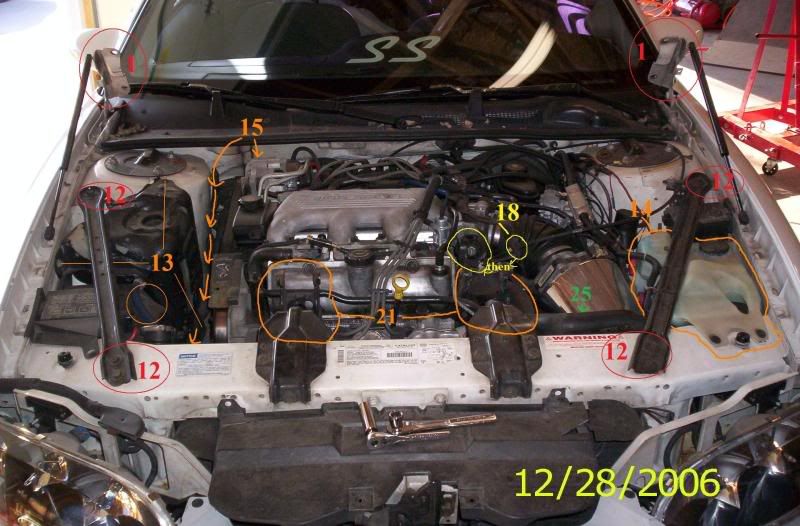
(the yellow arrows point to the downpipe connection if you want to unbolt it instead of cut it off) The red arrow pointing to the rag approximates where the plate for the shifter sheath bolts to.
24. Now is when it gets messy- you need to start draining fluid. I save this until the last thing because otherwise you have misc fluids dripping all over you while you're doing the other stuff. We'll start with the oil- its not necessary, but if you're tearing apart the old engine, you'd rather not have to deal with ~5 quarts of used oil
25. Next, we'll go to the radiator- remove the upper and lower radiator hoses and be ready to catch a ton of fluid (mostly from the lower radiator hose). There is a petcock on the radiator in the lower drivers corner, but mine was plugged up- so it only dribbled out when fully opened- removing the lower radiator hose does the same thing, just in a much more messy way.
26. As long as you're up front, you may as well go ahead and disconnect the transmission lines. You can do this one of two ways- unscrew the ends from the radiator (the tranny cooler is on the passenger end tank of the radiator). Or, if you plan to just splice the new ones in, you can always just cut both lines off in the very center where it is a solid rubber line
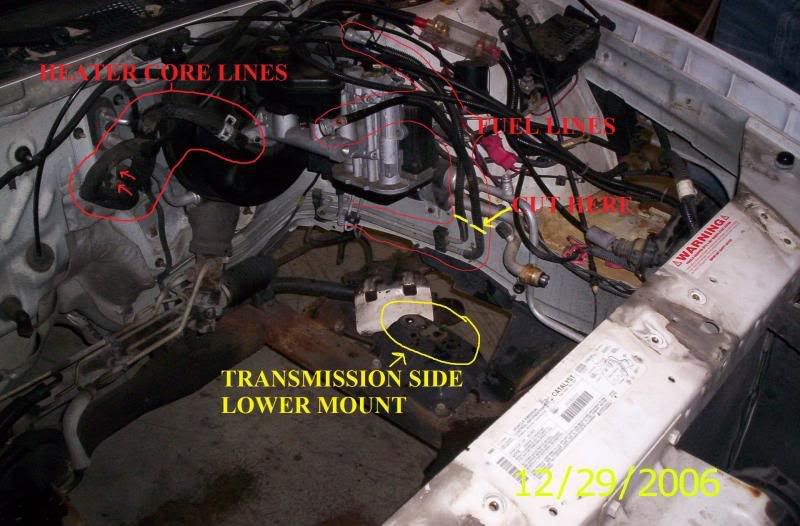
27. Heater hoses are next- either cut them in half at the back, or unclip and remove them from the firewall (they go in right in the center of the firewall, next to the brake booster)
28. Air conditioning can go next- you're supposed to have already had the lines evacuated by a professional, I opted to just go ahead and unbolt them from the back of the compressor. There are a lot of ways to disconnect them, including just cutting them- or unbolting them at other spots- it doesn't matter how you do it, just make sure they aren't attaching the motor to the chassis in any way (keep in mind its bad for the environment to vent that stuff to the atmosphere)
29. Fuel lines are next- locate the schrader valve (it'll be on the fuel rail- and should have a plastic cap on it- once you take the cap off it has a little peg in the center like a tire valve)- take a screwdriver and a rag, and press the center in (it
will spray fuel)- soak it up with the rag until pressure is gone, then use a fuel line disconnect tool (available at any parts store for cheap), and pop the lines from the tank free- keep in mind there will be gas, and it will get everywhere- be safe here. The pressure line may still have a little pressure left so have some rags ready. You really should have a fire extinguisher ready here. Your battery should be gone, and the engine should be ice cold by now after all this work- but you never want to take a chance.
30. Power steering lines are last up, unclip the rubber low pressure hose, and unbolt the high pressure hose- both at the bottom of the pump. You can also cut them if you absolutely have to in a pinch, but I don't recommend it.
31. At this point, your engine and transmission should be totally free to come out- go around and double, triple check everything- nothing should look like it connects from the engine to the body at any point. It helps to have a friend go around and look after you to make sure.
Here is a quick list of things to make sure have been removed:
-air intake
-fuel lines
-both radiator hoses
-both transmission cooler lines
-both power steering lines
-both axles
-the entire wiring harness
-both upper dogbones
-the 4 bolts on the lower engine mounts (2 on each)
-air conditioning lines
-throttle body cable
-transmission shifter linkage
Look around down in the engine bay- if you still see anything running between the engine and the car, you need to remove it.
32. Remove the fans (should be 3 bolts each), and then the two brackets holding the normal radiator in place (you could leave the radiator in place, I was just afraid of damaging it when manuevering, and I wanted to run some water through it to clean it out anyways). You can leave the a/c's radiator in because it won't really get in the way.
33. Now you're ready to get your cherry picker and chain the old engine up. There should be two loops to hook the chains to, but I also attached mine to some a main engine bolt on each end also, just as a backup. If that thing falls from 4 feet in the air (has the clear the upper radiator support with the car on jackstands)- you could either total your car, or kill someone. Have someone keep an eye on the car/jackstands- this thing has been sitting in the same spot for years, and it may take a little for it to pop loose- make sure you don't lift the car off the jackstands (you don't want it to pop loose and the car not be over the jackstands correctly). I can't stress the importance of safety here enough- this isn't a time for all of your buddys to be crowded around cheering you on- get everyone away from the car that is not performing an essential function. I don't care how much you paid for your cherry picker- the welder could've had a bad day, and a weld could break or the cylinder could fail. Enough ranting for now...
34. Jack the engine up about 2-3 inches straight up- you need the lower mount studs to clear their holes before you can start swinging it around.
35. Maneuver it towards the front of the car and all the way to the passenger side. Put some sort of cover over your upper radiator support just to make sure nothing drags on it and scrapes the paint.
36. At this point, the shear weight of the transmission on the one end should make the whole thing sit at like a 30* to 45* angle depending on how your chain is hooked up. This is a good thing, as it will help you to clear the master cylinder on the way out.
37. It's pretty obvious at this point, just wiggle it around and get it out- stay away from the
engine while it is in the air, and once you clear the upper radiator support, lower the engine back to within an inch off the ground. I hate seeing people wheel a powertrain 10' across a shop with the engine still 4' in the air- you only need the engine high enough that it doesn't drag the ground, and the lower it is, the less potential energy it has if it falls.
38. At this point, I would take the time to clean up the engine bay- there will be spilled fluid everywhere on the cradle- I suggest spraying the whole thing down with degreaser and taking a lunch break before you start scrubbing. I also recommend taking some old towels and wiping everything clean and dry when you get done. This will just help to keep you from getting your hands all wet and dirty when you're installing the new engine.
39. I highly suggest installing your high pressure power steering hose into the car now. You can
connect it at the rack end, and just leave it hang over on the passengers side (its very hard to get to once the engine is in). I did not do this step (I had the brilliant idea that I was going to splice a high pressure hose back together- which failed 3 times before I just bought a stock 98 Z34 line)- but after everything is in place, this line is insanely hard to put in. Just do it now, and save yourself some trouble.
40. If you are installing an L67 into a 5th gen monte carlo (95-99, similar luminas)- and you are installing aftermarket headers, now is the time to clearance your firewall- seriously. If you look down the firewall at the bottom you'll see a protrusion that typically needs completely cut out. Every header set is different, so this is going to be trial and error. If you're using stock manifolds/stock Z34 downpipe- then skip this step.

Empty engine bay shots (so you can see what you're gonna be working with):

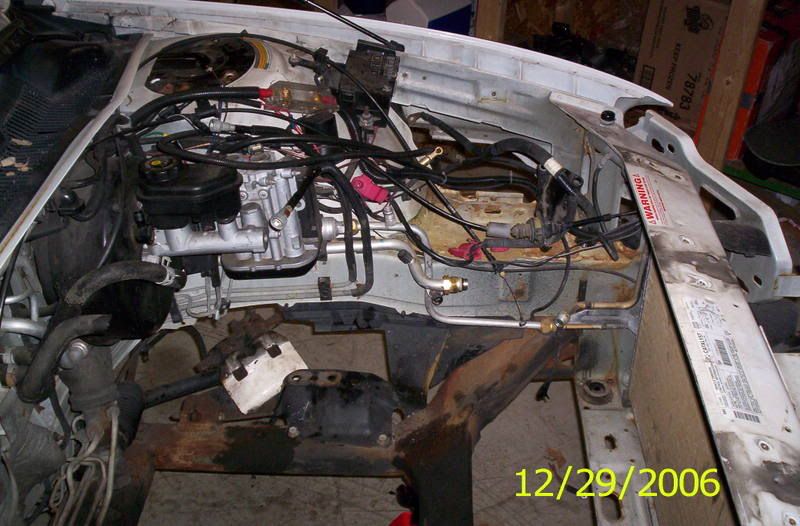
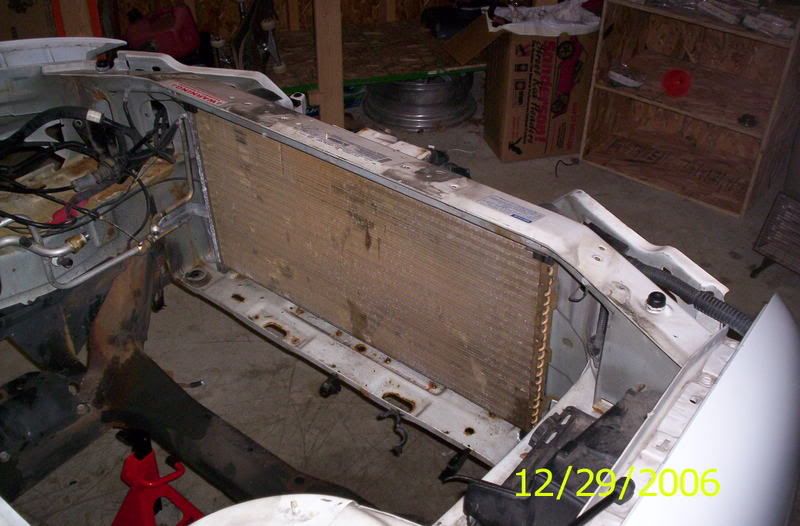
(thats the AC radiator in there- the normal radiator is removed already)
1. Remove hood (2 bolts on each side- you can leave the struts on the mounts). Make sure you put a mark around the mounting flanges so you can line it back up perfectly when you go to put it back on.
2. Remove front bumper and headlights (optional, but its nice to be able to get in closer- and its less to break and get scratched). Headlights are held in by two wing nuts from the back side. The bumper is primarily held on by two nuts underneath each fender (access from the bottom of the car), there are two push clips at the top by the headlights- and a few more clips and such in the lower grille opening.
3. Break loose the front axle nuts (the big nut in the center of the wheel's lug nuts- its like a 36mm or so and its very tight). You can go ahead and remove them at this time, they just keep the axle held firmly into the hub- so they don't support anything. Also break loose the lug nuts (obviously don't remove them, the car's weight is still resting on them).
4. Jack up car, and put on jack stands under the cradle. Be careful where you put the passenger side one to avoid putting it in the way of the lower engine mount. I would take a look at your engine picker now to see where the legs are going to go, so you don't end up with the jack stands in the way. Make sure you try rocking to car to make sure it is solid before continuing- lifting an engine out of a car can easily knock it off of improperly placed jack stands.
5. Remove lug nuts and front wheels.
6. Remove cotter pin and remove nut under each ball joint (the stud sticking out of the bottom of the strut into the control arm).
7. Remove the cotter pin and nut under each tie rod end- give them a few taps from the bottom side and they should pop out- if not you may need a tie rod fork and a
hammer. The tie rod is located on the backside of the control arm. This is what the steering rack connects to.
8. Pry downward on the lower control arm enough that you can push the lower ball joint's stud off to the side so it doesn't go back into the control arm hole. This is much easier if you remove the two bolts that connect the sway bar to the control arm first.
9. Unplug the ABS plug on the backside of the hub, and un-clip the harness so it's free.
10. Push the axle out of the hub (it will compress into itself) it may take a few taps with a hammer on the end to pop it loose initially due to rust. Since the strut is almost ready to come out, unbolt the three nuts at the top, and it will drop out. It is pretty heavy, and you may need to have two people; one person to unbolt and one to catch and maneuver it out. You could leave the struts in if you really wanted to, but its only 3 nuts on the top of each holding them in place, and it makes it a little easier. If you do remove them, make sure you mark on the body where they are lined up first (draw a straight line from the strut top onto the body, so you have both location and orientation correct).
11. The axles are now ready to come out; they can be tough. They are held into the transmission by clips that need to compress to allow them to pull out. Since you can't get to the clips (because they're inside the transmission), you need to put a lot of force on them to get them out- one recommended way is to stick a pry bardirectly between the inner axle joint and trans case.
The other option- since you have to make one hybrid axle later, is to cut both inner boots with a razor, and the center shaft will slide right out of the inner tripot. The downside to this is that the grease will be everywhere which can be messy, but they slide right out once the boot is cut (this will allow you to remove the engine/trans later with just the axle nubs attached- and since you aren't reusing the tranny anyways, it won't matter). If you have a 3100/4t60- I'd probably use this method, since you can't use either axle inner. If you already have a 3800/4t65, you at least need to pry out the drivers side axle because you can reuse all of it.
I've had people ask me if they have to cut all the way through the metal axle- and the answer is NO!, all you have to do is cut the rubber boot with a razor blade all the way around, and the two axle pieces will simply slide apart. In the car they are trapped between the transmission and the hub/wheel bearing, so there is nothing keeping it from just sliding out if you cut the boot.
12. Now go back topside, we need to get some stuff removed up here-start by removing both of the diagonal braces
13. Remove the coolant overflow tank and the pcm box lid (the pcm box is the black box on the passenger side under the cross brace- the front lid comes off with 2 clips- also remove the nuts holding on the passenger side fuse box as well.
14. Remove the battery, and the windshield washer tank.
15. Next up is the wiring- you need to make sure the car is not connected to the engine anywhere. Since you're swapping to a new harness anyways (unless you have a 98/99 Z), I suggest pulling the old harness out with the engine instead of trying to unclip all the various sensors on the engine. Start at the firewall on the passenger side- this is the C100 connector- it has a torx bolt in the center keeping it plugged in- unplug it.
16. Continue to follow this harness around, unclipping it and unplugging it- there are a few
clips along the strut tower; then unplug the pcm and get the harness out of the box; make sure the passenger fuse-box is loose; unplug the coolant sensor at the top of the radiator; then unplug the fans and all the little clips holding the harness on across the lower radiator support.
17. Now remove the wiring by the battery side- the battery cables are separate, so remove them (save them though, you will need them), and any extra grounds over there. Now the wiring harness for the engine should be free. Also, take off any air intake or air-box] you may have at this point as well.
18. Unclip the throttle cable, first pry the tab back and slide to sheathing holder out of its
groove, and then unhook the end of the cable from the throttle body.
19. The transmission shifter cable has to come off of the tranny- it is connected all the way in the back under the master cylinder, on the top of the transmission. It is very simple how it is held on- its just a small hole on the end, pressed over a tiny ball on the shifter arm- you have to pry the small end clip off the tiny ball- it is a nightmare, but it will come off- you can also get at it from the passenger wheel well if you have to.
20. There are 2 bolts where the trans cable sheath connects to the tranny about 6" before the end- about under the very front of the master cylinder- undo them, and swing the trans cable out of the way
21. Remove the dogbones at the top of the engine (the upper engine mounts)
22. Go underneath the car and undo the 4 bolts holding the lower mounts in- two can be easily accessed from the drivers side wheel well- this is the tranny mount and is very visible once you're down there. The other side is more difficult, its further forward, and tucked in more- the mount actually sits in a cup of sorts, so you can't actually see it- but you can see the two bolts holding it on-just look right at the front passenger corner of the cradle. Nothing is going to fall apart by removing these, the engine's weight is still holding it in place- this just allows you to lift the studs out of their holes when you pull it.
23. Exhaust is next- you need to remove your downpipe from your engine. I simply cut mine off right behind the cradle, but you can do yours however is easiest for you
(the yellow arrows point to the downpipe connection if you want to unbolt it instead of cut it off) The red arrow pointing to the rag approximates where the plate for the shifter sheath bolts to.
24. Now is when it gets messy- you need to start draining fluid. I save this until the last thing because otherwise you have misc fluids dripping all over you while you're doing the other stuff. We'll start with the oil- its not necessary, but if you're tearing apart the old engine, you'd rather not have to deal with ~5 quarts of used oil
25. Next, we'll go to the radiator- remove the upper and lower radiator hoses and be ready to catch a ton of fluid (mostly from the lower radiator hose). There is a petcock on the radiator in the lower drivers corner, but mine was plugged up- so it only dribbled out when fully opened- removing the lower radiator hose does the same thing, just in a much more messy way.
26. As long as you're up front, you may as well go ahead and disconnect the transmission lines. You can do this one of two ways- unscrew the ends from the radiator (the tranny cooler is on the passenger end tank of the radiator). Or, if you plan to just splice the new ones in, you can always just cut both lines off in the very center where it is a solid rubber line
27. Heater hoses are next- either cut them in half at the back, or unclip and remove them from the firewall (they go in right in the center of the firewall, next to the brake booster)
28. Air conditioning can go next- you're supposed to have already had the lines evacuated by a professional, I opted to just go ahead and unbolt them from the back of the compressor. There are a lot of ways to disconnect them, including just cutting them- or unbolting them at other spots- it doesn't matter how you do it, just make sure they aren't attaching the motor to the chassis in any way (keep in mind its bad for the environment to vent that stuff to the atmosphere)
29. Fuel lines are next- locate the schrader valve (it'll be on the fuel rail- and should have a plastic cap on it- once you take the cap off it has a little peg in the center like a tire valve)- take a screwdriver and a rag, and press the center in (it
will spray fuel)- soak it up with the rag until pressure is gone, then use a fuel line disconnect tool (available at any parts store for cheap), and pop the lines from the tank free- keep in mind there will be gas, and it will get everywhere- be safe here. The pressure line may still have a little pressure left so have some rags ready. You really should have a fire extinguisher ready here. Your battery should be gone, and the engine should be ice cold by now after all this work- but you never want to take a chance.
30. Power steering lines are last up, unclip the rubber low pressure hose, and unbolt the high pressure hose- both at the bottom of the pump. You can also cut them if you absolutely have to in a pinch, but I don't recommend it.
31. At this point, your engine and transmission should be totally free to come out- go around and double, triple check everything- nothing should look like it connects from the engine to the body at any point. It helps to have a friend go around and look after you to make sure.
Here is a quick list of things to make sure have been removed:
-air intake
-fuel lines
-both radiator hoses
-both transmission cooler lines
-both power steering lines
-both axles
-the entire wiring harness
-both upper dogbones
-the 4 bolts on the lower engine mounts (2 on each)
-air conditioning lines
-throttle body cable
-transmission shifter linkage
Look around down in the engine bay- if you still see anything running between the engine and the car, you need to remove it.
32. Remove the fans (should be 3 bolts each), and then the two brackets holding the normal radiator in place (you could leave the radiator in place, I was just afraid of damaging it when manuevering, and I wanted to run some water through it to clean it out anyways). You can leave the a/c's radiator in because it won't really get in the way.
33. Now you're ready to get your cherry picker and chain the old engine up. There should be two loops to hook the chains to, but I also attached mine to some a main engine bolt on each end also, just as a backup. If that thing falls from 4 feet in the air (has the clear the upper radiator support with the car on jackstands)- you could either total your car, or kill someone. Have someone keep an eye on the car/jackstands- this thing has been sitting in the same spot for years, and it may take a little for it to pop loose- make sure you don't lift the car off the jackstands (you don't want it to pop loose and the car not be over the jackstands correctly). I can't stress the importance of safety here enough- this isn't a time for all of your buddys to be crowded around cheering you on- get everyone away from the car that is not performing an essential function. I don't care how much you paid for your cherry picker- the welder could've had a bad day, and a weld could break or the cylinder could fail. Enough ranting for now...
34. Jack the engine up about 2-3 inches straight up- you need the lower mount studs to clear their holes before you can start swinging it around.
35. Maneuver it towards the front of the car and all the way to the passenger side. Put some sort of cover over your upper radiator support just to make sure nothing drags on it and scrapes the paint.
36. At this point, the shear weight of the transmission on the one end should make the whole thing sit at like a 30* to 45* angle depending on how your chain is hooked up. This is a good thing, as it will help you to clear the master cylinder on the way out.
37. It's pretty obvious at this point, just wiggle it around and get it out- stay away from the
engine while it is in the air, and once you clear the upper radiator support, lower the engine back to within an inch off the ground. I hate seeing people wheel a powertrain 10' across a shop with the engine still 4' in the air- you only need the engine high enough that it doesn't drag the ground, and the lower it is, the less potential energy it has if it falls.
38. At this point, I would take the time to clean up the engine bay- there will be spilled fluid everywhere on the cradle- I suggest spraying the whole thing down with degreaser and taking a lunch break before you start scrubbing. I also recommend taking some old towels and wiping everything clean and dry when you get done. This will just help to keep you from getting your hands all wet and dirty when you're installing the new engine.
39. I highly suggest installing your high pressure power steering hose into the car now. You can
connect it at the rack end, and just leave it hang over on the passengers side (its very hard to get to once the engine is in). I did not do this step (I had the brilliant idea that I was going to splice a high pressure hose back together- which failed 3 times before I just bought a stock 98 Z34 line)- but after everything is in place, this line is insanely hard to put in. Just do it now, and save yourself some trouble.
40. If you are installing an L67 into a 5th gen monte carlo (95-99, similar luminas)- and you are installing aftermarket headers, now is the time to clearance your firewall- seriously. If you look down the firewall at the bottom you'll see a protrusion that typically needs completely cut out. Every header set is different, so this is going to be trial and error. If you're using stock manifolds/stock Z34 downpipe- then skip this step.
Empty engine bay shots (so you can see what you're gonna be working with):
(thats the AC radiator in there- the normal radiator is removed already)
Last edited by bumpin96monte; Jul 3, 2009 at 08:02 PM.
Thread Starter
Joined: Feb 2008
Posts: 6,471
Section 2- Putting the new engine in
I'm not going to be quite as descriptive in this section because I'm assuming since you made it this far that you know what I'm talking about by part name, and how it attaches since you just took it off. I suggest integrating your L67 swap harness part into your 98/99 Monte Z34 harness now since its all out- so it will be ready to go.
1. Get your new engine and transmission all chained up to your cherry picker and ready to go. Have your new wiring harness already connected to your new engine, with the excess laying on top. Its so much easier to plug in certain items now such as the rear knock sensor and transmission speed sensor, etc. Also make sure the engine is as clean as you want it- it'll never be easier to degrease and clean than when its laying there in the open.
2. Lift the pair a couple inches off the ground and put on your drivers side engine mount (because the studs stick down so much further, many have it removed until right at the end)
3. Raise the engine up over the radiator support, and lower it down. At this point it helps to have 3 people- one in the driver's wheel well to guide the studs into their holes, and one underneath the passenger's side to guide that one in. I had a problem getting my tranny side in- so I had to remove the mount and set it in the car first, then lean it so the tranny would slide on top of it. Go ahead and tighten down the 4 nuts on the bottom- two each on each lower mount. Safety here is just as critical as before, except now you're putting more load on the car, and you're wiggling around a 500+ pound piece in the engine bay- so have your buddys in the wheel wells keep everything out from under the car, just in case you knock it off. It seems stupid- but the car is significantly lighter with no engine, and you've got such a big mass swinging around in there that it is very easy to do.
4. From here on, it's just the reverse of what you did before- putting everything back in-
doesn't really matter what order, just get it all back in
5. The radiator can go in first, followed by the fans
6. You can begin to plug the wiring back in- start with the C100 connector.
7. Continue on around, clipping it back in as you go- the pcm plug, just let the fuse box hang for now, plug in the coolant sensor, and both fans, as well as the clips along the lower radiator support- and continue plugging in all the way around the the last couple transmission plugs.
8. Snap your shifter connection back on, then bolt down the metal bracket about 6" before it.
9. Connect your transmission cooler lines. If you just unscrewed the old ones, then screw the new ones in. If you cut yours like I did, then you'll need to splice the two lines together. I used a double male barb fitting that slipped perfectly inside both hoses (tightly), and then used double hose clamps on each end. I would assume the lines from a 98 Z34 would work also.
10. Rock the engine forward now and wedge it forward. Now, from the passenger wheel well, you can reconnect your power steering. The open hose just hose clamps onto the return on the PS tank. The threaded hose end will screw into the bottom of the pump.
11. While the engine is rocked forward, now is a good time to hook up your heater hoses. I
suggest finding the correct hose ID and going out to buy new heater hose from the parts store-that way you can make one clean run all the way instead of splicing. You could also buy the hoses preformed for a 98/99 monte Z34 as they will drop right in as well, and will be less likely to kink.
12. Now you can let the engine rock back. Install your radiator hoses, upper and lower (if you bought the ones for a 98/99 monte Z34, they fit perfectly).
13. Bolt up your downpipe and whatever exhaust you have.
14. Next up is suspension- stick your new axle into the transmission until it clicks.
15. Slide the strut up and very loosely install the top 3 nuts so that it still has room to
wiggle around. Squish the axle in, and pull the bottom of the strut out- you should be able to stick the tip of the axle into the hub (don't force it- the splines have to line up). Thread on the axle nut a few threads to make sure it doesn't slip back out.
16. Now push in the bottom of the strut, and pry down on the control arm- stick the ball joint stud into the control arm.
17. Reconnect your wheel speed sensor, and bolt on the sway bar end link (may have to put a jack under the control arm), and tie rod end.
18. Tighten down all those bolts (I prefer to wait on the axle nut until the end)- repeat on the other side. Install the wheels tires as well (you can still tighten down the lug nuts, and axle nut later)
19. Continue reinstalling other parts under the hood- the dogbones, cross braces, bolt down the fuse box, and put the coolant overflow back in- just don't hook up the battery yet.
20. When you go to put your GTP pcm in the Monte box, you will have to spend about 15 minutes with a dremel tool to let it
slide in far enough- I did this when I first did my swap, and it worked fine, but there is another option. I bet the stock box out of a 98/99 Z34 would allow the pcm to drop right in. Or, this is what I went to on my setup:
http://www.wbodystore.com/grandprix/PCM-Tray-p-287.html
It is a pcm tray - you screw it down with a coupel of self tapping screws into the metal below and your new pcm clips right in. It won't be hidden- but being exposed is ok, many people run like this on GTP's with no issue.
Picture of the inside of the stock 96 LS pcm box:

21. Reconnect your throttle cable.
22. Double check all your electrical connections, and fill all your fluids.
23. All that should be left now is to hook up the battery, connect the fuel lines, and put your
body panels back on.
24. The fuel lines will be a pain, on the 3100's they are over on the drivers side, and will not each the top of the L67 without customization. They make splice kits, but it is not easy to do because the hose is a stiff plastic. What many people have done (and the setup I currently have)- is to buy high pressure fuel hose of the correct ID's for the two lines. Cut off all the plastic hose down to the metal- so you should have two bare metal hoses down in the drivers side by the frame. Then, just clamp the hose on the metal tube, and on the fuel rail at the other end (I double clamped the pressure line, single clamped the return. It is important that you don't just buy "fuel hose" (for carb'd applications with less than 10 psi)- you need fuel injection hose (because you'll have 50+ psi pressure in that line.
The other option is to convert both ends to AN fittings (they make fittings that clip into the fuel rail and convert to AN, then adapt the metal lines for AN, but since I have not done this, I cannot comment on it.
25. At this point, you think your fuel lines are connected. I recommend hooking up your battery (clean ALL spilled fuel first), and just turning the key to the on position to check for fuel leaks. Mine leaked 2 times before I finally got everything tightened correctly to where it wouldn't leak (I also thought that I could splice the hard stock plastic lines). ~50psi of fuel pressure will find a way out if it can.

26. Now that your fuel lines are setup double check EVERY connection. Again, I suggest having someone else go over it for you- its easy to skip
stuff and forget about it. I'd look at this list again, and make sure all the stuff is hooked up
-air intake
-fuel lines
-both radiator hoses
-both transmission cooler lines
-both power steering lines
-both axles
-the entire wiring harness
-both upper dogbones
-the 4 bolts on the lower engine mounts (2 on each)
-air conditioning lines (not really necessary at this point)
-throttle body cable
-transmission shifter linkage
27. You're all set to try and start her up. I bumped my engine over while on jack stands before I hooked the fuel up to get oil flowing, but if you have a used engine, it should be ok to fire up. Have a spotter up front, and get ready to kill it asap. I'd probably let it run for ~30 seconds or so- then kill it and check for leaks.
Next time, you can let it run longer if you wish (be aware of the exhaust fumes though- make sure to properly ventilate).
28. Once you got the engine running, and while its still on the jackstands, you'll need to bleed your power steering lines. Basically you turn it left, then all the way right (don't go ALL the way- you don't want to run it to the limit where it makes that louder whining noise, you want to stop just before that)- and keep doing that back and forth- occasionally topping off the fluid in the tank.
29. Last part is just putting back on your remaining body panels/hood/headlights, lowering the car off the jack stands, tightening your axle nuts and lug nuts and taking her for a test drive. Don't forget to tighten the lug nuts- you hate to pull off something this great, only to have your wheels fall off a block away for something so stupid. I'd bleed the cooling system once it gets up to operating temp also.
30. Remember to top off your fluids when you get back- primarily transmission (if yours is new or was drained for a filter change), and also power steering since you probably lost some. I'd probably also check the cooling system one more time, just try bleeding it again to be safe.
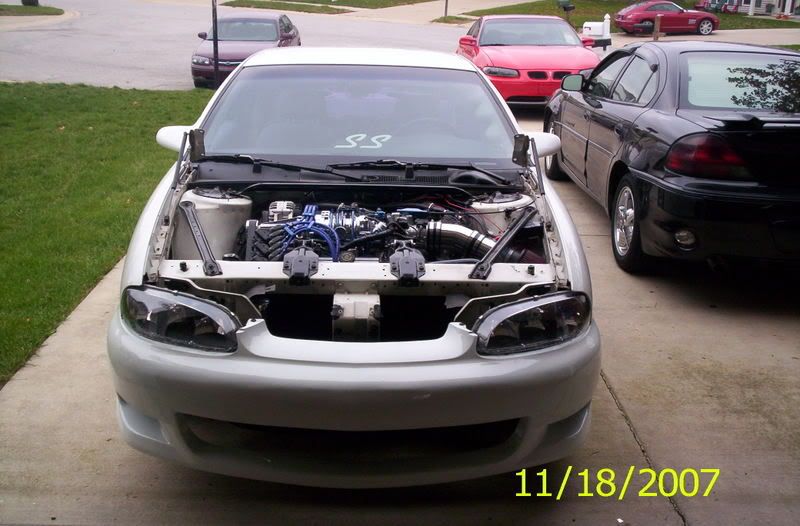
That's it; now it's time to enjoy your new engine. You are going to need an alignment because you pulled a lot of suspension pieces apart, and you may need a pcm tune
to get rid of some misc codes that may pop up. Remember that you need to have premium gas in the tank already. If not, try and drive it easy until the tank is almost empty to put premium in.
Ok, now for some extra pics to help clarify:
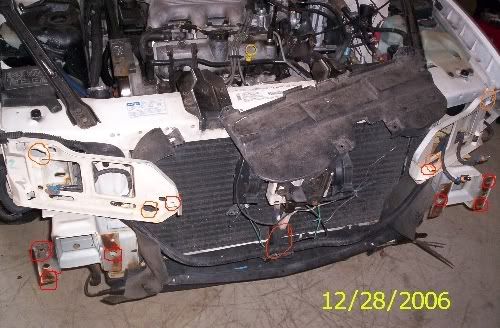
This is with both the plastic bumper, and metal bumper off- as well as the headlights. The three red circles on each side on those large metal body parts are where the actual metal bumper bolts onto. The two orange circles on the headlight mounts are where the headlight thumb screws are (they still need to be slid to the side to pull out). The two reddish circles on top by the headlight mounts are what that plastic top piece sticks to.

Engine bay minus engine- drivers side. Red circle on the subframe is where the transmision side mount bolts to. The blue arrow above it points to the plastic cover that is helpful to remove if you're messing with the shifter cable. The light green TB on the firewall is the shifter cable I think- I thought it was the throttle cable when I did the chop though. The dark green dot to the right is the heat shield you should remove, especialyl if you're doing aftermarket headers. The blue A/C up top points to the two A/C connections where they go into the car- the heater core lines are the two rubber ones right below it. The yellow dotted lines are your fuel lines, and finally the pink dot is on the sway bar.

This is the passenger side of the engine bay. The most important thing is the "C100" connector- this is the only place where the engine harness goes through the firewall. The blue line coming out of it is where the engine harness runs- (that box it breaks off to is the PCM box). There is a Y right by the C100 connector- the other side goes to the backside of the engine. The red circle on the subframe is the where the engine side bolts to (it sits down in a trough). The pink dotted line is the high pressure power steering line (note the threaded connector on the end). The yellow dotted line is the low pressure, return for power steering (note it also goes down on the bottom to the cooling loops.
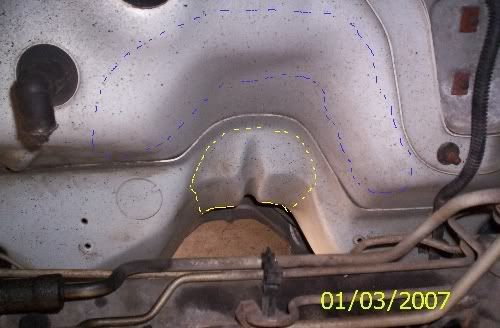
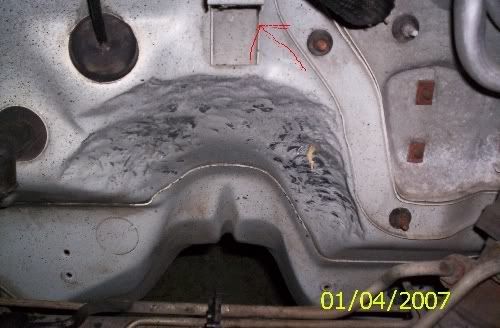
This is the firewall before and after my 'mods'. It is necessary to do if you are trying to install aftermarket headers. You can see the area I knocked out, but the area that must be heavily modded also is the yellow area (I mean it almost must be cut out). Also, you'll probably want to bend the heat shield mount out of the way- or cut it off (red arrow).
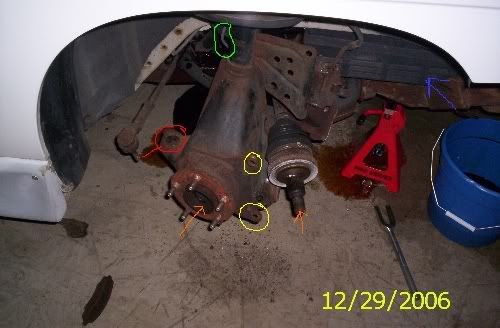
This is a suspension shot with the strut/hub still in there. The yellow circles are where the caliper bracket bolts on (huge Torx socket). The red circle is where the tie rod goes into (tie rod is what your powersteering rack pulls back and forth to steer the car). The orange arrows show where the axle normally goes into if it weren't already popped out. Lastly, the green up top shows the ABS wheel speed sensor wire. It must be unclipped from 2 wire clamps and unplugged before you can remove the strut.
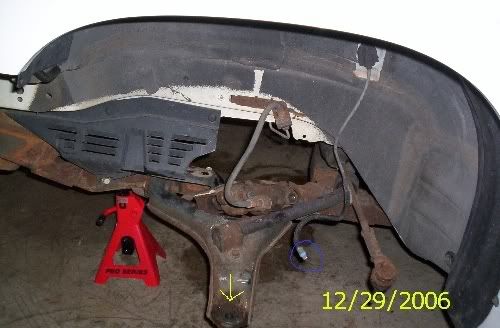
Other side without strut- now you can see the wheel speed sensor wire. The yellow arrow points to the hole that the stud sticking out of the bottom of the strut/ball joint goes into.

More identification of parts. The orange are 3100 fuel lines. The blue are the heater core hoses (new ones will run over to far passenger side below alternator). The yellow piece is the heat shield which will need to be removed before banging the firewall if you plan to install aftermarket headers. Red circle is where high presssure power steering line connects to rack (its the one on the side- not the one in the front).
How to build custom axles-for those who don't want to pay a shop to do it
For those of you who already have a 4t65e- you can reuse your factory drivers side axle. For those of you swapping from a 4t60e, you will need both axles replaced. The passenger side axle MUST be custom made if you want to run a 4t65e-HD; no 5th gen monte ever came with the HD trans, and the HD trans has a slightly larger differential housing. However, you can run a drivers side axle from a 98-99 Z34 monte- so you can go to the parts store, buy one, and drop it in- the drivers side axle is the same between the 4t65e and 4t65e-HD. If you want to save some money, you could always custom make both axles (assuming at least both inner axles came with your new trans) using parts from your old axles.
The basic process is- you can use your factory outer axle (the parts that plug into the wheel hubs, and center shafts (the part between the two boots)- you need to install the new inner axles (the part from the inner boot that plugs into the transmission) onto your stock outer axle/center shaft.
You will need 2 special tools before you begin. One is a set of snap ring pliers- there are two snap rings on each axle that you have to expand. Second is a CV boot crimper for doing the crimps on your new CV boot clamps. Plus, you also need a new 'boot kit' for each axle you do (comes with 1 boot, 1 bag of grease, 1 small clamp, 1 big clamp).
I made an illustration to show the process:
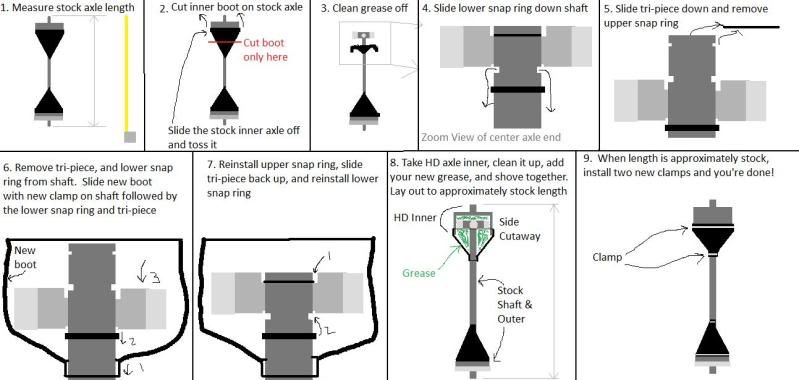
Lastly- some usual sticky spots with the swap:
Fuel Lines- I haven't found a solution to this that I really love that is easy and cheap. What I did was cut off all the plastic fuel line- and run new fuel injection hose from the hard metal line down on the frame rail up to the fuel rail for both feed and return. Make sure you use fuel injection hose, as the carb hose is not rated for the pressures involved. I also double clamped the feed hose on both ends. On the fuel rail end, I didn't use the quick disconnects at all- just put the hose right on the metal rail, it has a bump to hold it. You could convert to AN line, but thats kinda costly. Its really up to you- just know that the rubber FI hose needs to be checked frequently as a maintenance item- the clamps need checked for tightenss and the hose needs checked for cracks/leaks- it is a severe fire hazard if you let this hose rot or get melted on something!
Low boost- make sure the boost bypass valve (cylinder on the front of the supercharger) has the wiring going to its solenoid hooked up correctly (or that the vac port is blocked off to get rid of the solenoid completely). You have to run a wire to the pcm and such- and it is possible to screw it up. If you're down around 2-4 psi on a stock pulley- either you have a massive vacuum leak, or this is the problem.
Power steering- make sure you have a 98/99 Z34 high pressure line (Napa sells them for about $30) and it'll make this 100x easier.
Exhaust- the 5th gen monte has an unusually tight firewall clearance for the exhaust. Don't be suprised if you're trying to install headers, or any part made for a 2nd gen wbody (grand prix, etc)- if they don't fit- its very common. The only known thing to fit perfectly is a 98/99 Z34 downpipe.
Troubleshooting
Unfortunately, its difficult to troubleshoot something with so many variables. The basic key is the same with any engine:
-Do you have 12 volts of battery power (if so, the engine should turn over with the key)
-Do you have fuel pressure (listen for the fuel pump running, depress the test port and see if there is pressure)
-Do you have spark (you can use a spark tested to see if the spark is working)
If you have fuel + spark, and +12 volts, it should run.
If it is running very poorly, double check your vacuum lines, and all electrical connections.
If you're still having issues, post a thread and we'll try and help you figure it out!
Thanks for taking the time to read this- if you have any suggestions, corrections, or questions, please feel free to PM me.
I'm not going to be quite as descriptive in this section because I'm assuming since you made it this far that you know what I'm talking about by part name, and how it attaches since you just took it off. I suggest integrating your L67 swap harness part into your 98/99 Monte Z34 harness now since its all out- so it will be ready to go.
1. Get your new engine and transmission all chained up to your cherry picker and ready to go. Have your new wiring harness already connected to your new engine, with the excess laying on top. Its so much easier to plug in certain items now such as the rear knock sensor and transmission speed sensor, etc. Also make sure the engine is as clean as you want it- it'll never be easier to degrease and clean than when its laying there in the open.
2. Lift the pair a couple inches off the ground and put on your drivers side engine mount (because the studs stick down so much further, many have it removed until right at the end)
3. Raise the engine up over the radiator support, and lower it down. At this point it helps to have 3 people- one in the driver's wheel well to guide the studs into their holes, and one underneath the passenger's side to guide that one in. I had a problem getting my tranny side in- so I had to remove the mount and set it in the car first, then lean it so the tranny would slide on top of it. Go ahead and tighten down the 4 nuts on the bottom- two each on each lower mount. Safety here is just as critical as before, except now you're putting more load on the car, and you're wiggling around a 500+ pound piece in the engine bay- so have your buddys in the wheel wells keep everything out from under the car, just in case you knock it off. It seems stupid- but the car is significantly lighter with no engine, and you've got such a big mass swinging around in there that it is very easy to do.
4. From here on, it's just the reverse of what you did before- putting everything back in-
doesn't really matter what order, just get it all back in
5. The radiator can go in first, followed by the fans
6. You can begin to plug the wiring back in- start with the C100 connector.
7. Continue on around, clipping it back in as you go- the pcm plug, just let the fuse box hang for now, plug in the coolant sensor, and both fans, as well as the clips along the lower radiator support- and continue plugging in all the way around the the last couple transmission plugs.
8. Snap your shifter connection back on, then bolt down the metal bracket about 6" before it.
9. Connect your transmission cooler lines. If you just unscrewed the old ones, then screw the new ones in. If you cut yours like I did, then you'll need to splice the two lines together. I used a double male barb fitting that slipped perfectly inside both hoses (tightly), and then used double hose clamps on each end. I would assume the lines from a 98 Z34 would work also.
10. Rock the engine forward now and wedge it forward. Now, from the passenger wheel well, you can reconnect your power steering. The open hose just hose clamps onto the return on the PS tank. The threaded hose end will screw into the bottom of the pump.
11. While the engine is rocked forward, now is a good time to hook up your heater hoses. I
suggest finding the correct hose ID and going out to buy new heater hose from the parts store-that way you can make one clean run all the way instead of splicing. You could also buy the hoses preformed for a 98/99 monte Z34 as they will drop right in as well, and will be less likely to kink.
12. Now you can let the engine rock back. Install your radiator hoses, upper and lower (if you bought the ones for a 98/99 monte Z34, they fit perfectly).
13. Bolt up your downpipe and whatever exhaust you have.
14. Next up is suspension- stick your new axle into the transmission until it clicks.
15. Slide the strut up and very loosely install the top 3 nuts so that it still has room to
wiggle around. Squish the axle in, and pull the bottom of the strut out- you should be able to stick the tip of the axle into the hub (don't force it- the splines have to line up). Thread on the axle nut a few threads to make sure it doesn't slip back out.
16. Now push in the bottom of the strut, and pry down on the control arm- stick the ball joint stud into the control arm.
17. Reconnect your wheel speed sensor, and bolt on the sway bar end link (may have to put a jack under the control arm), and tie rod end.
18. Tighten down all those bolts (I prefer to wait on the axle nut until the end)- repeat on the other side. Install the wheels tires as well (you can still tighten down the lug nuts, and axle nut later)
19. Continue reinstalling other parts under the hood- the dogbones, cross braces, bolt down the fuse box, and put the coolant overflow back in- just don't hook up the battery yet.
20. When you go to put your GTP pcm in the Monte box, you will have to spend about 15 minutes with a dremel tool to let it
slide in far enough- I did this when I first did my swap, and it worked fine, but there is another option. I bet the stock box out of a 98/99 Z34 would allow the pcm to drop right in. Or, this is what I went to on my setup:
http://www.wbodystore.com/grandprix/PCM-Tray-p-287.html
It is a pcm tray - you screw it down with a coupel of self tapping screws into the metal below and your new pcm clips right in. It won't be hidden- but being exposed is ok, many people run like this on GTP's with no issue.
Picture of the inside of the stock 96 LS pcm box:
21. Reconnect your throttle cable.
22. Double check all your electrical connections, and fill all your fluids.
23. All that should be left now is to hook up the battery, connect the fuel lines, and put your
body panels back on.
24. The fuel lines will be a pain, on the 3100's they are over on the drivers side, and will not each the top of the L67 without customization. They make splice kits, but it is not easy to do because the hose is a stiff plastic. What many people have done (and the setup I currently have)- is to buy high pressure fuel hose of the correct ID's for the two lines. Cut off all the plastic hose down to the metal- so you should have two bare metal hoses down in the drivers side by the frame. Then, just clamp the hose on the metal tube, and on the fuel rail at the other end (I double clamped the pressure line, single clamped the return. It is important that you don't just buy "fuel hose" (for carb'd applications with less than 10 psi)- you need fuel injection hose (because you'll have 50+ psi pressure in that line.
The other option is to convert both ends to AN fittings (they make fittings that clip into the fuel rail and convert to AN, then adapt the metal lines for AN, but since I have not done this, I cannot comment on it.
25. At this point, you think your fuel lines are connected. I recommend hooking up your battery (clean ALL spilled fuel first), and just turning the key to the on position to check for fuel leaks. Mine leaked 2 times before I finally got everything tightened correctly to where it wouldn't leak (I also thought that I could splice the hard stock plastic lines). ~50psi of fuel pressure will find a way out if it can.
26. Now that your fuel lines are setup double check EVERY connection. Again, I suggest having someone else go over it for you- its easy to skip
stuff and forget about it. I'd look at this list again, and make sure all the stuff is hooked up
-air intake
-fuel lines
-both radiator hoses
-both transmission cooler lines
-both power steering lines
-both axles
-the entire wiring harness
-both upper dogbones
-the 4 bolts on the lower engine mounts (2 on each)
-air conditioning lines (not really necessary at this point)
-throttle body cable
-transmission shifter linkage
27. You're all set to try and start her up. I bumped my engine over while on jack stands before I hooked the fuel up to get oil flowing, but if you have a used engine, it should be ok to fire up. Have a spotter up front, and get ready to kill it asap. I'd probably let it run for ~30 seconds or so- then kill it and check for leaks.
Next time, you can let it run longer if you wish (be aware of the exhaust fumes though- make sure to properly ventilate).
28. Once you got the engine running, and while its still on the jackstands, you'll need to bleed your power steering lines. Basically you turn it left, then all the way right (don't go ALL the way- you don't want to run it to the limit where it makes that louder whining noise, you want to stop just before that)- and keep doing that back and forth- occasionally topping off the fluid in the tank.
29. Last part is just putting back on your remaining body panels/hood/headlights, lowering the car off the jack stands, tightening your axle nuts and lug nuts and taking her for a test drive. Don't forget to tighten the lug nuts- you hate to pull off something this great, only to have your wheels fall off a block away for something so stupid. I'd bleed the cooling system once it gets up to operating temp also.
30. Remember to top off your fluids when you get back- primarily transmission (if yours is new or was drained for a filter change), and also power steering since you probably lost some. I'd probably also check the cooling system one more time, just try bleeding it again to be safe.
That's it; now it's time to enjoy your new engine. You are going to need an alignment because you pulled a lot of suspension pieces apart, and you may need a pcm tune
to get rid of some misc codes that may pop up. Remember that you need to have premium gas in the tank already. If not, try and drive it easy until the tank is almost empty to put premium in.
Ok, now for some extra pics to help clarify:
This is with both the plastic bumper, and metal bumper off- as well as the headlights. The three red circles on each side on those large metal body parts are where the actual metal bumper bolts onto. The two orange circles on the headlight mounts are where the headlight thumb screws are (they still need to be slid to the side to pull out). The two reddish circles on top by the headlight mounts are what that plastic top piece sticks to.
Engine bay minus engine- drivers side. Red circle on the subframe is where the transmision side mount bolts to. The blue arrow above it points to the plastic cover that is helpful to remove if you're messing with the shifter cable. The light green TB on the firewall is the shifter cable I think- I thought it was the throttle cable when I did the chop though. The dark green dot to the right is the heat shield you should remove, especialyl if you're doing aftermarket headers. The blue A/C up top points to the two A/C connections where they go into the car- the heater core lines are the two rubber ones right below it. The yellow dotted lines are your fuel lines, and finally the pink dot is on the sway bar.
This is the passenger side of the engine bay. The most important thing is the "C100" connector- this is the only place where the engine harness goes through the firewall. The blue line coming out of it is where the engine harness runs- (that box it breaks off to is the PCM box). There is a Y right by the C100 connector- the other side goes to the backside of the engine. The red circle on the subframe is the where the engine side bolts to (it sits down in a trough). The pink dotted line is the high pressure power steering line (note the threaded connector on the end). The yellow dotted line is the low pressure, return for power steering (note it also goes down on the bottom to the cooling loops.
This is the firewall before and after my 'mods'. It is necessary to do if you are trying to install aftermarket headers. You can see the area I knocked out, but the area that must be heavily modded also is the yellow area (I mean it almost must be cut out). Also, you'll probably want to bend the heat shield mount out of the way- or cut it off (red arrow).
This is a suspension shot with the strut/hub still in there. The yellow circles are where the caliper bracket bolts on (huge Torx socket). The red circle is where the tie rod goes into (tie rod is what your powersteering rack pulls back and forth to steer the car). The orange arrows show where the axle normally goes into if it weren't already popped out. Lastly, the green up top shows the ABS wheel speed sensor wire. It must be unclipped from 2 wire clamps and unplugged before you can remove the strut.
Other side without strut- now you can see the wheel speed sensor wire. The yellow arrow points to the hole that the stud sticking out of the bottom of the strut/ball joint goes into.
More identification of parts. The orange are 3100 fuel lines. The blue are the heater core hoses (new ones will run over to far passenger side below alternator). The yellow piece is the heat shield which will need to be removed before banging the firewall if you plan to install aftermarket headers. Red circle is where high presssure power steering line connects to rack (its the one on the side- not the one in the front).
How to build custom axles-for those who don't want to pay a shop to do it
For those of you who already have a 4t65e- you can reuse your factory drivers side axle. For those of you swapping from a 4t60e, you will need both axles replaced. The passenger side axle MUST be custom made if you want to run a 4t65e-HD; no 5th gen monte ever came with the HD trans, and the HD trans has a slightly larger differential housing. However, you can run a drivers side axle from a 98-99 Z34 monte- so you can go to the parts store, buy one, and drop it in- the drivers side axle is the same between the 4t65e and 4t65e-HD. If you want to save some money, you could always custom make both axles (assuming at least both inner axles came with your new trans) using parts from your old axles.
The basic process is- you can use your factory outer axle (the parts that plug into the wheel hubs, and center shafts (the part between the two boots)- you need to install the new inner axles (the part from the inner boot that plugs into the transmission) onto your stock outer axle/center shaft.
You will need 2 special tools before you begin. One is a set of snap ring pliers- there are two snap rings on each axle that you have to expand. Second is a CV boot crimper for doing the crimps on your new CV boot clamps. Plus, you also need a new 'boot kit' for each axle you do (comes with 1 boot, 1 bag of grease, 1 small clamp, 1 big clamp).
I made an illustration to show the process:
Lastly- some usual sticky spots with the swap:
Fuel Lines- I haven't found a solution to this that I really love that is easy and cheap. What I did was cut off all the plastic fuel line- and run new fuel injection hose from the hard metal line down on the frame rail up to the fuel rail for both feed and return. Make sure you use fuel injection hose, as the carb hose is not rated for the pressures involved. I also double clamped the feed hose on both ends. On the fuel rail end, I didn't use the quick disconnects at all- just put the hose right on the metal rail, it has a bump to hold it. You could convert to AN line, but thats kinda costly. Its really up to you- just know that the rubber FI hose needs to be checked frequently as a maintenance item- the clamps need checked for tightenss and the hose needs checked for cracks/leaks- it is a severe fire hazard if you let this hose rot or get melted on something!
Low boost- make sure the boost bypass valve (cylinder on the front of the supercharger) has the wiring going to its solenoid hooked up correctly (or that the vac port is blocked off to get rid of the solenoid completely). You have to run a wire to the pcm and such- and it is possible to screw it up. If you're down around 2-4 psi on a stock pulley- either you have a massive vacuum leak, or this is the problem.
Power steering- make sure you have a 98/99 Z34 high pressure line (Napa sells them for about $30) and it'll make this 100x easier.
Exhaust- the 5th gen monte has an unusually tight firewall clearance for the exhaust. Don't be suprised if you're trying to install headers, or any part made for a 2nd gen wbody (grand prix, etc)- if they don't fit- its very common. The only known thing to fit perfectly is a 98/99 Z34 downpipe.
Troubleshooting
Unfortunately, its difficult to troubleshoot something with so many variables. The basic key is the same with any engine:
-Do you have 12 volts of battery power (if so, the engine should turn over with the key)
-Do you have fuel pressure (listen for the fuel pump running, depress the test port and see if there is pressure)
-Do you have spark (you can use a spark tested to see if the spark is working)
If you have fuel + spark, and +12 volts, it should run.
If it is running very poorly, double check your vacuum lines, and all electrical connections.
If you're still having issues, post a thread and we'll try and help you figure it out!
Thanks for taking the time to read this- if you have any suggestions, corrections, or questions, please feel free to PM me.
Last edited by bumpin96monte; Mar 10, 2010 at 07:52 PM.


Thread Starter
Joined: Feb 2008
Posts: 6,471
I actually googled it, hoping to find a totally different meaning for L67, like some random star cluster, or some sort of bacteria or something- but I was shocked to find L67 defined in urbandictionary... so I figured it was worth a post:

http://www.urbandictionary.com/define.php?term=L67