
Front Coilovers on 5th Gen


Thread Starter


Joined: Feb 2008
Posts: 6,471

Done for the weekend now...
I need to order new springs. I tried cutting into my new 2nd gen w-body upper mounts with a razor blade (to see how deep in the metal is) and it appears to be right under the surface. So now I need at least a 3" ID spring up top. I suppose I could always try ordering different mounts, but rather than risk it, I'm just going to go with new springs.
I found some QA1s that are a 2.5" bottom with a 3.5" top. Then I found some spring isolators for 3.5" spring that have a 3 1/8" ID (close enough to the 3.050" rubber on the new mounts). I'll get those ordered tonight so hopefully I'll have them by next weekend.
I did find a trick to removing the spring perch. I was initially trying to grind the whole band of material away, but it appears that is unnecessary. It worked better when I started grinding from the bottom (weld side) up because once you break through the weld, the metal mostly just peels off. There are two spot welds on the top side, but they're obvious once you've removed the entire lower weld.
I finished cleaning off as much rust as I could, and sprayed the whole thing down with rust converter. It needs to sit 24 hours before I paint it though.
While trying to prep the new hubs for the ARP studs, I ran into a couple of issues there too. The heads on the ARP studs are slightly bigger, so I had to notch the housing a tad. Also, I was having a very hard time getting my arbor press to push the knurled section in. It goes in 1/16" or so and stops, I'll pick up some washers and a high grade nut tomorrow to try and pull them into place with an impact.
edit- just placed my order. They had one of those wbody strut tools, so I went ahead and picked one up. It should help with removal of the other side, and should allow me to properly torque the new strut cap on.
On a side note, my hands still smell like strut oil, lol....
Last edited by bumpin96monte; Nov 8, 2015 at 09:21 PM.
Thread Starter
Joined: Feb 2008
Posts: 6,471
Ive got my parts in and I've got tomorrow free to work on it all day.
It looks like that spring setup I ordered is going to work perfectly. The 3.5" upper spring isolator fits very nicely around the upper strut mount rubber. Also, I can use the sealed torrington bearing setup that came with the upper mount set between the upper isolator and the strut tower. I'll probably still run the torrington bearing setup I bought on the bottom of the spring as well, I can't see any reason not to run both.
The spring is pretty odd too, it's 3.5" all the way down and then the last coil or two tapers down to 2.5". That should eliminate the issue of the spring rubbing that I've seen some people have. My only concern is the 10" length vs the other 12" spring. I do pick up 3/8" with the upper isolator, but it's still a lot shorter. We'll see if it causes any issues with height.
Last edited by bumpin96monte; Nov 14, 2015 at 08:38 PM.
Thread Starter
Joined: Feb 2008
Posts: 6,471
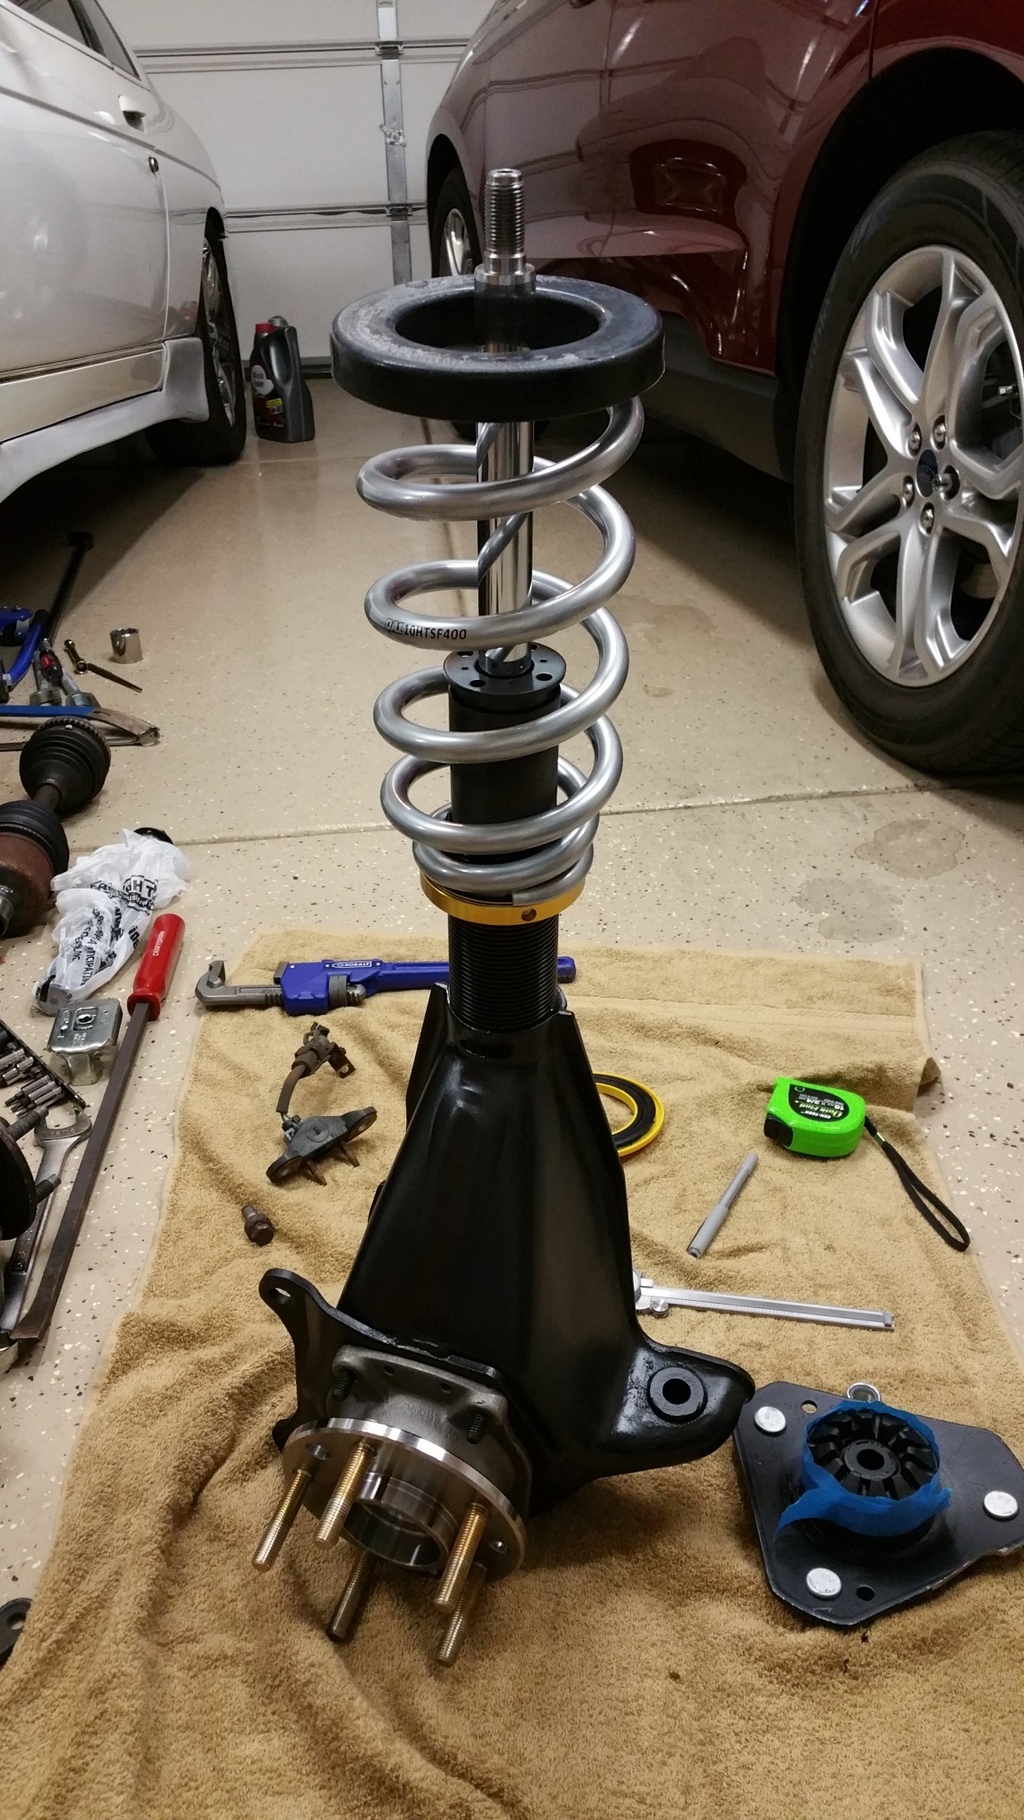
This is definitely more of a challenge than I had expected. Still don't have the first side done as of today. It's getting close, and I think I have a path forward, but it's still going to take some work.
At this point, I've got the new tie rod end in, axle rebuilt, new studs in the hub, hub installed, ball joint installed (not in the pic obviously). I've also got the sleeve step cut to fit the strut.
Where I'm still struggling is with the top mount. As I previously mentioned, the factory upper mount cannot work as the strut connection point is about 4" wide. I bought a 2nd Gen wbody upper mount, but it is a challenge. The bolt holes don't perfectly line up (easy to solve with a little dremel work), but the harder part is the actual strut rod hole.
The existing hole is about 9/16" diameter and the metal part of the hole is over an inch deep. The strut rod for a 5th gen monte needs a hole about 5/8", and even if I drilled it out, it would still cover the entire threaded portion of the strut rod.
I decided to cut the mount in half depth wise. After lots of melted rubber, I found something not so good. The mount is built using 3 concentric metal pipes with rubber in between each. So that means the actual center mount is completely suspended in rubber.
On the innermost pipe, to the strut rod mount, only half is filled with rubber. Theoretically I could just ream out the center hole and bolt it in, but I'm nervous that I've cut the strength down too much that the rubber would tear and the center metal piece would pop out.
I think I have a plan though. I think I'm going cut out a metal circle of sheet metal about the same OD as the mount (about 3.5") and epoxy it to the bottom of the mount. This will help spread the load across all of the metal rings in compression. For rebound strength, I'll just add a fender washer to the top side since it should be easy to find something to fit in the hole that will spread the load across at least 2 of the metal rings.
Last edited by bumpin96monte; Nov 22, 2015 at 09:26 PM.
Monte Of The Month -- May 2012
Monte Of The Year 2012
Monte Of The Month -- February 2017
Monte Of The Year 2012
Monte Of The Month -- February 2017

Joined: Jan 2008
Posts: 4,945
From: Mountains of Utah
Totally impressed with your perseverance, man those kinds of projects just seem to find you don't they. Nothing is ever ever easy for you. hats off to you and your great efforts...
Thread Starter
Joined: Feb 2008
Posts: 6,471
Got the first side pretty much finished yesterday. Only thing left is grinding the holes in the top plate so that I can fit it back on (the 2nd Gen wbody upper bolts are just slightly differently spaced than the 1.5 gen). It doesn't technically need the top plate anymore, but I do think it looks cleaner and it'll give the STB another layer of steel to push on.
The 10" spring works out perfectly. With the collar threaded 1/2" from the top of the sleeve, it sits right at stock ride height. I wasn't able to drop it too much with my normal jack, but I've got it sitting with 3/4" of fender gap.
One more problem has come up. The extended wheel studs appear to be a pinch too long for these lugs. I ended up having to install two 1/4" wheel spacers in order to be able to tighten down the lug nuts. That puts the wheel flush with the fender which obviously won't work over bumps and looks goofy with the rears tucked inside the fender.
The hard part is that these wheel have tiny lug holes, so I have to use tuner lugs to fit them. Looks like I'm going to have to order some extended tuner lugs off the Internet to be able to just get back to one spacer (I bought the spacers to get just a pinch more clearance to the caliper bracket since they are really close).
Monte Of The Month -- May 2012
Monte Of The Year 2012
Monte Of The Month -- February 2017
Monte Of The Year 2012
Monte Of The Month -- February 2017
Joined: Jan 2008
Posts: 4,945
From: Mountains of Utah
Nice to see your plan coming together Bumpin. Does not sound like the simple project at all. But then compared to what you have been doing with your engine it is relatively simple.
So you put on longer than normal ARP wheel studs? What was that about? They are so strong you can use the wheel spacers worry free. The tuner nuts can look nice just have to find the right ones, not that there are a ton to choose from.
I replaced all mine with ARP's and use 1/4" spacer on my rears too. I just did not like the feeling of 13 year old wheel studs taking the stress from a good romping, cornering etc.
Thread Starter
Joined: Feb 2008
Posts: 6,471
The wheels are what makes it difficult since there aren't many options for a lug nut that fits in the lug holes. Because the holes are deep and narrow, that pretty much requires you to run nuts that are end driven vs anything that is driven from the sides since the nuts barely fit in the hole by themself. I thought it would be no problem since my existing lugs are open ended, but I didn't think about them not being internally threaded past where the driver engages. So if you have even 1 more thread left on the stud once you've filled the threads, the nut gets tight but isn't seated on the wheel (which is the problem I had with only one spacer up front).
I did order some special extended, open ended tuner nuts, so I'm thinking that those will fit better and they won't care how much extra stud you have since they're threaded through.
As for running both spacers on one wheel, I want to get away from doing that. I'm not worried about strength of the studs, but I am worried that the tire is flush with the fender. It looks nice, but a hard bump will put the tire into the fender for sure. It would take a ton of rolling the fender to make it have clearance for suspension travel. That's why I need to get back down to just one spacer so that it all tucks inside the wheel well.
Last edited by bumpin96monte; Dec 1, 2015 at 03:23 PM.
Thread Starter
Joined: Feb 2008
Posts: 6,471
On a side note, I did get the first side (drivers) completed. I backed the car out to clean up the garage. Should be starting the second side this weekend.
It should go a lot faster since now I have all of the right parts and know exactly what needs to be modified.
It should go a lot faster since now I have all of the right parts and know exactly what needs to be modified.
Monte Of The Month -- May 2012
Monte Of The Year 2012
Monte Of The Month -- February 2017
Monte Of The Year 2012
Monte Of The Month -- February 2017
Joined: Jan 2008
Posts: 4,945
From: Mountains of Utah
Your the boss! Really admire you and the great variety of modification work you have personally taken on and always find some solution to complete the mods.
I understand more now with your explanation about being able to only use end driven lugs. Tuner nuts it is... Our 6th gens have open ended nuts and then the plastic nut covers, would that combination have not been an option? Would your stud be too long and the caps not have any room to be seated?
I understand more now with your explanation about being able to only use end driven lugs. Tuner nuts it is... Our 6th gens have open ended nuts and then the plastic nut covers, would that combination have not been an option? Would your stud be too long and the caps not have any room to be seated?