
Repair Guide: Finally!!! Gauge Cluster Problem Fix!! - Stepper Motor


Thread Starter


Joined: Oct 2006
Posts: 3,986
From: North Fond du Lac, WI
For those of you who own the 2000 - 2005 Monte Carlo we know that a popular problem has been our speedometer to stick, go dead, etc. I have FINALLY found the answer to the problem!!!
Inside the cluster there is a stepper motor for each gauge and they have a tendency to go bad. There is now an updated motor that is performs better.
Here is some information regarding the motor and associated problems. I have just copied/pasted in no particular order. I know I can fix these now so if someone would like me to, PM me and we will set it up.
If your Speedometer is experiencing any of the problems listed below, then these NEW UPDATED stepper motor will fix your problem. [ul][*]any gauge dead[*]stickey gauges[*]gauges not reading correctly[*]Needles peg out, and come back after it sets and then it only goes down 5 miles at a time when you turn the key on.[*]And any other weird thing.....
[/ul]THE BAD STEPPER MOTOR IN YOUR SPEEDOMETER IS PART # X C5 168
THE UPDATED STEPPER MOTOR WITH THE FIX IN THEM IS PART # X 25 168
UPDATE STEPPER MOTOR, PART # X 25 168 THAT GO BAD IN THE TRUCKS AND CARS LISTED BELOW,[*]FULL SIZE SIERRA[*]SILVERADO[*]SUBURBAN[*]TAHOE[*]YUKON[*]ESCALADE[*]AVALANCHE[*]DENALI[*]GMC ENVOY[*]TRAILBLAZER[*]H2 HUMMER[*]IMPALA[*]MONTE CARLO[*]ENVOY[*]CAVALIER[*]SUNFIRE[*]VENTURE[*]ASCENDER [*]SILHOULETTE


Joined: May 2005
Posts: 3,221
ORIGINAL: 04 Intimidator
For those of you who own the 2000 - 2005 Monte Carlo we know that a popular problem has been our speedometer to stick, go dead, etc. I have FINALLY found the answer to the problem!!!
Inside the cluster there is a stepper motor for each gauge and they have a tendency to go bad. There is now an updated motor that is performs better.
Here is some information regarding the motor and associated problems. I have just copied/pasted in no particular order. I know I can fix these now so if someone would like me to, PM me and we will set it up.
If your Speedometer is experiencing any of the problems listed below, then these NEW UPDATED stepper motor will fix your problem. [ul][*]any gauge dead[*]stickey gauges[*]gauges not reading correctly[*]Needles peg out, and come back after it sets and then it only goes down 5 miles at a time when you turn the key on.[*]And any other weird thing.....
[/ul]THE BAD STEPPER MOTOR IN YOUR SPEEDOMETER IS PART # X C5 168
THE UPDATED STEPPER MOTOR WITH THE FIX IN THEM IS PART # X 25 168
UPDATE STEPPER MOTOR, PART # X 25 168 THAT GO BAD IN THE TRUCKS AND CARS LISTED BELOW,[*]FULL SIZE SIERRA[*]SILVERADO[*]SUBURBAN[*]TAHOE[*]YUKON[*]ESCALADE[*]AVALANCHE[*]DENALI[*]GMC ENVOY[*]TRAILBLAZER[*]H2 HUMMER[*]IMPALA[*]MONTE CARLO[*]ENVOY[*]CAVALIER[*]SUNFIRE[*]VENTURE[*]ASCENDER [*]SILHOULETTE
Thread Starter
Joined: Oct 2006
Posts: 3,986
From: North Fond du Lac, WI
It's about a 30 minute job once the cluster is out. All you need are the motors and know how to solder decently.
It's a little complicated but you turn the dials back to zero, tape them in place, put a mark on the tape were they were located, pop one off with a fork. Then each motor has 4 solder points on it. You desolder them, put the new motor on and then put the dial back on. Repeat until they are replaced.
It's a little complicated but you turn the dials back to zero, tape them in place, put a mark on the tape were they were located, pop one off with a fork. Then each motor has 4 solder points on it. You desolder them, put the new motor on and then put the dial back on. Repeat until they are replaced.
Joined: May 2005
Posts: 3,221
ORIGINAL: 04 Intimidator
It's about a 30 minute job once the cluster is out. All you need are the motors and know how to solder decently.
It's a little complicated but you turn the dials back to zero, tape them in place, put a mark on the tape were they were located, pop one off with a fork. Then each motor has 4 solder points on it. You desolder them, put the new motor on and then put the dial back on. Repeat until they are replaced.
Thread Starter
Joined: Oct 2006
Posts: 3,986
From: North Fond du Lac, WI
ORIGINAL: 04MonteLS
It would be nice to have a guide with pictures, any chance you could make that happen?
It would be nice to have a guide with pictures, any chance you could make that happen?

Here is a walk through that is from a Blazer, not quite the same, but close enough.
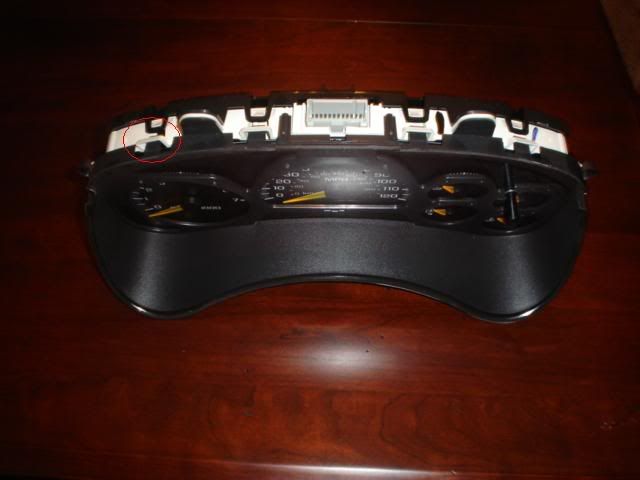
The cluster is constructed from 3 pieces which are held together with clips. Remove the front clear cover by unfastening the clips.
Turn each needle counter-clockwise until it stops as shown below and then mark off the location on the tape with a pen. If you do this, you should have no issues with calibration when you reassemble.
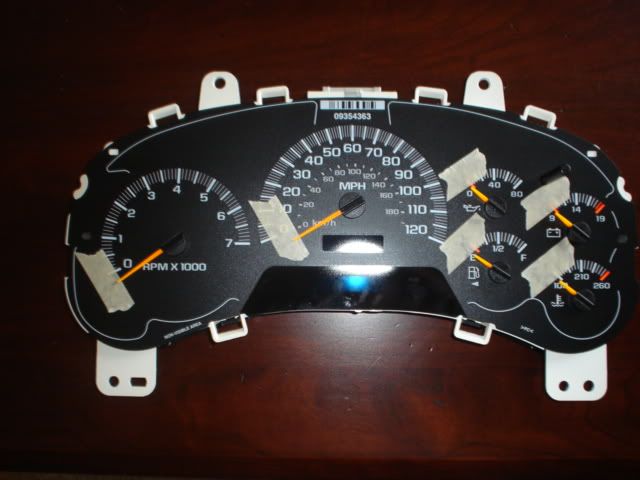
Once you have your positions marked, turn each needle counter-clockwise until it breaks free from the shaft. Then use a fork to pry each needle off. It will take a little force, but just be slow.

Unfasten the remaining clips that hold the back cluster cover in place and remove. You will then be able to pull the circuit board off.
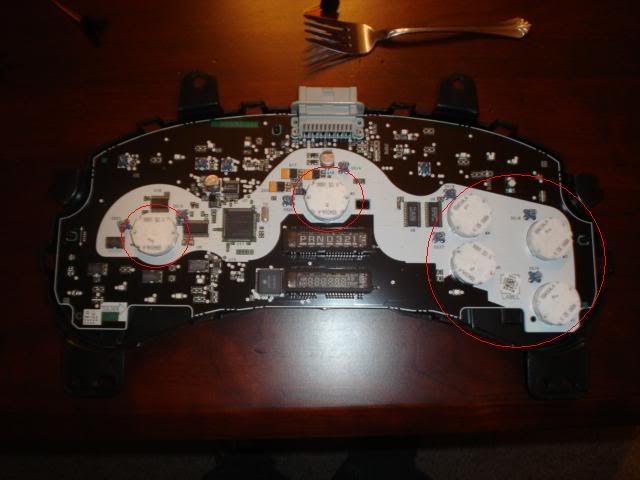
Notice the 6 stepper motors, each about the size of a quarter.
(Replace stepper motor)
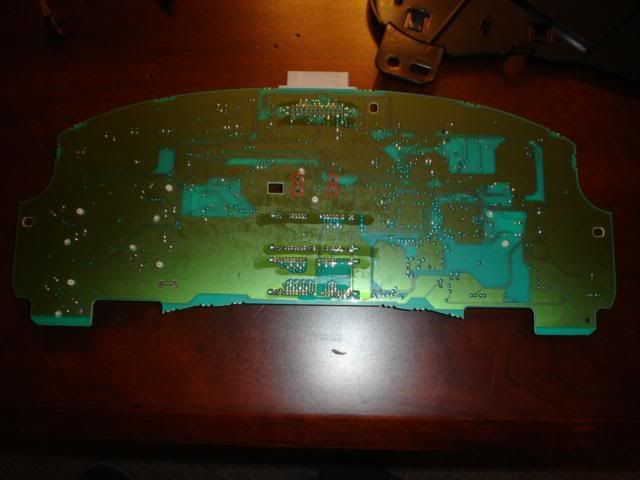
On the reverse side of the circuit board you will need to desolder the 4 points that are holding the motor on. These are easy to determine as they stick up a bit more.
Heat the solder and use a solder-sucker to remove the solder. If you don't have a solder-sucker, you can have an extra hand pry at the motor from the other side as you heat.
**Just be careful not to heat things up too much as this is a circuit board and you can harm other components if not careful.
I was replacing my speedometer motor, so I desoldered the following points.
Once the old motor is off, make sure the holes are clear of solder and put your new motor in.
Resolder your 4 points and place the circuit board on the back cover. Fasten the overlay piece back on now.
Now press each needle back on in the 12 o-clock position. Then turn each needle back to your mark on the tape. If you miss the mark just keep turning counter-clockwise until you come around again.

To test things out, plug the wiring harness back to the cluster. You should immediately see the needles jump down and then up to the original 'zero' points.
Make sure the needle for your new motor moved. You should really test this out first before reassembling everything to make sure your needles go back to their original points.
Typically, the gas gauge needle is a tick or so below empty. My RPM gauge was also about 100 rpm under zero at the rest position, so I made sure they were exactly in the same spot after I plugged the cluster back in.
Yours may differ slightly.
Once you determine your needles are correct, just snap the clear plastic cover back on the gauge.
(Reassemble)
Attach the cluster back to the dash and reassemble the dash in reverse order.
Joined: May 2005
Posts: 3,221
ORIGINAL: 04 Intimidator
Needy.
Here is a walk through that is from a Blazer, not quite the same, but close enough.
The cluster is constructed from 3 pieces which are held together with clips. Remove the front clear cover by unfastening the clips.
Turn each needle counter-clockwise until it stops as shown below and then mark off the location on the tape with a pen. If you do this, you should have no issues with calibration when you reassemble.
Once you have your positions marked, turn each needle counter-clockwise until it breaks free from the shaft. Then use a fork to pry each needle off. It will take a little force, but just be slow.
Unfasten the remaining clips that hold the back cluster cover in place and remove. You will then be able to pull the circuit board off.
Notice the 6 stepper motors, each about the size of a quarter.
(Replace stepper motor)
On the reverse side of the circuit board you will need to desolder the 4 points that are holding the motor on. These are easy to determine as they stick up a bit more.
Heat the solder and use a solder-sucker to remove the solder. If you don't have a solder-sucker, you can have an extra hand pry at the motor from the other side as you heat.
**Just be careful not to heat things up too much as this is a circuit board and you can harm other components if not careful.
I was replacing my speedometer motor, so I desoldered the following points.
Once the old motor is off, make sure the holes are clear of solder and put your new motor in.
Resolder your 4 points and place the circuit board on the back cover. Fasten the overlay piece back on now.
Now press each needle back on in the 12 o-clock position. Then turn each needle back to your mark on the tape. If you miss the mark just keep turning counter-clockwise until you come around again.
To test things out, plug the wiring harness back to the cluster. You should immediately see the needles jump down and then up to the original 'zero' points.
Make sure the needle for your new motor moved. You should really test this out first before reassembling everything to make sure your needles go back to their original points.
Typically, the gas gauge needle is a tick or so below empty. My RPM gauge was also about 100 rpm under zero at the rest position, so I made sure they were exactly in the same spot after I plugged the cluster back in.
Yours may differ slightly.
Once you determine your needles are correct, just snap the clear plastic cover back on the gauge.
(Reassemble)
Attach the cluster back to the dash and reassemble the dash in reverse order.
ORIGINAL: 04MonteLS
It would be nice to have a guide with pictures, any chance you could make that happen?
It would be nice to have a guide with pictures, any chance you could make that happen?
Here is a walk through that is from a Blazer, not quite the same, but close enough.
The cluster is constructed from 3 pieces which are held together with clips. Remove the front clear cover by unfastening the clips.
Turn each needle counter-clockwise until it stops as shown below and then mark off the location on the tape with a pen. If you do this, you should have no issues with calibration when you reassemble.
Once you have your positions marked, turn each needle counter-clockwise until it breaks free from the shaft. Then use a fork to pry each needle off. It will take a little force, but just be slow.
Unfasten the remaining clips that hold the back cluster cover in place and remove. You will then be able to pull the circuit board off.
Notice the 6 stepper motors, each about the size of a quarter.
(Replace stepper motor)
On the reverse side of the circuit board you will need to desolder the 4 points that are holding the motor on. These are easy to determine as they stick up a bit more.
Heat the solder and use a solder-sucker to remove the solder. If you don't have a solder-sucker, you can have an extra hand pry at the motor from the other side as you heat.
**Just be careful not to heat things up too much as this is a circuit board and you can harm other components if not careful.
I was replacing my speedometer motor, so I desoldered the following points.
Once the old motor is off, make sure the holes are clear of solder and put your new motor in.
Resolder your 4 points and place the circuit board on the back cover. Fasten the overlay piece back on now.
Now press each needle back on in the 12 o-clock position. Then turn each needle back to your mark on the tape. If you miss the mark just keep turning counter-clockwise until you come around again.
To test things out, plug the wiring harness back to the cluster. You should immediately see the needles jump down and then up to the original 'zero' points.
Make sure the needle for your new motor moved. You should really test this out first before reassembling everything to make sure your needles go back to their original points.
Typically, the gas gauge needle is a tick or so below empty. My RPM gauge was also about 100 rpm under zero at the rest position, so I made sure they were exactly in the same spot after I plugged the cluster back in.
Yours may differ slightly.
Once you determine your needles are correct, just snap the clear plastic cover back on the gauge.
(Reassemble)
Attach the cluster back to the dash and reassemble the dash in reverse order.
But before I do all that, I need to order some custom guage faces. Anyone make them for the LS?