
DIY: Painting using Dupli-Color

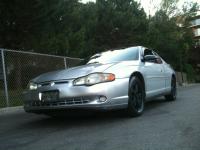


just showing the steps i took to bring my front bumper back to life, it had scratches and missing paint all over the entire bumper and got to the point where it just started making the car look plain ugly.
all the products i got were either from Pepboys or autozone. also advance and Orilley's sell these too.
first the collection of the items you will need to start the project,

i didn't picture everything in there but here is everything piece by piece
prep wipes

sand paper grit 320

sand paper grit 1500

sand paper grit 2000

spray primer

perfect match color (duplicate to the original paint code)

and finally, Clear coat

and i didn't picture it but painters tape too, you will see it at later on applied.
here is what i'm trying to repair,


somethings are a must:
1. have a garage or a closed area to work at
2. the weather has to be cool and dry, moister will cause paint to look foamy and dries white like milk.
first step, Sanding.
After washing the car section off what you don't want painted and sand the area using the 320 grit paper applying medium to heavy pressure.


all the products i got were either from Pepboys or autozone. also advance and Orilley's sell these too.
first the collection of the items you will need to start the project,
i didn't picture everything in there but here is everything piece by piece
prep wipes
sand paper grit 320
sand paper grit 1500
sand paper grit 2000
spray primer
perfect match color (duplicate to the original paint code)
and finally, Clear coat
and i didn't picture it but painters tape too, you will see it at later on applied.
here is what i'm trying to repair,
somethings are a must:
1. have a garage or a closed area to work at
2. the weather has to be cool and dry, moister will cause paint to look foamy and dries white like milk.
first step, Sanding.
After washing the car section off what you don't want painted and sand the area using the 320 grit paper applying medium to heavy pressure.


sanding shows how much more worst it was.
next step, wash the bumper again using a damp/wet towel (i used two sheets of blue shop towels folded and soaked)
that will remove most of the powder generated by sanding the paint.
next use the prep wipes as pictured above and wipe the entire area, i used 3 sheets in total.
now the fun part, applying primer.
tips to avoid bleeding the primer:
shake the can for a few minutes
hold can 8-12 inches away from bumper
the nozzle has a white tip, it directs the paint to spray horizontal or vertical, just turn it with you're finger to what you like better.
when you start spraying do no just squeeze the nozzle and start moving back and forth, but instead do one line at a time going one direction. start spraying away from the bumper and then quickly make a pass on the bumper one section at time, this will help over spray from happening in the end where you would have to stop you're motion and start moving the other way causing paint bleeding.
this is right after i sprayed the primer on.
i applied 2 coats of primer, 20 minutes wait time between coats.


allow any where from 15 minutes to a few hours of dry time, the bigger the area the more wait time.
this is how it looked the next morning,

in my case i made a small section where you can see some bleeding (sadly my camera wouldn't show it and i didn't take a closer pic)
but if you did get the bleeding situation to even out the paint surface, you will have to
1. sand the area with the 320 grit paper applying light pressure
2. take you're time, do NOT apply heavy pressure
3. blow or wipe the area you are sanding regularly
4. once smooth, wash with wet towel.
5. use the 1500 and dry sand it to smooth the edges and the infected area
6. repeat step 4.
now before i painted i used the 1500 grit paper and very lightly dry sanded the entire bumper to allow for a smoother surface for paint to sit on and reduce the chance of having orange peel effect later. *you don't have to do this if you don't want to.
Third biggest step is applying paint,
same rules apply as to painting as it is to priming, however you when applying paint first coat leave the tape on the car,
allow some time to dry (about an hour) then before you apply you're second coat, this is IMPORTANT, remove the tape off and increase you're work area, basically allow the paint coats to merge with the original untouched paint to avoid the obvious difference between new paint and old/faded paint. apply 2-3 coats in total with the 2nd and 3rd with out the paint.
this is how it looked after my first coat,


i forgot to take a picture of the 2 following coats with the tape off but it looked the same as above minus the tape being there.
Now for the clear coat.
clear coat doesn't require alot of shaking but you can either treat it the same as primer and paint as far as applying it or you can just plain hold and spay all over the pace, either way it doesn't matter, but don't stay in one place too long or you will get the bleeding situation.
i did my research and found out GM uses 3 coats of clear. so i did the same and applied 3 coats of clear, it goes on clear, you won't notice it on so don't worry its only to add shine and protection to you're paint. same applies for clear coat allow 20-60 minutes of dry time between each coat.
after the wait time is over for the 3rd coat, grab the 2000 grit sand paper and put it in a bowl of water, also use a water hose or spray bottle and wet sand the entire area you painted, apply very light pressure while constantly soaking the area with water. this will take away most orange peel and even out the surface leaving you with a smooth finish thus distributing the shine of the car properly.
here is the final product, its night pictures and i'm sorry these are the best my camera could do.


everything together came out to a little over $50
i also did my hood a little since i had extra primer/paint/bodyfiller/clear left.
you can also clay and wax the car after that, but that's up to you...
oh and before i forget, BLACK CARS OWNERS beware black cars are very hard to do and if you make any mistakes the entire job will be a mess, just giving the heads up on that. silver cars are actually the easiest to paint followed by similar colors and light colors then the darker the color is the harder it gets.
Last edited by Habbibie; Oct 11, 2011 at 01:53 AM.

Good write up & great job on it but ill have to dissagree about silver being easiest to paint, there prob one of the hardest if u dont have the paint exact to the origonal itll stick out like a sore thumb


oh and last thing, all the products combined including the tape (not pictured) was $52.70 and about 24 hours of work and wait time.
ps. when i add final pics i will correct the grammer and spelling to my original post.
Last edited by Habbibie; Oct 10, 2011 at 08:32 PM.

i disagree too. black is the easiest to match and paint...anything with metallics are hard and whites are a pain also.
i've also done my brother's front bumper on his car, white car and that was pretty easy...as easy as this monte carlo was.
what i meant by saying black cars are hard is not the paint not matching good but the clear paint wouldn't, all cars are easy truly if you get the exact paint code color as yours.
oh and PICTURES ARE UP!!!!


Great write up. i was thinking of doing this to one of my friends black 95 LS but seeing that black is harder maybe we have to think about it. Did you use a product like Meguires Ultimate Compound after the 2000 grit?
No, i used Mothers Clay bar kit and Turtle spray on wax after that.