
2003 fender replacement question...


Thread Starter
|

Joined: May 2015
Posts: 8
What's involved in removing the driver side front fender on a 2003 Monte SS with the High Sport package?
Car was hit and I'm wondering if replacing the fender is something that a layman like myself can do without resorting to a body shop.
Thanks.
Car was hit and I'm wondering if replacing the fender is something that a layman like myself can do without resorting to a body shop.
Thanks.


Estimated completion time 60-90 minutes. Used a drill/impact driver which made it a 60 minute job, manual operation will take longer.
Difficulty level 2 out of 5
I just replaced mine last week actually. You will need sockets in the following sizes: a 7mm, deep 10mm, 12mm and maybe a deep 11mm (some montes come with 11mm nuts holding the bumper to the fender some have a 10mm) and a needle nose pliers.
1. remove the wheel of the corisponding fender (makes life easier if the bumper is still attached to the car.
2. Remove the screws holding the splash guard (all are 7mm) remove it completely it makes life a bit easier, also remove the headlight.
3. Pop the hood open, there are three 10mm bolts holding it, loosen these up but don't remove all the way yet.
4. There are two 12mm bolts holding it at the hinge to the hood, loosen these but don't remove them completely.At the end you will need to remove the bolts all the way but remember it will make it a bit challenging to reinstall as you need to lift the hood with one hand and screw with another, if it's your original fender it will have a spot weld under that hinge, you will have to wiggle it till it breaks the weld.
5. Remove the two nuts holding the bumper to the fender (either a 10 or 11mm/ 7/16" nuts)
6. Remove the side support screws attaching it to the wheel-wel area (10mm) of you are doing the passabger fender you will need to remove the window washer fluid tank to access all the screws properly, the washer tank is also held in place by three 10mm screws.
7. Under the car (if it hasn't rusted all out yet, there will be two 10mm bolts holding the fender to the frame) carefully remove these.
8. Use either a flat head screw driver or needle nose plairs to squeeze the trim clip holding the fender to the side trim piece on bottom. Try your best and be patient with this clip. Don't break it, getting a replacement might take a few days.
9. Once all screws are removed on the lower side of the fender refer back to step (3) and fully remove theses bolts now, and see if it will slide out from under the hinge bolts (refer to step 4) if it doesn't side out because the tap weld, then remove hinge bolts and lift the hinge and forcefully break the weld. Smooth out the weld hole of needed after that.
10. By now your fender should be completely loose and ready to come off!
Putting new fender on... Start by reversing these steps in this order: step 4, step 3, step 6, step 7, step 8, step 5. (Keep all the bolts loose, this will give you about an eight of and inch play to adjust the fender gap to the door, make sure your door opens up freely before tightening everything. Once adjusted and all previous steps screws are tight, reverse step 2 and reinstal your splash guard, reinstal your headlight And don't forget to tighten the screws in step 5.
Boom you're done, ensure your door still fully opens after everything is been tightened (do it carefully as if it did move back the door will bend or scratch the fender.
I did this literally 7 days ago (I also replaced my door and bumper that day too)
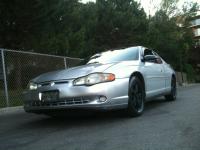
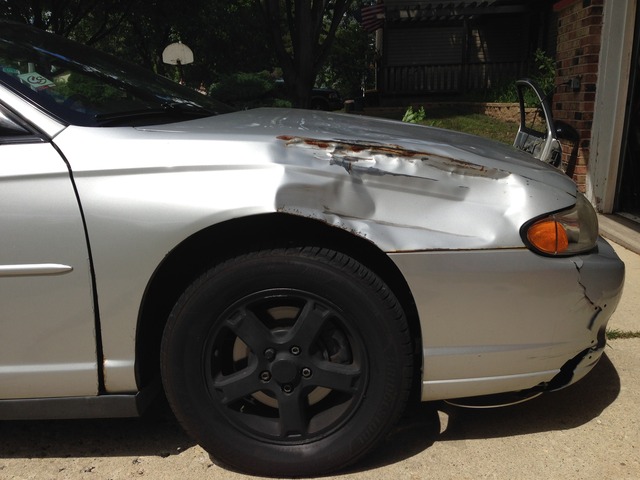
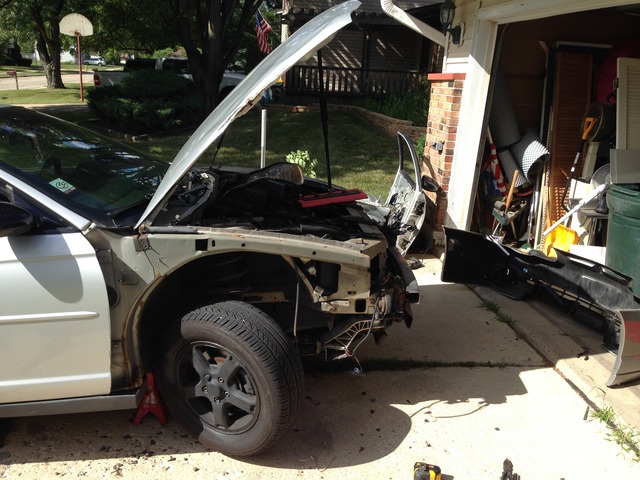
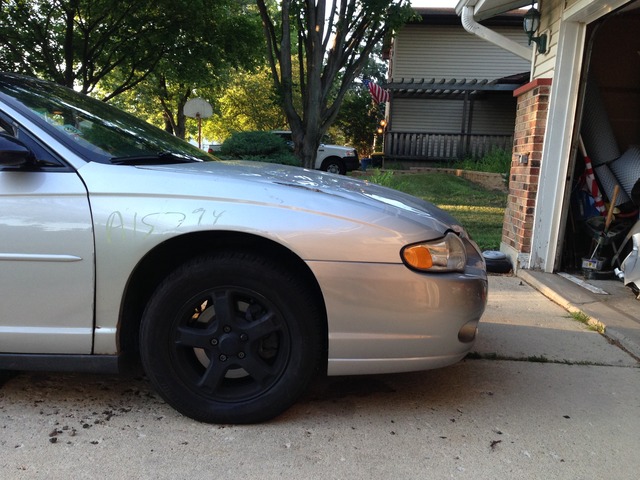
Here's my before, during and after pics.
PM me if you have any questions.
Difficulty level 2 out of 5
I just replaced mine last week actually. You will need sockets in the following sizes: a 7mm, deep 10mm, 12mm and maybe a deep 11mm (some montes come with 11mm nuts holding the bumper to the fender some have a 10mm) and a needle nose pliers.
1. remove the wheel of the corisponding fender (makes life easier if the bumper is still attached to the car.
2. Remove the screws holding the splash guard (all are 7mm) remove it completely it makes life a bit easier, also remove the headlight.
3. Pop the hood open, there are three 10mm bolts holding it, loosen these up but don't remove all the way yet.
4. There are two 12mm bolts holding it at the hinge to the hood, loosen these but don't remove them completely.At the end you will need to remove the bolts all the way but remember it will make it a bit challenging to reinstall as you need to lift the hood with one hand and screw with another, if it's your original fender it will have a spot weld under that hinge, you will have to wiggle it till it breaks the weld.
5. Remove the two nuts holding the bumper to the fender (either a 10 or 11mm/ 7/16" nuts)
6. Remove the side support screws attaching it to the wheel-wel area (10mm) of you are doing the passabger fender you will need to remove the window washer fluid tank to access all the screws properly, the washer tank is also held in place by three 10mm screws.
7. Under the car (if it hasn't rusted all out yet, there will be two 10mm bolts holding the fender to the frame) carefully remove these.
8. Use either a flat head screw driver or needle nose plairs to squeeze the trim clip holding the fender to the side trim piece on bottom. Try your best and be patient with this clip. Don't break it, getting a replacement might take a few days.
9. Once all screws are removed on the lower side of the fender refer back to step (3) and fully remove theses bolts now, and see if it will slide out from under the hinge bolts (refer to step 4) if it doesn't side out because the tap weld, then remove hinge bolts and lift the hinge and forcefully break the weld. Smooth out the weld hole of needed after that.
10. By now your fender should be completely loose and ready to come off!
Putting new fender on... Start by reversing these steps in this order: step 4, step 3, step 6, step 7, step 8, step 5. (Keep all the bolts loose, this will give you about an eight of and inch play to adjust the fender gap to the door, make sure your door opens up freely before tightening everything. Once adjusted and all previous steps screws are tight, reverse step 2 and reinstal your splash guard, reinstal your headlight And don't forget to tighten the screws in step 5.
Boom you're done, ensure your door still fully opens after everything is been tightened (do it carefully as if it did move back the door will bend or scratch the fender.
I did this literally 7 days ago (I also replaced my door and bumper that day too)
Here's my before, during and after pics.


PM me if you have any questions.
Last edited by Habbibie; Aug 27, 2015 at 12:21 AM.


 Good job