Submit Guide: F-Body brake upgrade

Thread Starter


Joined: Mar 2014
Posts: 207
From: PA
This guide will cover:
Part numbers and sources
Bracket modification
Seal installation
Hardware installation
Mounting to car
Also my disclaimer: (I am very sorry to have to include this )
)
Brakes are dangerous. This is for informational/educational purposes ONLY, meant to show what is possible. There is no warranty expressed or implied. THERE IS NO WARRANTY, PERIOD !! I am not liable, if someone gets hurt, or hurts someone else, by choosing to utilize the information in this thread, in my account, or anywhere on the internet posted by user Scott_S, scott, or by any name I go by on any other site. Utilize any and all information AT YOUR OWN RISK!! By allowing this post to remain on the site, MCF agrees to not hold me accountable, or liable, if ANYONE (member or not) uses this information and hurts themselves or anyone else. Brakes can kill, use common sense. Again sorry for that, I don't want sued if some entitled brat hurts themselves, or worse, someone else. I fully trust the members of the site, but since this post is accessible by non-members I have to cover myself, legally. I'm sure you understand that it pained me to write that. Please feel free to PM me, if you have issues with your "install".
Check your brake lines, if they are bad change them!! Mine broke at a yellow light and I had to limp home over multiple “mountains” as the locals call em. I’m glad I was taught to downshift when going down hills.
After this mod, I seriously don’t feel right driving other cars, these brakes give me THAT level of confidence.
I used brakelabs slotted rotors and rear ceramic pads with duralast ceramic fronts. The only thing I don't like about this mod is at stop signs I now get a little bit of a groan at very speeds, because it grabs so well. Its not a squeal, it's the sound you get on a steep hill when you slowly ease off the brakes. Could be the slots, or the bigger brake pad, but it doesn't bother me. Edit: this sound is all but gone, I think the slots had sharp edges that had to wear down.
Let’s get this thing started:
Note: many people recommend changing to steel hoses, if I feel any type of "spongy feeling" I will be replacing the rubber hoses. I do not put stock in the steel lines. Many places say they are for "racing only". I need something more reliable than that, it's now my DD .
.
Here's what I know:
--the 98-02 f-body have the same sized master cylinder as both the ABS monte/impala and the Non-ABS monte/impala, utilizing a 1 inch bore.
Our brake booster weighs more (1/2 lb) but has a slightly smaller diaphragm than the fbody booster (0.029in). --should perform very similarly.
Source: autozone
--GM used rubber lines on the f-body, like the w-body. Had they felt it necessary, they would have used braided steel hoses in the stock application. There is NO more pressure build up with dual pistons. The inlet between the two internal reservoirs is TINY, this will be the pressure bottle neck.
<img src="https://b9ck6q.dm2303.livefilestore.com/y3mvHkcfFzxwjCsy3rJGMthB7Yh4xSSI67Gk4DuvRBjFYj25kC HZxECyRJsU8j1D7jsddL0igV87YziC6uRFsIrVrm1oQvPie2N8 rTfMnTyWNF6weOXf79q1tkvkmYQdtYgPeSCySRdchd6kufC082 tlqLeV8GcFxwok3bzXowMa10?width=768&height=1024&cro pmode=none" width="768" height="1024" />
That little groove is the channel that allows the brake fluid to move through the chambers
-We can bend our brackets instead of having to get f-body hoses as recommended by others. (I drove a week with the bent bracket modification, with no rubbing anywhere)
Edit: it’s been months, it’s fine!
The only thing that could affect the modified line is a catastrophic strut failure, you'd have worse problems than a brake line at that point.
If you have a spongy pedal after changing the calipers out, bleed the air out until the pedal is very firm, then bleed again. If you let the MC go dry, you must remove it and bench bleed it. Also re bleed EVERY caliper afterwards. Essentially, do not let the MC go dry! I am willing to bet that everyone that did not feel the benefit of this mod did not correctly bleed the calipers.... It's not hard but expect to use at least a 32 oz bottle (if you're using a vac bleeder) or more (if you’re not). AAP frequently has sales on brake fluid, I get their brand DOT 4, or Valvoline dot3&4 if they’re out of store brand dot4.
Edit: I think my non-abs system may be why this mod gas such good “feel” to me. Personally ABS feels mushy and is more of a distraction, everyone is different. Unless I install this on the impala, I have no way to compare with abs/non-abs.
<img src="https://pbkwxw.dm2303.livefilestore.com/y3mOqG6a5XKlnXy0vDQqaWF4turo3xO96REPDWlFnePGLzf6D8 0E2Cl0hiGi9m2fkem-jXs6InSbt79HD5epAI3Pm0o53s_BTkSoultW3TFtVxSzQwTvVh nvsj8BRnFIeVUpPUHBTL467E1IbTnsUpJGO23al6Em79OxexQW TvSJSw?width=768&height=1024&cropmode=none" width="768" height="1024" />
The f-body calipers ride on the whole rotor. No more wasted space!
Parts you WILL need:
front calipers
-1998 to 2002 chevy camaro or pontiac firebird
front caliper brackets
-1998 to 2002
<img src="https://0ey7pa.dm2303.livefilestore.com/y3mXOwtNrIA7EC1lzVMxLsx1iSot0LXEkYOATjnlJwrqkDxlcv s9P_aApEYv5KIWH-Ru0cjP6CH89igebpZzC2jjBzd5yIMOIZ3bnB9MuEkrqDH3kFx5 CMoAoAmyRCEStmO6p5RjnVhY2qFK6ci0lCfQv-3EMeCE2zctGr4FF4cG4Y?width=768&height=1024&cropmod e=none" width="768" height="1024" />
This is what the calipers and brackets look like. If they don't have those fins, you don't want them. I have to touch up that bracket. There was something wrong with the VHT paint, my prep was perfect with double baking time.They made it right by sending me another can though.
copper crush washers (come with rebuilds and new hoses)
-not sure on size, I bought an assorted pack with the help of the counter man at APP.
It may be beneficial to buy new rubber hoses, if they aren't firm, that assorted pack wasn’t cheap, and I needed two new hoses anyway after a month.
The copper washer's spec'ed for our hoses will fit the f-body banjo bolt.
Parts you MAY need:
I replaced the parts in bold
Bleeder screws
pn # H9409 (Carlson)
Banjo bolt
Size M10-1.5 x 22.8mm I couldn’t find a local source. The originals are working fine.
Can't find part number
Don't expect the counter man to know what a banjo bolt is. You'll get weird looks like "this isn't a music store".
Guide pins
carlson # H5074
Caliper rebuild kit
carlson #41168
Hardware kit
carlson # H5640Q
If you are going to buy remanufactured calipers, be sure to get the bracketed ones (semi-loaded). As of now pepboys has 30% off online parts orders, so this would be a wise time to do this upgrade and save a lot (not sure on their brake pads though).
rebuilt semi-loaded numbers: If prices are advertising, I will remove.
Pep Boys
Right Front
PN 18B4693
SKU 1222331
54.99 + 30 core
Left Front
PN 18B4692
SKU 1222317
54.99 + 30 core
Auto Zone
Right Front
PN 18B4692
56.99 + 40 core
Left Front
PN 18B4693
56.99 + 40 core
clearly Pep Boys is cheaper, especially with deals they like to throw.
I wasn't able to find new bleeder screws anywhere locally and forget to throw them in my rockauto order. Guy at the parts desk didn't have any, said they weren't too bad but to "PUT SOME LOCTITE ON THE THREADS" More like put a thin layer of silglyde on the threads...
Just to be clear, DO NOT PUT THREAD LOCKER Of ANY TYPE ON THE BLEEDER SCREWS!!!
Be aware that because I chose to use junkyard calipers. I had to change things that those who choose rebuilds will not.
I have not had good luck with rebuilds in the past, even from NAPA. I also did not want to eat the core charge. I paid less than the core charge for these, so I figured I would be ahead even if I had to buy rebuilds.
The calipers used in this guide were sourced from a local junkyard. The dust boots were a little dry. The pistons were in workable condition, the only mention-able rust is on the outside portion (like any caliper piston has). The brackets were fairly rusty, but cleaned up very well. Kinda like me…
Modifying the caliper bracket
[insert picture]
The stock Camaro bracket uses smaller bolts than Montes and Impalas. We have two choices.
1. Use the Camaro bolt with a sleeve or bushing to hold it securely in the knuckle. I don’t like this method and can’t believe I even mentioned it. Safety FIRST!
2. Drill and tap the holes to accommodate the Monte/Impala caliper mounting bolt.
You going to need a drill press, and a drill press vise to be sure everything is decently square. I simply eyeballed it in the vise.
<img src="https://okrvva.dm2303.livefilestore.com/y3m5yfrnE5JSHlN3fITKeoqmvLGGUmg9GKPrFSI7MUOPPm-eedqT9BdGI65QnWHAwZ7cvQ6qNTESaDzbK9prmKSsUVzT2eXY-jwsR3USNfcx74RtE03z23VRdd9CFbCDgtZzToXtWL94XPVJ9J2 6mNTfDa6RlErbt770pi9rVjrXtA?width=768&height=1024& cropmode=none" width="768" height="1024" />
<img src="https://2c0crg.dm2303.livefilestore.com/y3mNmwx9_9hX6SG3Ujb2fVfnSbuivdF8k-07QmkudLOEogJptD8-2mSgow2bIaY2Ug42rQhQepu-ze_8h1POYPXhyEyyFTJkatkHyjZL3e_UkHfDxxKNX7LhOUZIem wwXSbbssQ1Egt038uW2OScm57ykVtEr-sr1_4L0IXM_TgTC8?width=768&height=1024&cropmode=no ne" width="768" height="1024" />
This is cast iron we are drilling here. Use plenty of lubricant Start with a bit that barely fits the hole to remove the previous threads. Move up in drill bit sizes until you reach the desired size, I believe 15/32 for my Vermont American tap.
Clean the holes when you are done drilling them out. You are going to have enough cast iron crumbs in there during the next step, you don't want any more.
Brake cleaner works well for this, just makes a greasy mess on the floor.
Break out the 14-2 tap and slowly, with lubricant, start to turn it in drilled holes until it starts to catch. Slowly turn it a bit to be sure there is sufficient threading. Then back it out a bit to break the chips loose. I did a 1-1.5 tuns forward to 1/4 to 1/2 turn back to break the chips loose. You'll get a feel for it after the first one. Watch videos of people tapping cast iron. We have resources available that people would have killed for 50 years ago, utilize them!
I like this reference video, he's tapping cast iron, so it's much the same.
Part numbers and sources
Bracket modification
Seal installation
Hardware installation
Mounting to car
Also my disclaimer: (I am very sorry to have to include this
)Brakes are dangerous. This is for informational/educational purposes ONLY, meant to show what is possible. There is no warranty expressed or implied. THERE IS NO WARRANTY, PERIOD !! I am not liable, if someone gets hurt, or hurts someone else, by choosing to utilize the information in this thread, in my account, or anywhere on the internet posted by user Scott_S, scott, or by any name I go by on any other site. Utilize any and all information AT YOUR OWN RISK!! By allowing this post to remain on the site, MCF agrees to not hold me accountable, or liable, if ANYONE (member or not) uses this information and hurts themselves or anyone else. Brakes can kill, use common sense. Again sorry for that, I don't want sued if some entitled brat hurts themselves, or worse, someone else. I fully trust the members of the site, but since this post is accessible by non-members I have to cover myself, legally. I'm sure you understand that it pained me to write that. Please feel free to PM me, if you have issues with your "install".
Check your brake lines, if they are bad change them!! Mine broke at a yellow light and I had to limp home over multiple “mountains” as the locals call em. I’m glad I was taught to downshift when going down hills.
After this mod, I seriously don’t feel right driving other cars, these brakes give me THAT level of confidence.
I used brakelabs slotted rotors and rear ceramic pads with duralast ceramic fronts. The only thing I don't like about this mod is at stop signs I now get a little bit of a groan at very speeds, because it grabs so well. Its not a squeal, it's the sound you get on a steep hill when you slowly ease off the brakes. Could be the slots, or the bigger brake pad, but it doesn't bother me. Edit: this sound is all but gone, I think the slots had sharp edges that had to wear down.
Let’s get this thing started:
Note: many people recommend changing to steel hoses, if I feel any type of "spongy feeling" I will be replacing the rubber hoses. I do not put stock in the steel lines. Many places say they are for "racing only". I need something more reliable than that, it's now my DD
.Here's what I know:
--the 98-02 f-body have the same sized master cylinder as both the ABS monte/impala and the Non-ABS monte/impala, utilizing a 1 inch bore.
Our brake booster weighs more (1/2 lb) but has a slightly smaller diaphragm than the fbody booster (0.029in). --should perform very similarly.
Source: autozone
--GM used rubber lines on the f-body, like the w-body. Had they felt it necessary, they would have used braided steel hoses in the stock application. There is NO more pressure build up with dual pistons. The inlet between the two internal reservoirs is TINY, this will be the pressure bottle neck.
<img src="https://b9ck6q.dm2303.livefilestore.com/y3mvHkcfFzxwjCsy3rJGMthB7Yh4xSSI67Gk4DuvRBjFYj25kC HZxECyRJsU8j1D7jsddL0igV87YziC6uRFsIrVrm1oQvPie2N8 rTfMnTyWNF6weOXf79q1tkvkmYQdtYgPeSCySRdchd6kufC082 tlqLeV8GcFxwok3bzXowMa10?width=768&height=1024&cro pmode=none" width="768" height="1024" />
That little groove is the channel that allows the brake fluid to move through the chambers
-We can bend our brackets instead of having to get f-body hoses as recommended by others. (I drove a week with the bent bracket modification, with no rubbing anywhere)
Edit: it’s been months, it’s fine!
The only thing that could affect the modified line is a catastrophic strut failure, you'd have worse problems than a brake line at that point.
If you have a spongy pedal after changing the calipers out, bleed the air out until the pedal is very firm, then bleed again. If you let the MC go dry, you must remove it and bench bleed it. Also re bleed EVERY caliper afterwards. Essentially, do not let the MC go dry! I am willing to bet that everyone that did not feel the benefit of this mod did not correctly bleed the calipers.... It's not hard but expect to use at least a 32 oz bottle (if you're using a vac bleeder) or more (if you’re not). AAP frequently has sales on brake fluid, I get their brand DOT 4, or Valvoline dot3&4 if they’re out of store brand dot4.
Edit: I think my non-abs system may be why this mod gas such good “feel” to me. Personally ABS feels mushy and is more of a distraction, everyone is different. Unless I install this on the impala, I have no way to compare with abs/non-abs.
<img src="https://pbkwxw.dm2303.livefilestore.com/y3mOqG6a5XKlnXy0vDQqaWF4turo3xO96REPDWlFnePGLzf6D8 0E2Cl0hiGi9m2fkem-jXs6InSbt79HD5epAI3Pm0o53s_BTkSoultW3TFtVxSzQwTvVh nvsj8BRnFIeVUpPUHBTL467E1IbTnsUpJGO23al6Em79OxexQW TvSJSw?width=768&height=1024&cropmode=none" width="768" height="1024" />
The f-body calipers ride on the whole rotor. No more wasted space!
Parts you WILL need:
front calipers
-1998 to 2002 chevy camaro or pontiac firebird
front caliper brackets
-1998 to 2002
<img src="https://0ey7pa.dm2303.livefilestore.com/y3mXOwtNrIA7EC1lzVMxLsx1iSot0LXEkYOATjnlJwrqkDxlcv s9P_aApEYv5KIWH-Ru0cjP6CH89igebpZzC2jjBzd5yIMOIZ3bnB9MuEkrqDH3kFx5 CMoAoAmyRCEStmO6p5RjnVhY2qFK6ci0lCfQv-3EMeCE2zctGr4FF4cG4Y?width=768&height=1024&cropmod e=none" width="768" height="1024" />
This is what the calipers and brackets look like. If they don't have those fins, you don't want them. I have to touch up that bracket. There was something wrong with the VHT paint, my prep was perfect with double baking time.They made it right by sending me another can though.
copper crush washers (come with rebuilds and new hoses)
-not sure on size, I bought an assorted pack with the help of the counter man at APP.
It may be beneficial to buy new rubber hoses, if they aren't firm, that assorted pack wasn’t cheap, and I needed two new hoses anyway after a month.
The copper washer's spec'ed for our hoses will fit the f-body banjo bolt.
Parts you MAY need:
I replaced the parts in bold
Bleeder screws
pn # H9409 (Carlson)
Banjo bolt
Size M10-1.5 x 22.8mm I couldn’t find a local source. The originals are working fine.
Can't find part number
Don't expect the counter man to know what a banjo bolt is. You'll get weird looks like "this isn't a music store".
Guide pins
carlson # H5074
Caliper rebuild kit
carlson #41168
Hardware kit
carlson # H5640Q
If you are going to buy remanufactured calipers, be sure to get the bracketed ones (semi-loaded). As of now pepboys has 30% off online parts orders, so this would be a wise time to do this upgrade and save a lot (not sure on their brake pads though).
rebuilt semi-loaded numbers: If prices are advertising, I will remove.
Pep Boys
Right Front
PN 18B4693
SKU 1222331
54.99 + 30 core
Left Front
PN 18B4692
SKU 1222317
54.99 + 30 core
Auto Zone
Right Front
PN 18B4692
56.99 + 40 core
Left Front
PN 18B4693
56.99 + 40 core
clearly Pep Boys is cheaper, especially with deals they like to throw.
I wasn't able to find new bleeder screws anywhere locally and forget to throw them in my rockauto order. Guy at the parts desk didn't have any, said they weren't too bad but to "PUT SOME LOCTITE ON THE THREADS"
More like put a thin layer of silglyde on the threads...Just to be clear, DO NOT PUT THREAD LOCKER Of ANY TYPE ON THE BLEEDER SCREWS!!!
Be aware that because I chose to use junkyard calipers. I had to change things that those who choose rebuilds will not.
I have not had good luck with rebuilds in the past, even from NAPA. I also did not want to eat the core charge. I paid less than the core charge for these, so I figured I would be ahead even if I had to buy rebuilds.
The calipers used in this guide were sourced from a local junkyard. The dust boots were a little dry. The pistons were in workable condition, the only mention-able rust is on the outside portion (like any caliper piston has). The brackets were fairly rusty, but cleaned up very well. Kinda like me…
Modifying the caliper bracket
[insert picture]
The stock Camaro bracket uses smaller bolts than Montes and Impalas. We have two choices.
1. Use the Camaro bolt with a sleeve or bushing to hold it securely in the knuckle. I don’t like this method and can’t believe I even mentioned it. Safety FIRST!
2. Drill and tap the holes to accommodate the Monte/Impala caliper mounting bolt.
You going to need a drill press, and a drill press vise to be sure everything is decently square. I simply eyeballed it in the vise.
<img src="https://okrvva.dm2303.livefilestore.com/y3m5yfrnE5JSHlN3fITKeoqmvLGGUmg9GKPrFSI7MUOPPm-eedqT9BdGI65QnWHAwZ7cvQ6qNTESaDzbK9prmKSsUVzT2eXY-jwsR3USNfcx74RtE03z23VRdd9CFbCDgtZzToXtWL94XPVJ9J2 6mNTfDa6RlErbt770pi9rVjrXtA?width=768&height=1024& cropmode=none" width="768" height="1024" />
<img src="https://2c0crg.dm2303.livefilestore.com/y3mNmwx9_9hX6SG3Ujb2fVfnSbuivdF8k-07QmkudLOEogJptD8-2mSgow2bIaY2Ug42rQhQepu-ze_8h1POYPXhyEyyFTJkatkHyjZL3e_UkHfDxxKNX7LhOUZIem wwXSbbssQ1Egt038uW2OScm57ykVtEr-sr1_4L0IXM_TgTC8?width=768&height=1024&cropmode=no ne" width="768" height="1024" />
This is cast iron we are drilling here. Use plenty of lubricant
Start with a bit that barely fits the hole to remove the previous threads. Move up in drill bit sizes until you reach the desired size, I believe 15/32 for my Vermont American tap.Clean the holes when you are done drilling them out. You are going to have enough cast iron crumbs in there during the next step, you don't want any more.
Brake cleaner works well for this, just makes a greasy mess on the floor.
Break out the 14-2 tap and slowly, with lubricant, start to turn it in drilled holes until it starts to catch. Slowly turn it a bit to be sure there is sufficient threading. Then back it out a bit to break the chips loose. I did a 1-1.5 tuns forward to 1/4 to 1/2 turn back to break the chips loose. You'll get a feel for it after the first one. Watch videos of people tapping cast iron. We have resources available that people would have killed for 50 years ago, utilize them!
I like this reference video, he's tapping cast iron, so it's much the same.
Last edited by Scott_S; May 21, 2016 at 02:00 PM. Reason: edit 4/4; getting closer to final product
Thread Starter
Joined: Mar 2014
Posts: 207
From: PA
REMOVING THE PISTONS
insert pictures
I made a few special tools to help this process go as smoothly as possible.
brake hose attachment
The calipers I got from the JY had cut hoses attached, I took advantage of this.
To make this contraption, I took one of the hoses and reamed it out on the cut end with a stepped drill bit.
This allowed it to fit over the tip of the blowgun, but I needed a third hand to hold the connection. The hose clamp is my third hand . I tightened the cheapie clamp until it stripped out, but it still held pressure well.
<img src="https://2c0jjq.dm2303.livefilestore.com/y3mHrMpbEL0XwyhNkXEKVEF4fGsUqkB2nLznUATzBqzo_8wb0-zTw96jIBa-DqYwM_-wTRkSCS9K_Gx6LgduyL22Iw-qqMIUEbhxtOw0PS1RAsAM8oL-nPWZUcCaNqpDHUtiK7ZDzid9jS5Ancmamyb0e7LhIQV00xPb3v Oxy23RCg?width=768&height=1024&cropmode=none" width="768" height="1024" />
<img src="https://2c23ug.dm2303.livefilestore.com/y3mq-UnAF0WZ_2u5CiuhjzVa4LRBbqSZuFo3a1UABJHntz_2MHD2yKH M9dCfVCFNmqp0BDTNTkEnVYPwphWmDMt_lTHsEmfh05fC5L9jF cy2qwf5Y7YhTOBMmS3gIZCOUpEsmKSLhj0btREQANlRE6o0aMF LjCydNU-d7fdFiU-4Uc?width=768&height=1024&cropmode=none" width="768" height="1024" />
<img src="https://bfu0pa.dm2303.livefilestore.com/y3mLMUmWJn3Dz4NaJURvGEbMbB1R5muJ9fyEHqf7HaNzPpMJ7k WdidJjoFjaDKeGL_rQ9AE8kGEpMPLco0G5MwC8123phJTZJnoa 6O2Ka8sFiuEq2rpNcIhmP8RDCLQ4BljmjlAxSRU3Cy94H68xRG 0SevE2dPPfN60fbZv71oNZsQ?width=768&height=1024&cro pmode=none" width="768" height="1024" />
There are two ways to extract the caliper pistons, I needed both.
When you apply the air pressure to the piston, it is likely that the piston that is opposite from the hose will be the one to break loose first.
You need a chock block set up to keep it from coming more that about half way out.
This is a picture from Install University. I'll ask for permission and share this guide with them.
After the piston is chocked, keep applying air pressure until the other breaks free, it may take a while. If you don't have success, vary your air pressure. Some pistons break free better with lower psi (higher volume, cfm). Some like pressure.
Oh look I just personified caliper pistons
If you are having trouble with the piston in front of the brake hose, don't fret.bThere is a low tech solution:
<img src="https://b9alxg.dm2303.livefilestore.com/y3msKbRVauqPxKnb0dL-5UERAnFL1teOd2DiXUnJTY45FT55n4WCi2XdQ6yWbv4VQYW-AnAk02m9HOt6NfSH4LIcNghBjB4gTI_w6Ml7NGRUED5FKXB8vT LbrJIvfrf0LJdMH8yhy6BgGLHBbGKsjBrN67RfR-nm4R55nINY3QXau4?width=768&height=1024&cropmode=no ne" width="768" height="1024" />
Take a cheapie screwdriver (philips would be marginally easier to work with) and grind the head off of it, be sure to round the resulting shaft to make a tool with minimal chance of marring the threading or the bottom of the piston.
Take this screwdriver (or what�s left of it) and insert it into the banjo bolt hole. Lightly tap the screwdriver to slowly force the piston out persuasively. Be sure to have the caliper supported while you do this (use a vice).
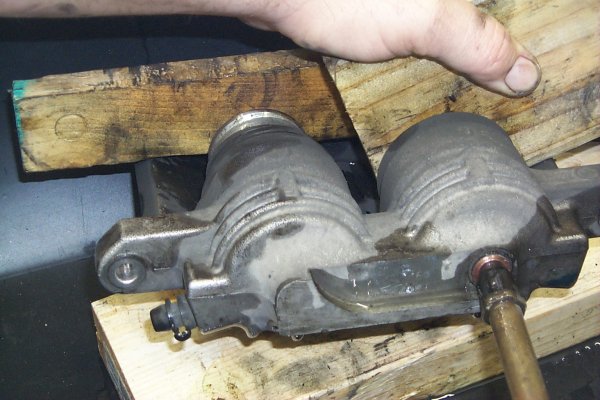
this picture shows how the banjo bolt hole is directly behind one of the pistons. I hadn't done much cleaning of the inside at that point.
<img src="https://b9ck6q.dm2303.livefilestore.com/y3mvHkcfFzxwjCsy3rJGMthB7Yh4xSSI67Gk4DuvRBjFYj25kC HZxECyRJsU8j1D7jsddL0igV87YziC6uRFsIrVrm1oQvPie2N8 rTfMnTyWNF6weOXf79q1tkvkmYQdtYgPeSCySRdchd6kufC082 tlqLeV8GcFxwok3bzXowMa10?width=768&height=1024&cro pmode=none" width="768" height="1024" />
removing the pistons
clean up the pistons.
I used a scotch brite to gently clean the old fluid residue and rubber boot residue from the caliper pistons.
i also used a dremel to clean the outside "rim" of the pistons. It was kinda rusty on mine.
(inset pictures)
<img src="https://pbl76g.dm2303.livefilestore.com/y3mfHQQmYBPuW1bSiOVHrOq08fRNgMvKTY2XJZYqjQct2VXIAR FDeY_4z-wvmS39oXG9_WlNlXzk6LPjXUfq4FRgSXBo7vrPwEjLn2Lscgvx qKzV1IVF85FBraPbCWb46pQ4xD2tGc5T0-9UYXW88HFplltx1zjJdWG8G7bSYCiXqU?width=768&height= 1024&cropmode=none" width="768" height="1024" />
<img src="https://pbkpga.dm2303.livefilestore.com/y3mbWfJG1qu5aU4xBnosyf62-btjKUt7NnKyYzjowg6hFXVQbm1xq4dhegyQ4CJ-fwbr4Mmk0lrRlovpNjr8zPivPeHtjG09T4cn-R4S7AWYrWd-35fpKvYqhIDJ0dKbjxw-XP8w3ckcoCS5VUYtRLGv2RB62ZfP16W3CBZS0HOcrQ?width=7 68&height=1024&cropmode=none" width="768" height="1024" />
Also clean the lip of the piston of any rust. I used a brass wheel on a dremel to gently remove it.
before
<img src="https://2c1eoq.dm2303.livefilestore.com/y3m5jXww6iAgSZMWmSagkMvjzYgqKR0O2vwEmtkGHBAnBBR0Rs-FwcDLuVKOtMUl3J1GoLcDysethG-DxXsDblkpuSiMGVvQrXxwCIUlZAjWGCftgX8DTOtejjAg_gM-sd_HEczMGZIAaX27zkpPmZUCKwhHqtwrV-KU5WjDjwaf98?width=768&height=1024&cropmode=none" width="768" height="1024" />
after
<img src="https://oksexg.dm2303.livefilestore.com/y3mLsq0MLNWZV_4XE_Ni5xhlPlWoMgNifPUGpbBskbYu_krrLr zXqJVnVnWbOvOZOPP9INuG7oo3Ak-OfOygqGrfcrUwX4eEx-Og4BC15Zj8nDdsc_00-P0HfHs6VYEP9BjpfZBYjfXbbgCH3dFvQVhbvdX0tQlJbMxFJqM WEbFAOo?width=768&height=1024&cropmode=none" width="768" height="1024" />
<img src="https://pbkbig.dm2303.livefilestore.com/y3mK3SjAMzesQPjRnk3PS3WtEYnZuGaZv55cUszB7LgqYBJ2kh-Z190-js_6lbUjgES4RnRRBnJ_KEfIR0gUpz-ZnpbZYVkQIQjBi-G_kcMLmyynSY986XtLqB8UGKatcnHNo4T6CC66XcZDp-UpUFM7VKDPhBW4nKteMuS4g-hz0s?width=768&height=1024&cropmode=none" width="768" height="1024" />
Removing seals.
I used a flat screwdriver to gently pry out the flat seals. I treid a hook and it didn't work. Do not gouge the caliper near the groove where this seal seats. If you scratch the interior of the caliper, fine, no real harm done, you just marginally increaded the volume that the caliper holds
<img src="https://bftpuw.dm2303.livefilestore.com/y3mUbKSPq_mG01PNRILq1J4hwk6sDKCkDWoktxu5DLELuEXkUi wMbWBLT0CbVQfh5FuNEXcrEJpXCXiVUOysVJ1Y6_qEWutSlnjl t3IT_8LPhKbYz7WRea3cfh_S_Mb0AnKV7A_yOmM8IrlLsBxQTk zf9fyF_ZIZNj6EpRzVddBpjQ?width=768&height=1024&cro pmode=none" width="768" height="1024" />
<img src="https://2c2b0q.dm2303.livefilestore.com/y3m9XFotzjt5H31dqMC_uiLy-4-PkZC24ez9fGWr8XdkZQFUY_jpxJqDjhY205Ot9QyGYcvnO-y7O8wawP4SC5Wt8kHBnS6QNGcBR6zVNyBh8_X1651RMGBAtwcq x3yn2DxxJLW7bYe4DkB_ZoXJlWpeUqHWuIXy5JhCdZwKxZS4Bc ?width=768&height=1024&cropmode=none" width="768" height="1024" />
sorry it's out of focus. My phone decided to focus on he other bore.
use the screwdriver and gently scrape out the crud that accumulated under the flat cut seals. (no picture)
A pipe cleaner would also work if you wanna be more careful.
Use plenty of brake cleaner.
I cleaned the caliper bores with brake cleaner and heavy duty shop paper towels.
This removed the cruddy residue seen on the previous pictures.
installing the seals
Square cut seals are unbelievably easy to install. They only fit one way, just be sure not to twist them during installation. The installation is basically the reverse of removal.
<img src="https://bftpuw.dm2303.livefilestore.com/y3mUbKSPq_mG01PNRILq1J4hwk6sDKCkDWoktxu5DLELuEXkUi wMbWBLT0CbVQfh5FuNEXcrEJpXCXiVUOysVJ1Y6_qEWutSlnjl t3IT_8LPhKbYz7WRea3cfh_S_Mb0AnKV7A_yOmM8IrlLsBxQTk zf9fyF_ZIZNj6EpRzVddBpjQ?width=768&height=1024&cro pmode=none" width="768" height="1024" />
Picture of new seals and clean bores. That "yellow" tint is the amber color of the brake fluid. The camera flash accentuated the color.
Installing boots
The boots are a little tricky to install, and even trickier to keep attached while the piston is being inserted in the bore
There are two methods to install the dust boots. I took pictures of each.
First, you could install the boot onto the piston, then guide the boots into the channels in the bore. I found this method more difficult.
<img src="https://pbl0ow.dm2303.livefilestore.com/y3mkf7fsBuojvrVBSdzFptqBI9dqzTFVrBstapfcB94mLu6YNI 3yb7TrAuNH6CooBYtGY-x3TsaNx4Cz54F2nFdGTyha1jXWTApUfHSYBhCEJjsq3KdmkbVn jpBWksNEn2TswUOKIAvCcVXskrzYMcArkYX1OpfkXRQjyFfiz-YO5E?width=768&height=1024&cropmode=none" width="768" height="1024" />
[insert bracket modification]
<img src="https://pbmcqg.dm2303.livefilestore.com/y3m3HQbM205X3KKENzNz0HfrbXNhXq6e-qgvXrHGStGROiO7qxnVbIHNIPaRLFkDAiCjvTuNnZnR2IgepgP GBWUukL-8yLEjyhcBmjq4l9fMRUZxdfWp2WpBKyqDritZxUcbB9zlni_VA-piNotqYBdb0wkKUgVtnwE-PxZcNW3jH0?width=768&height=1024&cropmode=none" width="768" height="1024" />
<img src="https://b9da0g.dm2303.livefilestore.com/y3mcpJBnIIqHHWtflPNyUT4GDd8V5dP5HPY7stkREVbC2jBjI1 QhnNyPvKAN9USbae2H2utvQQK2Fb5wh5EQHULoBdn9-bsjmBsB9KeuzgOMkrfESKsN16Yz4qt05Tvv4MnNrJTUbfwBVlg r2PVu4yAahTwLGLELNTZSfPFsXHFrEc?width=768&height=1 024&cropmode=none" width="768" height="1024" />
Secondly, you could install the boots into the bore channel, pushing the piston through it. The outer edge of the dust boot will "engage" into the piston's channel. I found this easier, but like I mentioned It makes more of a seal in the piston. Start with the piston the seats in the "sealed" bore, it's impossible to seat this piston if you don't. Ask how I know...
<img src="https://b9aspq.dm2303.livefilestore.com/y3mCAguEWXSPVyfXaO7A5IP4mNd05umxZyXFLs2R5Zd3v14WX9 JLzAi9EA32XeeUrMaHHYJdOKJx_tRuxC9i5VQkJHg0Pex7WnrM R00sv9ByU1GyRhbDB1L3LKuZr2S5EffK5fk06s5bheWX58epE3 _4zVLVpZzGB7XZFopB4jx4y0?width=768&height=1024&cro pmode=none" width="768" height="1024" />
insert pictures
I made a few special tools to help this process go as smoothly as possible.
brake hose attachment
The calipers I got from the JY had cut hoses attached, I took advantage of this.
To make this contraption, I took one of the hoses and reamed it out on the cut end with a stepped drill bit.
This allowed it to fit over the tip of the blowgun, but I needed a third hand to hold the connection. The hose clamp is my third hand . I tightened the cheapie clamp until it stripped out, but it still held pressure well.
<img src="https://2c0jjq.dm2303.livefilestore.com/y3mHrMpbEL0XwyhNkXEKVEF4fGsUqkB2nLznUATzBqzo_8wb0-zTw96jIBa-DqYwM_-wTRkSCS9K_Gx6LgduyL22Iw-qqMIUEbhxtOw0PS1RAsAM8oL-nPWZUcCaNqpDHUtiK7ZDzid9jS5Ancmamyb0e7LhIQV00xPb3v Oxy23RCg?width=768&height=1024&cropmode=none" width="768" height="1024" />
<img src="https://2c23ug.dm2303.livefilestore.com/y3mq-UnAF0WZ_2u5CiuhjzVa4LRBbqSZuFo3a1UABJHntz_2MHD2yKH M9dCfVCFNmqp0BDTNTkEnVYPwphWmDMt_lTHsEmfh05fC5L9jF cy2qwf5Y7YhTOBMmS3gIZCOUpEsmKSLhj0btREQANlRE6o0aMF LjCydNU-d7fdFiU-4Uc?width=768&height=1024&cropmode=none" width="768" height="1024" />
<img src="https://bfu0pa.dm2303.livefilestore.com/y3mLMUmWJn3Dz4NaJURvGEbMbB1R5muJ9fyEHqf7HaNzPpMJ7k WdidJjoFjaDKeGL_rQ9AE8kGEpMPLco0G5MwC8123phJTZJnoa 6O2Ka8sFiuEq2rpNcIhmP8RDCLQ4BljmjlAxSRU3Cy94H68xRG 0SevE2dPPfN60fbZv71oNZsQ?width=768&height=1024&cro pmode=none" width="768" height="1024" />
There are two ways to extract the caliper pistons, I needed both.
When you apply the air pressure to the piston, it is likely that the piston that is opposite from the hose will be the one to break loose first.
You need a chock block set up to keep it from coming more that about half way out.
This is a picture from Install University. I'll ask for permission and share this guide with them.
After the piston is chocked, keep applying air pressure until the other breaks free, it may take a while. If you don't have success, vary your air pressure. Some pistons break free better with lower psi (higher volume, cfm). Some like pressure.
Oh look I just personified caliper pistons
If you are having trouble with the piston in front of the brake hose, don't fret.bThere is a low tech solution:
<img src="https://b9alxg.dm2303.livefilestore.com/y3msKbRVauqPxKnb0dL-5UERAnFL1teOd2DiXUnJTY45FT55n4WCi2XdQ6yWbv4VQYW-AnAk02m9HOt6NfSH4LIcNghBjB4gTI_w6Ml7NGRUED5FKXB8vT LbrJIvfrf0LJdMH8yhy6BgGLHBbGKsjBrN67RfR-nm4R55nINY3QXau4?width=768&height=1024&cropmode=no ne" width="768" height="1024" />
Take a cheapie screwdriver (philips would be marginally easier to work with) and grind the head off of it, be sure to round the resulting shaft to make a tool with minimal chance of marring the threading or the bottom of the piston.
Take this screwdriver (or what�s left of it) and insert it into the banjo bolt hole. Lightly tap the screwdriver to slowly force the piston out persuasively. Be sure to have the caliper supported while you do this (use a vice).
this picture shows how the banjo bolt hole is directly behind one of the pistons. I hadn't done much cleaning of the inside at that point.
<img src="https://b9ck6q.dm2303.livefilestore.com/y3mvHkcfFzxwjCsy3rJGMthB7Yh4xSSI67Gk4DuvRBjFYj25kC HZxECyRJsU8j1D7jsddL0igV87YziC6uRFsIrVrm1oQvPie2N8 rTfMnTyWNF6weOXf79q1tkvkmYQdtYgPeSCySRdchd6kufC082 tlqLeV8GcFxwok3bzXowMa10?width=768&height=1024&cro pmode=none" width="768" height="1024" />
removing the pistons
clean up the pistons.
I used a scotch brite to gently clean the old fluid residue and rubber boot residue from the caliper pistons.
i also used a dremel to clean the outside "rim" of the pistons. It was kinda rusty on mine.
(inset pictures)
<img src="https://pbl76g.dm2303.livefilestore.com/y3mfHQQmYBPuW1bSiOVHrOq08fRNgMvKTY2XJZYqjQct2VXIAR FDeY_4z-wvmS39oXG9_WlNlXzk6LPjXUfq4FRgSXBo7vrPwEjLn2Lscgvx qKzV1IVF85FBraPbCWb46pQ4xD2tGc5T0-9UYXW88HFplltx1zjJdWG8G7bSYCiXqU?width=768&height= 1024&cropmode=none" width="768" height="1024" />
<img src="https://pbkpga.dm2303.livefilestore.com/y3mbWfJG1qu5aU4xBnosyf62-btjKUt7NnKyYzjowg6hFXVQbm1xq4dhegyQ4CJ-fwbr4Mmk0lrRlovpNjr8zPivPeHtjG09T4cn-R4S7AWYrWd-35fpKvYqhIDJ0dKbjxw-XP8w3ckcoCS5VUYtRLGv2RB62ZfP16W3CBZS0HOcrQ?width=7 68&height=1024&cropmode=none" width="768" height="1024" />
Also clean the lip of the piston of any rust. I used a brass wheel on a dremel to gently remove it.
before
<img src="https://2c1eoq.dm2303.livefilestore.com/y3m5jXww6iAgSZMWmSagkMvjzYgqKR0O2vwEmtkGHBAnBBR0Rs-FwcDLuVKOtMUl3J1GoLcDysethG-DxXsDblkpuSiMGVvQrXxwCIUlZAjWGCftgX8DTOtejjAg_gM-sd_HEczMGZIAaX27zkpPmZUCKwhHqtwrV-KU5WjDjwaf98?width=768&height=1024&cropmode=none" width="768" height="1024" />
after
<img src="https://oksexg.dm2303.livefilestore.com/y3mLsq0MLNWZV_4XE_Ni5xhlPlWoMgNifPUGpbBskbYu_krrLr zXqJVnVnWbOvOZOPP9INuG7oo3Ak-OfOygqGrfcrUwX4eEx-Og4BC15Zj8nDdsc_00-P0HfHs6VYEP9BjpfZBYjfXbbgCH3dFvQVhbvdX0tQlJbMxFJqM WEbFAOo?width=768&height=1024&cropmode=none" width="768" height="1024" />
<img src="https://pbkbig.dm2303.livefilestore.com/y3mK3SjAMzesQPjRnk3PS3WtEYnZuGaZv55cUszB7LgqYBJ2kh-Z190-js_6lbUjgES4RnRRBnJ_KEfIR0gUpz-ZnpbZYVkQIQjBi-G_kcMLmyynSY986XtLqB8UGKatcnHNo4T6CC66XcZDp-UpUFM7VKDPhBW4nKteMuS4g-hz0s?width=768&height=1024&cropmode=none" width="768" height="1024" />
Removing seals.
I used a flat screwdriver to gently pry out the flat seals. I treid a hook and it didn't work. Do not gouge the caliper near the groove where this seal seats. If you scratch the interior of the caliper, fine, no real harm done, you just marginally increaded the volume that the caliper holds
<img src="https://bftpuw.dm2303.livefilestore.com/y3mUbKSPq_mG01PNRILq1J4hwk6sDKCkDWoktxu5DLELuEXkUi wMbWBLT0CbVQfh5FuNEXcrEJpXCXiVUOysVJ1Y6_qEWutSlnjl t3IT_8LPhKbYz7WRea3cfh_S_Mb0AnKV7A_yOmM8IrlLsBxQTk zf9fyF_ZIZNj6EpRzVddBpjQ?width=768&height=1024&cro pmode=none" width="768" height="1024" />
<img src="https://2c2b0q.dm2303.livefilestore.com/y3m9XFotzjt5H31dqMC_uiLy-4-PkZC24ez9fGWr8XdkZQFUY_jpxJqDjhY205Ot9QyGYcvnO-y7O8wawP4SC5Wt8kHBnS6QNGcBR6zVNyBh8_X1651RMGBAtwcq x3yn2DxxJLW7bYe4DkB_ZoXJlWpeUqHWuIXy5JhCdZwKxZS4Bc ?width=768&height=1024&cropmode=none" width="768" height="1024" />
sorry it's out of focus. My phone decided to focus on he other bore.
use the screwdriver and gently scrape out the crud that accumulated under the flat cut seals. (no picture)
A pipe cleaner would also work if you wanna be more careful.
Use plenty of brake cleaner.
I cleaned the caliper bores with brake cleaner and heavy duty shop paper towels.
This removed the cruddy residue seen on the previous pictures.
installing the seals
Square cut seals are unbelievably easy to install. They only fit one way, just be sure not to twist them during installation. The installation is basically the reverse of removal.
<img src="https://bftpuw.dm2303.livefilestore.com/y3mUbKSPq_mG01PNRILq1J4hwk6sDKCkDWoktxu5DLELuEXkUi wMbWBLT0CbVQfh5FuNEXcrEJpXCXiVUOysVJ1Y6_qEWutSlnjl t3IT_8LPhKbYz7WRea3cfh_S_Mb0AnKV7A_yOmM8IrlLsBxQTk zf9fyF_ZIZNj6EpRzVddBpjQ?width=768&height=1024&cro pmode=none" width="768" height="1024" />
Picture of new seals and clean bores. That "yellow" tint is the amber color of the brake fluid. The camera flash accentuated the color.
Installing boots
The boots are a little tricky to install, and even trickier to keep attached while the piston is being inserted in the bore
There are two methods to install the dust boots. I took pictures of each.
First, you could install the boot onto the piston, then guide the boots into the channels in the bore. I found this method more difficult.
<img src="https://pbl0ow.dm2303.livefilestore.com/y3mkf7fsBuojvrVBSdzFptqBI9dqzTFVrBstapfcB94mLu6YNI 3yb7TrAuNH6CooBYtGY-x3TsaNx4Cz54F2nFdGTyha1jXWTApUfHSYBhCEJjsq3KdmkbVn jpBWksNEn2TswUOKIAvCcVXskrzYMcArkYX1OpfkXRQjyFfiz-YO5E?width=768&height=1024&cropmode=none" width="768" height="1024" />
[insert bracket modification]
<img src="https://pbmcqg.dm2303.livefilestore.com/y3m3HQbM205X3KKENzNz0HfrbXNhXq6e-qgvXrHGStGROiO7qxnVbIHNIPaRLFkDAiCjvTuNnZnR2IgepgP GBWUukL-8yLEjyhcBmjq4l9fMRUZxdfWp2WpBKyqDritZxUcbB9zlni_VA-piNotqYBdb0wkKUgVtnwE-PxZcNW3jH0?width=768&height=1024&cropmode=none" width="768" height="1024" />
<img src="https://b9da0g.dm2303.livefilestore.com/y3mcpJBnIIqHHWtflPNyUT4GDd8V5dP5HPY7stkREVbC2jBjI1 QhnNyPvKAN9USbae2H2utvQQK2Fb5wh5EQHULoBdn9-bsjmBsB9KeuzgOMkrfESKsN16Yz4qt05Tvv4MnNrJTUbfwBVlg r2PVu4yAahTwLGLELNTZSfPFsXHFrEc?width=768&height=1 024&cropmode=none" width="768" height="1024" />
Secondly, you could install the boots into the bore channel, pushing the piston through it. The outer edge of the dust boot will "engage" into the piston's channel. I found this easier, but like I mentioned It makes more of a seal in the piston. Start with the piston the seats in the "sealed" bore, it's impossible to seat this piston if you don't. Ask how I know...
<img src="https://b9aspq.dm2303.livefilestore.com/y3mCAguEWXSPVyfXaO7A5IP4mNd05umxZyXFLs2R5Zd3v14WX9 JLzAi9EA32XeeUrMaHHYJdOKJx_tRuxC9i5VQkJHg0Pex7WnrM R00sv9ByU1GyRhbDB1L3LKuZr2S5EffK5fk06s5bheWX58epE3 _4zVLVpZzGB7XZFopB4jx4y0?width=768&height=1024&cro pmode=none" width="768" height="1024" />
Last edited by Scott_S; May 21, 2016 at 04:13 PM. Reason: additional content
Thread Starter
Joined: Mar 2014
Posts: 207
From: PA
Installing pistons
I found it easiest to start with the piston with the solid chamber behind it (the one without the banjo bolt hole behind it).
I wised up and did the second piston's install vertically, which made using the c-clamp easier, it's also much easier to gauge if the piston is perfectly straight in the vertical plane, at least for me. After you get the piston inserted perfectly straight, use a c-clamp to speed the installation. The new seals are force the piston past by hand.
This piston is crooked.
<img src="https://pbmcqg.dm2303.livefilestore.com/y3m3HQbM205X3KKENzNz0HfrbXNhXq6e-qgvXrHGStGROiO7qxnVbIHNIPaRLFkDAiCjvTuNnZnR2IgepgP GBWUukL-8yLEjyhcBmjq4l9fMRUZxdfWp2WpBKyqDritZxUcbB9zlni_VA-piNotqYBdb0wkKUgVtnwE-PxZcNW3jH0?width=768&height=1024&cropmode=none" width="768" height="1024" />
Don't let the piston get crooked. They are hard to remove once crooked.You have two options(everything has two options in this install, haha) if they don't budge by hand. First, you could use a furring strip (thin and narrow piece of wood) to gently tap the of "lip" of the piston to knock it loose. If that doesn't work, you have to resort to the removing with air. Be sure to chock the other with wood first, you don't want to lose progress. You also don't want a piston flying across your work space...
installing hardware
installing the guide pins
<img src="https://b9bbrw.dm2303.livefilestore.com/y3mxmB3Us4QrRsyEmmoBnhcS8Xb6JuHbALHJ8PC2Fc00pP5ITf wkU68I51mKOAdW0a6wf-geIr8udrZGecCIcUm5GU6MXDnd_bUevJcIDBwDMds7nT4viXn8 b4C43eVrZ8SezE-FQH7NcoOJ3Hm12JZt3gpK9RL61a2jTcD6XgZjBA?width=768& height=1024&cropmode=none" width="768" height="1024" />
The guide pins have dust boots which are similar to those on the pistons. However, this time, it is easier to install the boot starting on the pin, then fold the boot over the groove in the bracket. It should look like it does in the picture, it only goes one way.
Side profile:
<img src="https://2c2pla.dm2303.livefilestore.com/y3mWrE8TSaroympoKkShP_A89pyb1UCWZfoxHNQjeVLojuRrg7-kXtmsGr71dzgfzmmNa1AiunvwRiM5Dr7X_hziU2VVI_OsE4cbc 7XBZA9NvwziSf4HOEFkbwmftH8gGRNkQPar15cmMQzvcI4_l-lhy2QrHN_7fqENt8HB14N6fI?width=768&height=1024&cro pmode=none" width="768" height="1024" />
brake pad hardware:
<img src="https://2c2pla.dm2303.livefilestore.com/y3mWrE8TSaroympoKkShP_A89pyb1UCWZfoxHNQjeVLojuRrg7-kXtmsGr71dzgfzmmNa1AiunvwRiM5Dr7X_hziU2VVI_OsE4cbc 7XBZA9NvwziSf4HOEFkbwmftH8gGRNkQPar15cmMQzvcI4_l-lhy2QrHN_7fqENt8HB14N6fI?width=768&height=1024&cro pmode=none" width="768" height="1024" />
side profiles:
<img src="https://2c0crg.dm2303.livefilestore.com/y3mNmwx9_9hX6SG3Ujb2fVfnSbuivdF8k-07QmkudLOEogJptD8-2mSgow2bIaY2Ug42rQhQepu-ze_8h1POYPXhyEyyFTJkatkHyjZL3e_UkHfDxxKNX7LhOUZIem wwXSbbssQ1Egt038uW2OScm57ykVtEr-sr1_4L0IXM_TgTC8?width=768&height=1024&cropmode=no ne" width="768" height="1024" />
<img src="https://okq50w.dm2303.livefilestore.com/y3mpcoxNU8mIN7TkVLhnDlZn1T3yRQMBJid0Bkjoi0oBDqxbbc bVMBbxnOxodiDCetjjCJKq4QkH8Xzw4D7QrsSU7OzCveGQA65G vKt8UOQpku5vsdHtgYm_dTyyPzvhKC849dYMKGbuhs23tTkwKq BhvPP3nA34wel-IYqJLOdvsg?width=768&height=1024&cropmode=none" width="768" height="1024" />
mounting to car
-modify brake line bracket
Bend the bracket to look something like this: I used vice grips and channel locks. Be sure to unbolt from the car before bending.
<img src="https://0ebwga.dm2303.livefilestore.com/y3mfdpzHLZTdYHaa0bdCIzdpoYEIgqL7tU1fxUkRhSCE0zWjKd 7DipCA4Cvl7b9JYFeocka_jfEN2uCKu8JJpDIXxe3gXcvyvJkh eotVLSGdtdpdRSY5Qh1f9Q3LieNH1pspD1hCjLT_V9gO6EOZc0 UdGMCn-skvSnkA5ju6vu1NNw?width=768&height=1024&cropmode=n one" width="768" height="1024" />
<img src="https://bfufag.dm2303.livefilestore.com/y3mZSocKcAZVaWeus5KWCfLLFIGg4JENwN1MLiu8es5KE7kfGt 6ORNe8BrhPwp-XI771HCEsoalEp9zXKU4aevzni7KejFd2HEsU8Z1R9bNe9jyVe ahai7vA-EfhD3dfOKm-ZYKnYU9BIONN3QTHIPQHVXcNGXrVaM77uVtHJducE4?width=7 68&height=1024&cropmode=none" width="768" height="1024" />
<img src="https://bfvqjq.dm2303.livefilestore.com/y3mbNsot2dZeXiiEqOOze9uRAQgW-WMDKoKKEI0cbXRYwuS73jC1mi4rYKtq2Ij0qQc80fz7IQasR-snQ4EJIRyUJXVDUeNCfRm7YB8yl0BuOM-dsG7KhhI14xj-fTgE63UjhBXx9Kzaxjh5Rr9xN2Yei5_FFgASau-c4DZhVAeZus?width=768&height=1024&cropmode=none" width="768" height="1024" />
<img src="https://bfslog.dm2303.livefilestore.com/y3mEwofIBdLlRZ39yjP03tuBkWSbIQThQGY3ud1Z43Qpg_vzgx 5vmGABetKzuozpzT1XTyXo_q5l8J75FnkjmpsOqw5Icmbu1ThC NO4BX78GaqOeqOhUA5g-so8a6Ap1yFM9zYidtsTHFcqeKlMQQzQxgE5AF_-8U1R3E5jLplAVA8?width=768&height=1024&cropmode=non e" width="768" height="1024" />
Caliper bracket installation.
Like any other GM caliper I've worked on, I install the caliper bracket to the knuckle prior to installing the caliper to the bracket. I didn't take any pictures, it was late.
Next insert the brake pads into the mounting hardware, place the squealer on the back side (side without pistons) edging away from rotation. This placement trick reduces brake squeak from squealers rubbing during rotation.
The guide pins are different from ours. they have a 10mm bolt that holds the caliper onto the guide pin. The main guide pin rides under the caliper. I like this design better than ours...
Take note that most of the replacement brake hoses are threaded for a BUBBLE flare. I generally used double flare, therefore the need for a an adapter from double flare tube nut to bubble flare . I'll get the specs og the nut, they are either M10s or M11s.
Last edited by Scott_S; May 21, 2016 at 04:25 PM.
Thread Starter
Joined: Mar 2014
Posts: 207
From: PA
Reserve 3
this picture shows how the banjo bolt hole is directly behind one of the pistons. I hadn't done much cleaning of the inside at that point.
<img src="https://b9ck6q.dm2303.livefilestore.com/y3mvHkcfFzxwjCsy3rJGMthB7Yh4xSSI67Gk4DuvRBjFYj25kC HZxECyRJsU8j1D7jsddL0igV87YziC6uRFsIrVrm1oQvPie2N8 rTfMnTyWNF6weOXf79q1tkvkmYQdtYgPeSCySRdchd6kufC082 tlqLeV8GcFxwok3bzXowMa10?width=768&height=1024&cro pmode=none" width="768" height="1024" />
removing the pistons
clean up the pistons.
I used a scotch brite to gently clean the old fluid residue and rubber boot residue from the caliper pistons.
i also used a dremel to clean the outside "rim" of the pistons. It was kinda rusty on mine.
(inset pictures)
<img src="https://pbl76g.dm2303.livefilestore.com/y3mfHQQmYBPuW1bSiOVHrOq08fRNgMvKTY2XJZYqjQct2VXIAR FDeY_4z-wvmS39oXG9_WlNlXzk6LPjXUfq4FRgSXBo7vrPwEjLn2Lscgvx qKzV1IVF85FBraPbCWb46pQ4xD2tGc5T0-9UYXW88HFplltx1zjJdWG8G7bSYCiXqU?width=768&height= 1024&cropmode=none" width="768" height="1024" />
<img src="https://pbkpga.dm2303.livefilestore.com/y3mbWfJG1qu5aU4xBnosyf62-btjKUt7NnKyYzjowg6hFXVQbm1xq4dhegyQ4CJ-fwbr4Mmk0lrRlovpNjr8zPivPeHtjG09T4cn-R4S7AWYrWd-35fpKvYqhIDJ0dKbjxw-XP8w3ckcoCS5VUYtRLGv2RB62ZfP16W3CBZS0HOcrQ?width=7 68&height=1024&cropmode=none" width="768" height="1024" />
Also clean the lip of the piston of any rust. I used a brass wheel on a dremel to gently remove it.
before
<img src="https://2c1eoq.dm2303.livefilestore.com/y3m5jXww6iAgSZMWmSagkMvjzYgqKR0O2vwEmtkGHBAnBBR0Rs-FwcDLuVKOtMUl3J1GoLcDysethG-DxXsDblkpuSiMGVvQrXxwCIUlZAjWGCftgX8DTOtejjAg_gM-sd_HEczMGZIAaX27zkpPmZUCKwhHqtwrV-KU5WjDjwaf98?width=768&height=1024&cropmode=none" width="768" height="1024" />
after
<img src="https://oksexg.dm2303.livefilestore.com/y3mLsq0MLNWZV_4XE_Ni5xhlPlWoMgNifPUGpbBskbYu_krrLr zXqJVnVnWbOvOZOPP9INuG7oo3Ak-OfOygqGrfcrUwX4eEx-Og4BC15Zj8nDdsc_00-P0HfHs6VYEP9BjpfZBYjfXbbgCH3dFvQVhbvdX0tQlJbMxFJqM WEbFAOo?width=768&height=1024&cropmode=none" width="768" height="1024" />
Removing seals.
I used a flat screwdriver to gently pry out the flat seals. I treid a hook and it didn't work. Do not gouge the caliper near the groove where this seal seats. If you scratch the interior of the caliper, fine, no real harm done, you just marginally increaded the volume that the caliper holds
<img src="https://bftpuw.dm2303.livefilestore.com/y3mUbKSPq_mG01PNRILq1J4hwk6sDKCkDWoktxu5DLELuEXkUi wMbWBLT0CbVQfh5FuNEXcrEJpXCXiVUOysVJ1Y6_qEWutSlnjl t3IT_8LPhKbYz7WRea3cfh_S_Mb0AnKV7A_yOmM8IrlLsBxQTk zf9fyF_ZIZNj6EpRzVddBpjQ?width=768&height=1024&cro pmode=none" width="768" height="1024" />
<img src="https://2c2b0q.dm2303.livefilestore.com/y3m9XFotzjt5H31dqMC_uiLy-4-PkZC24ez9fGWr8XdkZQFUY_jpxJqDjhY205Ot9QyGYcvnO-y7O8wawP4SC5Wt8kHBnS6QNGcBR6zVNyBh8_X1651RMGBAtwcq x3yn2DxxJLW7bYe4DkB_ZoXJlWpeUqHWuIXy5JhCdZwKxZS4Bc ?width=768&height=1024&cropmode=none" width="768" height="1024" />
sorry it's out of focus. My phone decided to focus on he other bore.
use the screwdriver and gently scrape out the crud that accumulated under the flat cut seals. (no picture)
A pipe cleaner would also work if you wanna be more careful.
Use plenty of brake cleaner.
installing the seals
installing hardware
mounting to car[/B]
-modify brake line bracket
Bend the bracket to look something like this: I used vice grips and channel locks. Be sure to unbolt from the car before bending.
<img src="https://0ebwga.dm2303.livefilestore.com/y3mfdpzHLZTdYHaa0bdCIzdpoYEIgqL7tU1fxUkRhSCE0zWjKd 7DipCA4Cvl7b9JYFeocka_jfEN2uCKu8JJpDIXxe3gXcvyvJkh eotVLSGdtdpdRSY5Qh1f9Q3LieNH1pspD1hCjLT_V9gO6EOZc0 UdGMCn-skvSnkA5ju6vu1NNw?width=768&height=1024&cropmode=n one" width="768" height="1024" />
<img src="https://bfufag.dm2303.livefilestore.com/y3mZSocKcAZVaWeus5KWCfLLFIGg4JENwN1MLiu8es5KE7kfGt 6ORNe8BrhPwp-XI771HCEsoalEp9zXKU4aevzni7KejFd2HEsU8Z1R9bNe9jyVe ahai7vA-EfhD3dfOKm-ZYKnYU9BIONN3QTHIPQHVXcNGXrVaM77uVtHJducE4?width=7 68&height=1024&cropmode=none" width="768" height="1024" />
<img src="https://bfvqjq.dm2303.livefilestore.com/y3mbNsot2dZeXiiEqOOze9uRAQgW-WMDKoKKEI0cbXRYwuS73jC1mi4rYKtq2Ij0qQc80fz7IQasR-snQ4EJIRyUJXVDUeNCfRm7YB8yl0BuOM-dsG7KhhI14xj-fTgE63UjhBXx9Kzaxjh5Rr9xN2Yei5_FFgASau-c4DZhVAeZus?width=768&height=1024&cropmode=none" width="768" height="1024" />
<img src="https://bfslog.dm2303.livefilestore.com/y3mEwofIBdLlRZ39yjP03tuBkWSbIQThQGY3ud1Z43Qpg_vzgx 5vmGABetKzuozpzT1XTyXo_q5l8J75FnkjmpsOqw5Icmbu1ThC NO4BX78GaqOeqOhUA5g-so8a6Ap1yFM9zYidtsTHFcqeKlMQQzQxgE5AF_-8U1R3E5jLplAVA8?width=768&height=1024&cropmode=non e" width="768" height="1024" />
Take note that most of the replacement brake hoses are threaded for a BUBBLE flare. I generally used double flare, therefore the need for a an adapter from double flare tube nut to bubble flare . I'll get the specs og the nut, they are either M10s or M11s.
[insert bracket modification]
insert pics [mounting to car]
Last edited by Scott_S; May 21, 2016 at 02:35 PM.
Thread Starter
Joined: Mar 2014
Posts: 207
From: PA

Reserve 4 JIC (not sure how many pics I can have in each)
Teaser of next mod guide (sorry this one is taking so long for m to finish)
<img src="https://c6jlpa.dm2303.livefilestore.com/y3m_Uo3gI4wWvfb80b-2AUE0vp6iRMLbniE4Aj-HZTFDUhrpvezuEVtqims6FysowOAd2-dJd44B97BNkr4uLIBv_fP-KZGCX7aW5AE9SdtI5Qtjjyaa4l6-xdB8BAx9cnmOTciJI5sYbq8tC5C87HQ8qT_EUG_5PSZqQrckr9 VjXU?width=1024&height=768&cropmode=none" width="1024" height="768" />
Not my actual seats, mine are in better condition.
Last edited by Scott_S; Apr 8, 2016 at 10:56 AM.


Scott
I am unable to see the pics. Is there anyway you can upload them to the MCF server and then post them?? I believe each post can have 5 pics.
Looking forward to seeing this. Thank you for taking the time to document this and share with other MCF members!!!
I am unable to see the pics. Is there anyway you can upload them to the MCF server and then post them?? I believe each post can have 5 pics.
Looking forward to seeing this. Thank you for taking the time to document this and share with other MCF members!!!
Thread Starter
Joined: Mar 2014
Posts: 207
From: PA
EDIT: I backed up my photos from google drive to MS onedrive. Low and behold onedrive gives you an embed link w/ html code. Looks like I'm going to edit them with google photos (makes photos pop with quick editing) and permanently store them on onedrive (much larger free storage space).
hey barbara,
I have them hosted on google's server. How do I upload photos to MCF servers, just upload them to my albums ? I'll try to do things differently, and see if i can get them working
I like documenting things and sharing knowledge.
Right now, I feel as if I have gotten a lot of useful information from this place. It's time to give back
Last edited by Scott_S; Mar 8, 2016 at 12:01 AM. Reason: pictures now working