
How To: Building Fiberglass Projects


Thread Starter


Joined: Feb 2008
Posts: 6,477

So I've received PM's at various times on various forums about how to build stuff with fiberglass. So I figured I'd give a little quicky how to. The bad thing is- these were some of my first projects ever, so they do have flaws (that I'll point out)- and aren't really taken in a 'how to' style- but hopefully when I get a house and garage- I can take some more pictures to fill in the gaps in pictures.
As a precursor- if this is your first time, START SMALL. Don't try building some crazy huge piece your first time- this is a learning process- and you can easily get a lot of money wrapped up in materials in really big parts (you'd hate to scrap it). So pick something small and doable.
Part I - Planning
This is pretty straight forward, but is a step that should not be skipped. Here is what you need to think about:
-what items will need mounted (sub, monitor, amp, etc)
-how will they be secured (mounted to wood, or have their housing incorporated)
-are you going to make a brand new piece- or use stock parts for the frame
-how will you keep it from warping during the curing process
-how will you secure the new piece
-how will you finish the piece (paint or material cover)
Go take some measurements- lay your parts out, and make some simple sketches. Mocking stuff up by setting it in place can tell you real quick what needs to go where. Try adding some measurements to your drawing to give you a rough idea of where stuff will go.
Part II - Supplies
The nice thing about fiberglassing is it is pretty cheap to do, just extremely time consuming. Here is some stuff to pick up (quantities vary based on the size of your project):
-Fiberglass resin (has catalyst tube in the lid)
-Bondo (regular weight, also comes with catalyst)
-Spot Putty tube (if you plan to paint it)
-Wood for frame, like MDF (depends on how you design it)
-Fleece (big enough to cover your piece in 1 shot)
-Fiberglass cloth/matte (if you will need extra support to add to the fleece)
-Finishing material (primer/paint/clear or material/glue)
-Can of dark sand-able primer (only if painting)
-body filler grater (nick named cheese grater)
-body filler spreader
-sand paper
-others and more tools as you will see by reading
Seems pretty easy right? The resin, bondo, and spot putty can all be picked up at any regular auto parts store, even autozone- and walmart usually has some too. I would always buy more resin, and a smaller can of bondo, and a single tube of spot putty.
Part III - Build your frame- wood or stock part as frame
Now you can start assembling your frame work. You need to make something strong enough to tightly wrap the material around, so it can't be flimsy.
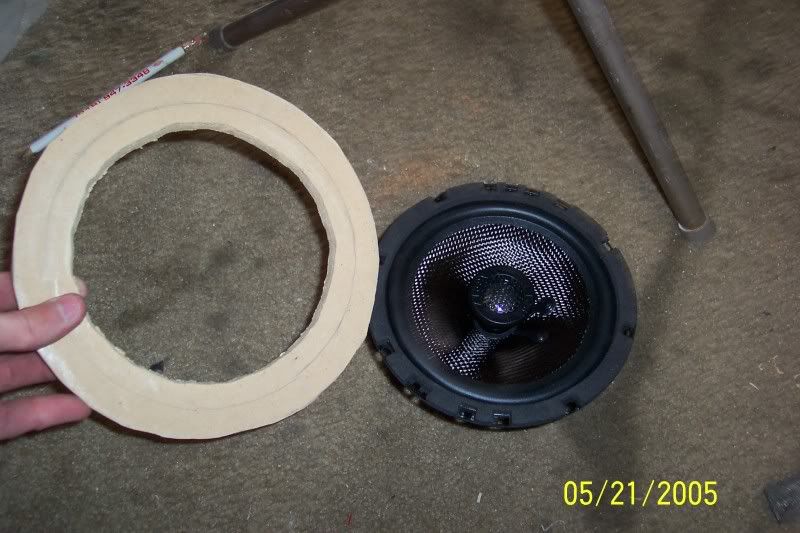
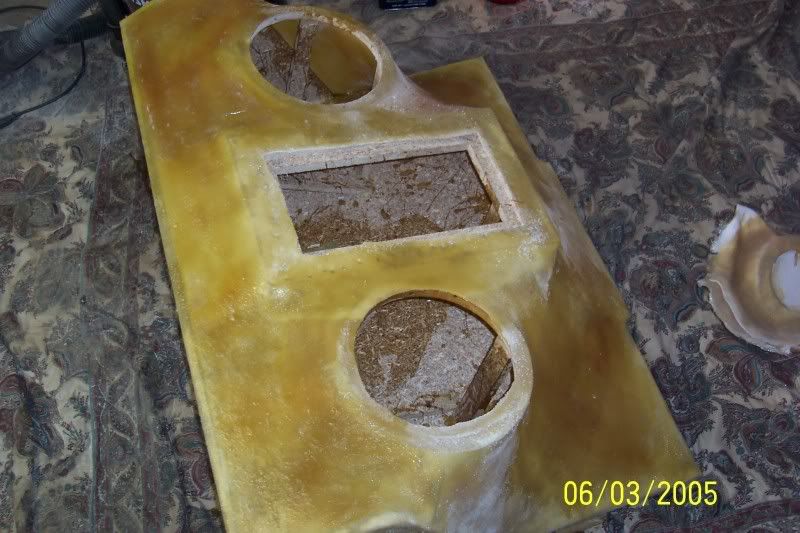
Make mounts for all the different parts you need to put on (ie flat board for an amp rack, circle for speakers or subs, or headrest mount for a monitor, etc). Make your basic framework also at this time. If you're building a sub box with a custom front, you would build the entire sub box except the front panel- and you'd cut two sub/speaker rings. This is pretty straightforward- but make sure you always keep in mind how you plan to mount your frame to the car when you're done.
By mounts, I mean stuff like this:
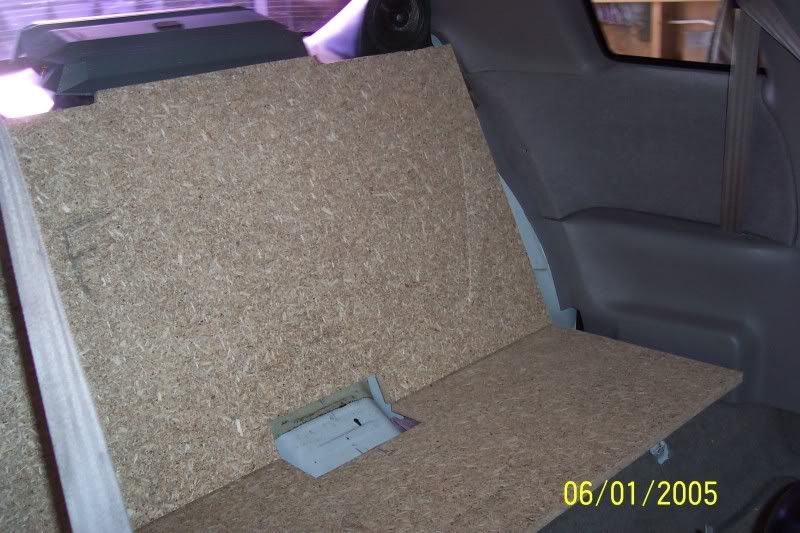
Attach your frame or modified stock part to the car now (bolts, screws, stock clips, whatever). I know it seems stupid to bolt just your frame to the car, but it is necessary to know that it will fit perfectly when you're done, cut the parts now that don't fit right. Take a pencil and mark any special areas to be careful with (so you know what to avoid later). Once your frame fits perfectly, its time to move on.
You should only have a basic frame at this point, like this (although I did add a brace with screws to keep the angle constant just after the photo):
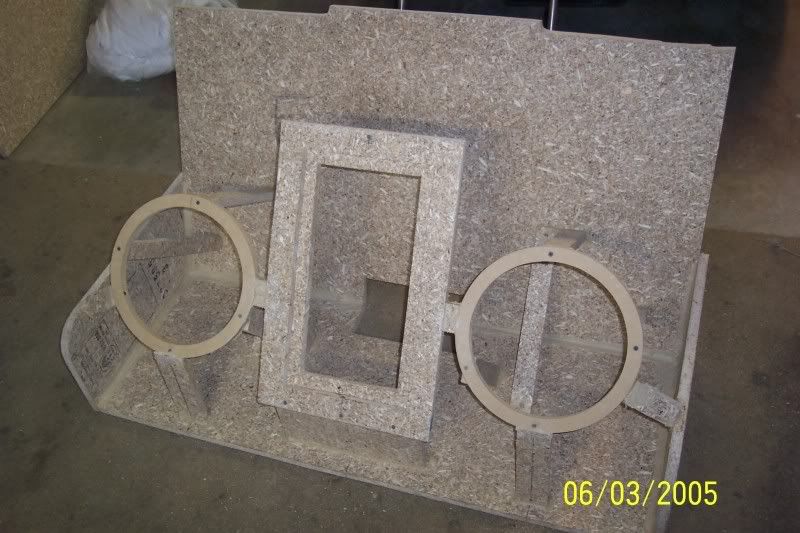
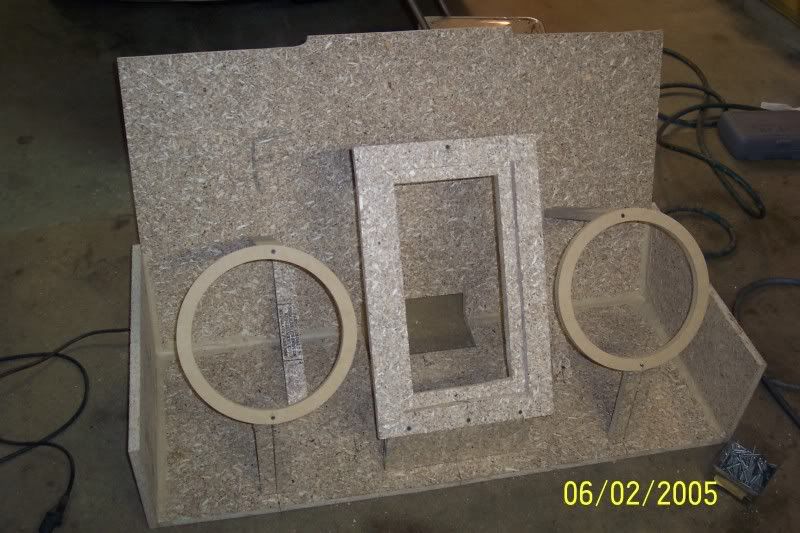
Now you just need to take your mounts (speaker rings, monitor mount, etc) and attach those to the frame with wood dowels, or pieces of cut flat stock, etc. When you get done, you should set your frame with all the secured mounts back in the car to get an idea for fitment. Right now is the time to find out how you want it done- if you want something moved a little or angled a bit, now is the time- its just a couple screws holding it together. When you're happy, you should have something like this:
Go over everything one more time to make sure it is 100% solid- you're about to put a ton of stress on this part, nothing can be wobbly, or only partially attached. But now you're ready to cover the part with material (please skip to part IV).
Part III B: Build your frame (all fiberglass)
There are some times where you simply can't build a wood frame (kickpod speaker mounts)- or you don't want to use a modified stock part to save weight (ie brand new door panels). I separated this section out, because it is a little different.
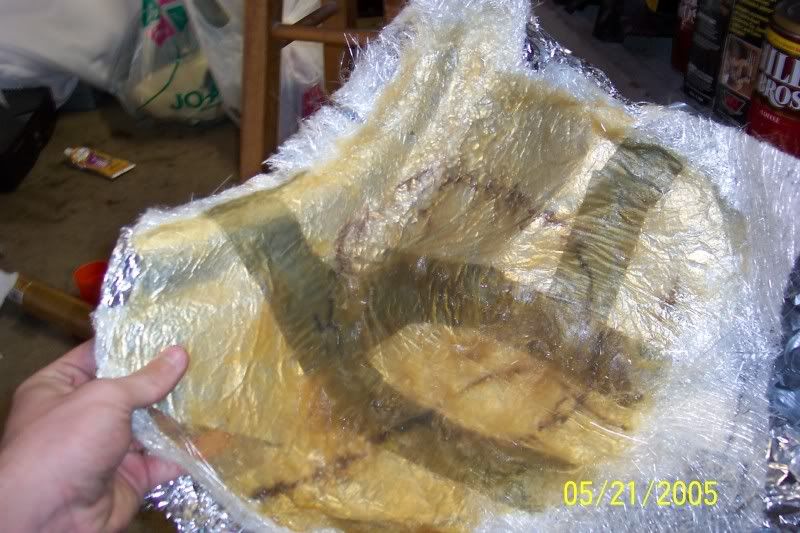
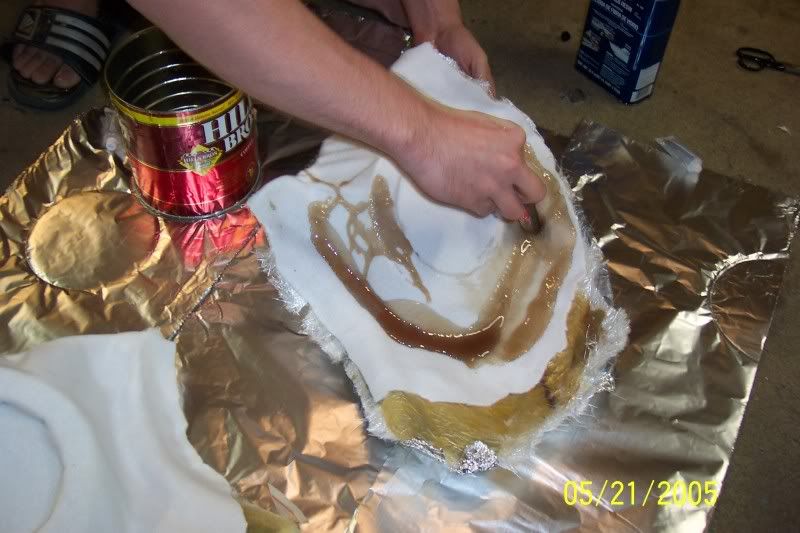
To build your backing- you need to take a mold of where your part will sit. This could be the floor behind your kickpod, your stock door panel, a corner of the trunk (for a hidden sub box, etc). The first thing you need to do is lay down something to protect the surface. I like aluminum foil personally (although I always use 2 layers) because it is easy to get to conform, but there are many different ways to do it. Basically- you want something to follow the form of your part- but won't let any resin through.
Keep in mind- if that resin gets on anything- it is ruined. If it gets into your stock carpet, it is ruined. It will harden into a rock, and there won't be anything to stop it (especially if you don't catch it until after it's dried)- I also lay down plastic sheeting (like a cheap $2 shower curtain) in the area between where I will be transporting the resin over the car (ie the door jamb and trim when doing kickpods, or the trunk jamb and floor when doing a hidden sub box).
Now you need to jump straight into fiberglassing. Doing a backing mold is usually easier using the chop matte fiberglass (the stuff that is random criss cross cuts)- just start with a single layer.
Put your foil down over the area to be covered (plan to go at least a couple inches out each way extra)- and lay down the chop matte over the top, trying to make it conform to the foil as much as possible.
Now you need to mix your resin- this is very simple, just follow the directions on the can. You need to put in a specific amount of catalyst per amount of resin. Too much and it will start gelling while you're applying it, and get super hot (I've seen it smoke before)- too little and it may not dry for 3 days. Just keep in mind, mix it in a separate container- however much you mix will be garbage after an hour or so weather its on your part or not- so don't try and mix it in the can- do it in a separate coffee can, or drink cup. Once you've got the right amount of catalyst and resin- stir it with a disposable stir stick, and immediately start applying it to the fiberglass matte with a paint brush. If you brush it like paint, you can pull and distort the fiberglass- so be careful to mostly just blot- you're just trying to soak through period.
Also keep in mind- the container you mixed it in is now garbage, as is your paint brush, and stir stick. After an hour or so, it will all be rock hard, and its too much of a pain to clean up. You obviously can save the container and stir stick and reuse them once the stuff is rock hard though.
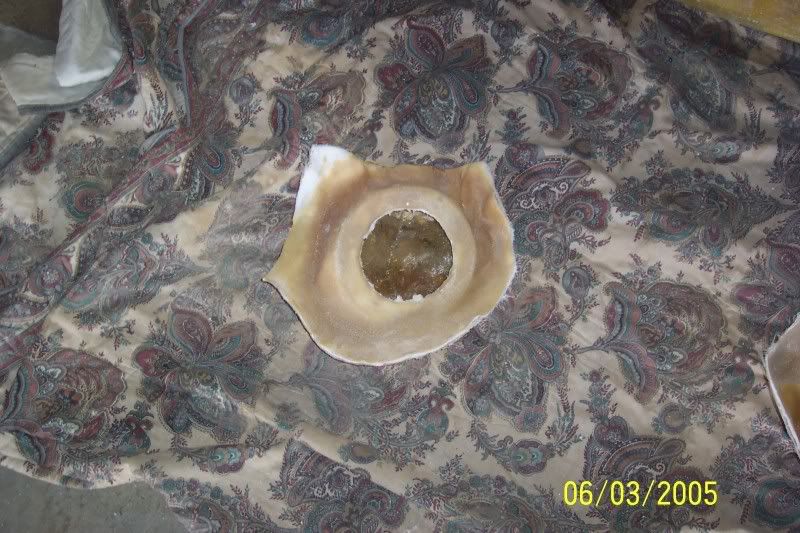
Work quickly to get the resin on there- once it starts turning really thick and gelling, you're pretty much done (if you weren't done applying, then next time use less catalyst or mix a smaller batch). Once you've got it all soaked in resin, stop and let it sit a couple hours to let it harden. If it's something that will be structurally important (like the backing for a complete fiberglass door)- then a good idea once the first layer is setting is to go ahead and do a second layer of matte and resin. You can keep adding layers (make sure there are no air bubbles) to make it stronger, but it will also be heavier as well. For something like a kickpod, one or two layers is fine.
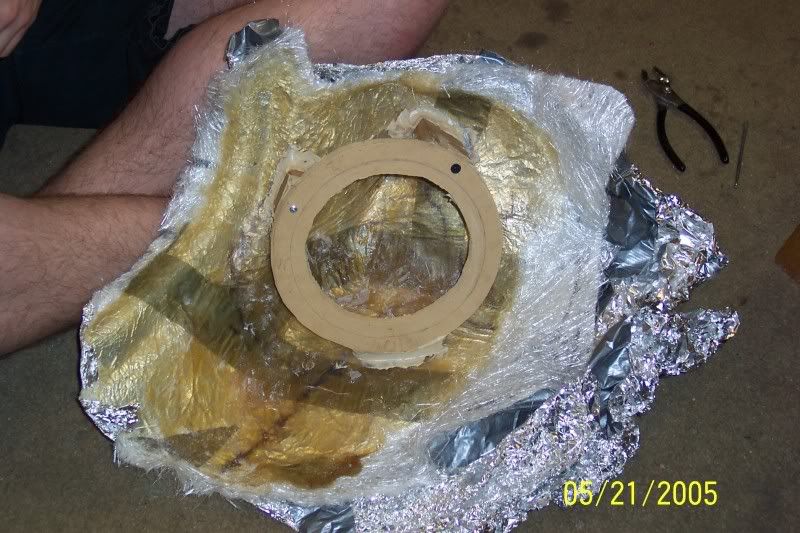
After everything is dry and cool and hard, you're done with your frame for now- give it a couple hours just in case. Should have something like this:
Once that is complete, you need to take your mounts- and attach them at the locations you want with cut up wood, wood dowel, etc. If you do this outside of the car- make sure you test fit the piece in the car, and make any adjustments to it now, because it is much harder to make changes later.
Keep in mind that this frame must be relatively strong- you're going to put it under some stress, so it can't be wobbly. When you're done, it should look like this:
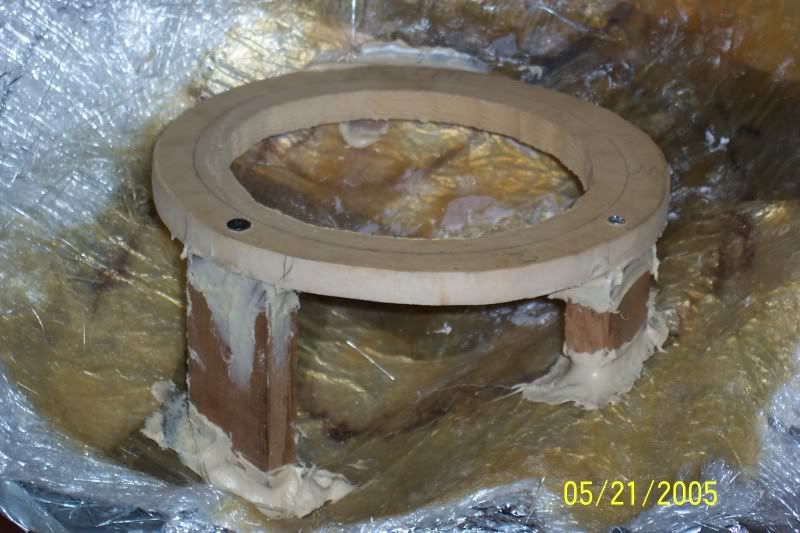
You'll probably notice I always liquid nail the joints, even though they're screwed together (or nailed in some of my later projects)- I do that because sometimes if the piece warps a bit, I've had the structure lose perfect contact with the frame and end up buzzing or vibrating later on. Its not really necessary, just something I like to do.
Part IV - Fiberglass the front
This is the step that makes or breaks the project. If this is done improperly, you could turn a simple 10 hour project into a 60 hour project by having to do gobs of bodywork. You have a few main goals to follow:
-You shouldn't really have many straight/flat sections- curves give fiberglass a lot of strength, and big open flat areas are weak- and take much more reinforcement. If you have big flat areas, consider making them out of wood or doing something different with them.
-Once the piece is wrapped in material it should look 99.99% what the finished piece will look like. Any part that is low, high, wrinkly, etc will require bodywork to fix and is a pain. Take your time to get the material perfect.
-Make sure the material is taught- if it is not pulled pretty tightly, once it is soaked in resin and it doubles or triples weight, it will sag. Where it sags will have to be body filled. This adds time, money, and weight. If you can push with your finger and the material is deflecting inches, you need to attach it better.
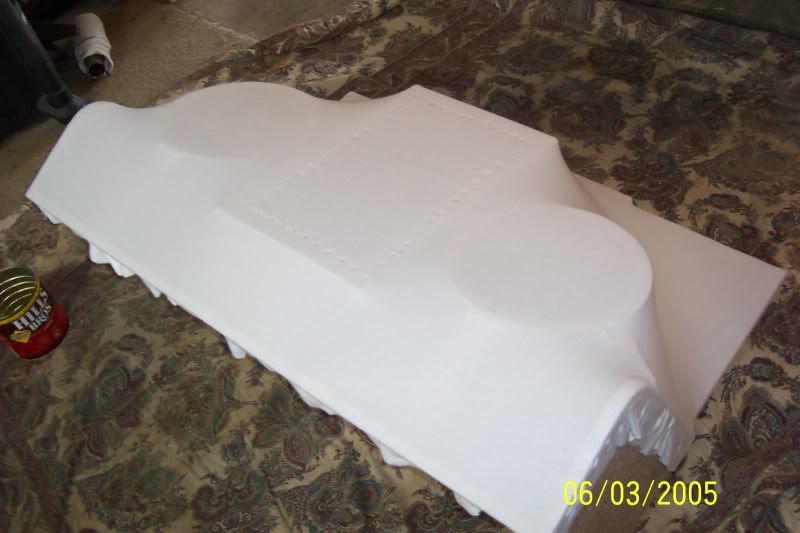
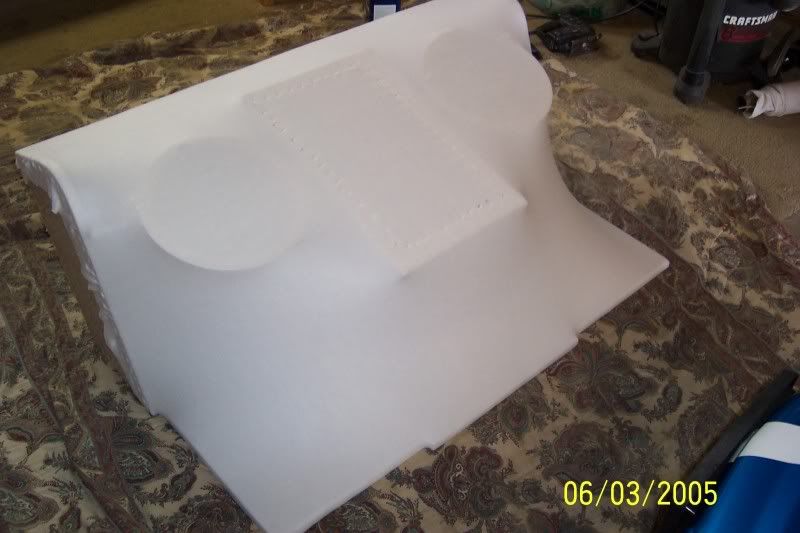
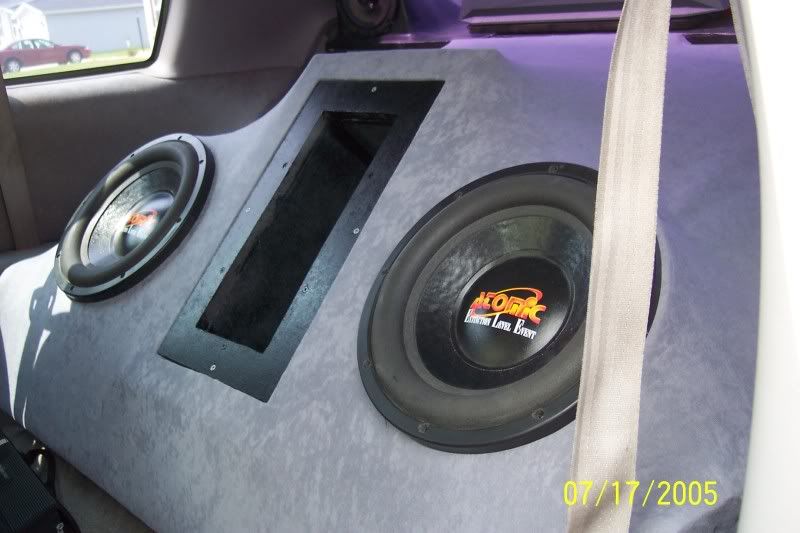
Ok, so you're ready and happy with your frame, right? Take your fleece and lay it over the part. The fleece should be medium thickness- and you may as well buy the butt ugly color from the clearance rack at the fabric store- its going to be covered anyways. Now you need to attach the material to your backing and frame around the entire opening. With an all wood frame (like the sub box in the pictures) this is cake with an air stapler (I got the one I used for $15 w/ staples from harbor freight)- staple it every inch or so to make sure it's snug.
With a fiberglass backing like kickpods, it can become tricky- I've used screws, upholstery glue, and other methods, but it is tough. You're just going to need to be super light with the resin application- no pushing.
So now that your fleece is attached, you should have this:
I will say I had some wrinkles in my kickpods, and made some (used glue to hold the fleece down) by pushing too hard. It was bad enough that some spots had to be cut out and fiberglassed over because they would've taken too much bondo to fill.
You're now ready for the resin. Mix it as I mentioned in part III B (please go back and read the section about working with resin above) -and apply with a paint brush.
You need to be careful about one thing here- warping! If this structure isn't rock solid, the drying resin (especially on a stapled on fleece) will heavily stress the part. If you have an area that must remain flat (ie like your mount)- and its made out of thinner wood, then screw it to a hunk of 3/4" MDF until it dries. Same goes for using stock panels as part of your frame- my doors warped each side up about 1/4" (U shaped looking top down at them)- you really should screw the piece to a piece of 3/4 MDF before you add resin. I ended up having minor fiberglass cracking issues on my door panels from having to force them flat to go back in the car. Obviously if you're building a sub box that is already made from 1/2" or 3/4" MDF, its not as big of a deal. But you have been warned.
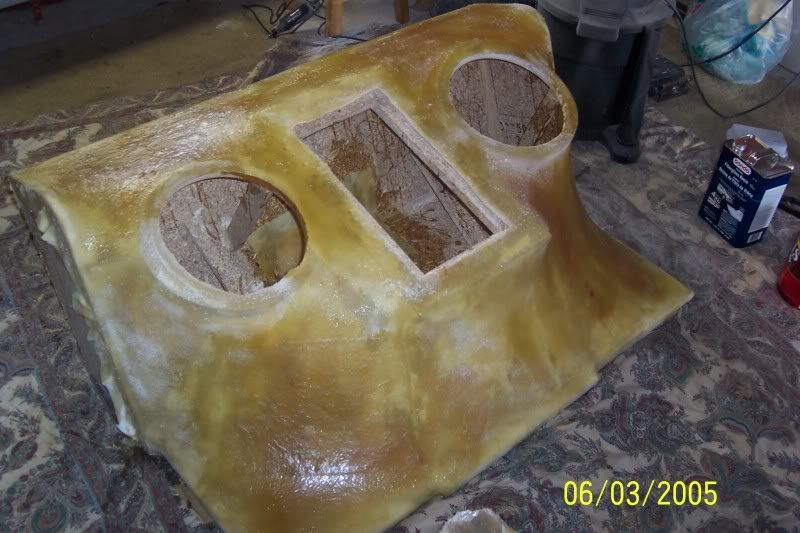
Once you get done, and it has hardened- you need to look for imperfections. Stick your hand inside (if possible) and feel the fleece to see if there are any dry patches. Feel around the corners or blow with compressed air to see if you have unsealed edges. Also, press on the piece in various places to see how strong it is. If you have any real movement at all, you'll need to reinforce (I could stand on my kickpods).
If you have dry patches inside, mix a new batch of resin, and get in there with a brush if possible. If you have unsealed edges, take some resin, pour it in, and slosh it around to coat the corners. This also fixes dry patches if you can't hit them with a brush. If you need reinforcement (pretty unlikely with fully saturated medium thick fleece)- cut some fiberglass matte, layer it on- and resin it in. I did do this in my box in the large curves above each speaker because I wanted extra thickness due to the large unsupported area. I added 2 layers of fiberglass matte on the outside and 3 layers inside. Just be careful how high you build it up on the outside because you'll need to smooth it down later- so try to avoid ridges (this is the time when it helps to actually brush the resin in like painting- you can draw the strands out and feather the edges a bit).
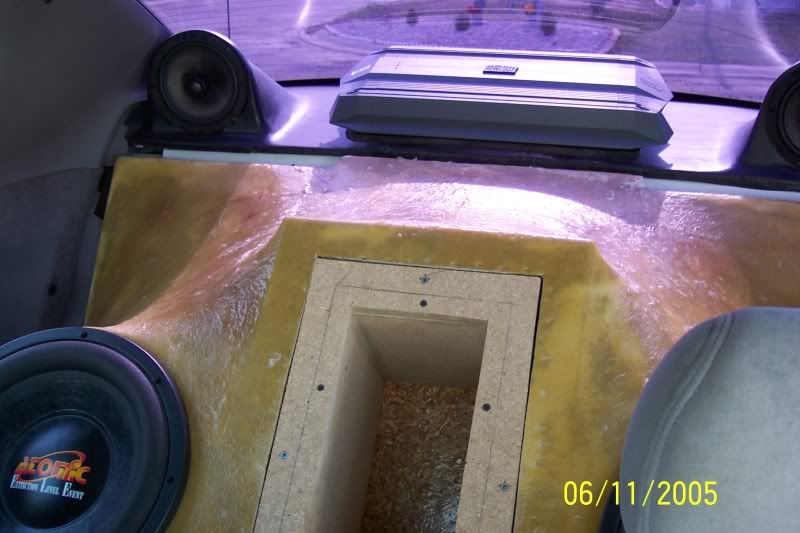
So now your part should be done with fiberglassing. Go put it back in the car again to make sure it fits before you get into finish work.
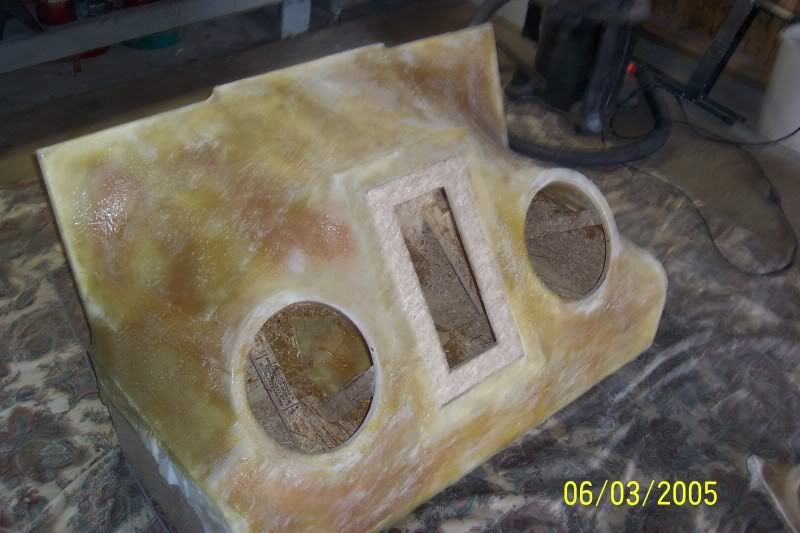
Test fit (obviously the box is supposed to sit up a little higher which it did when bolted in):

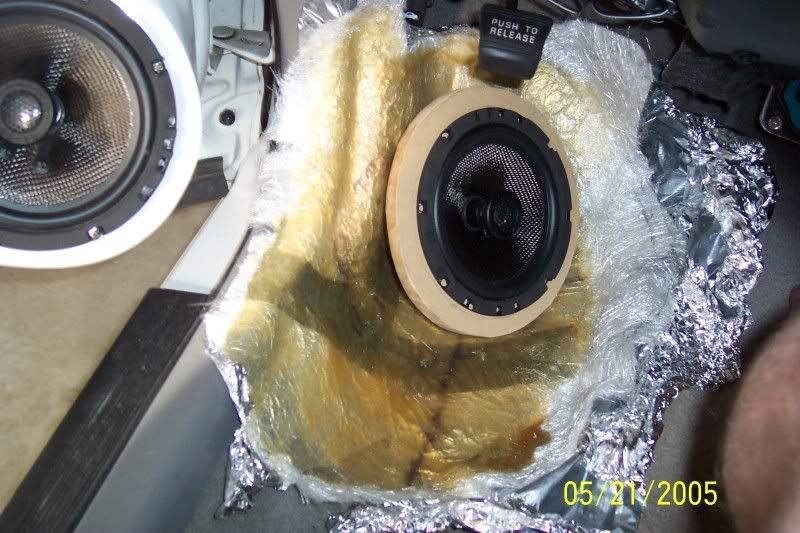
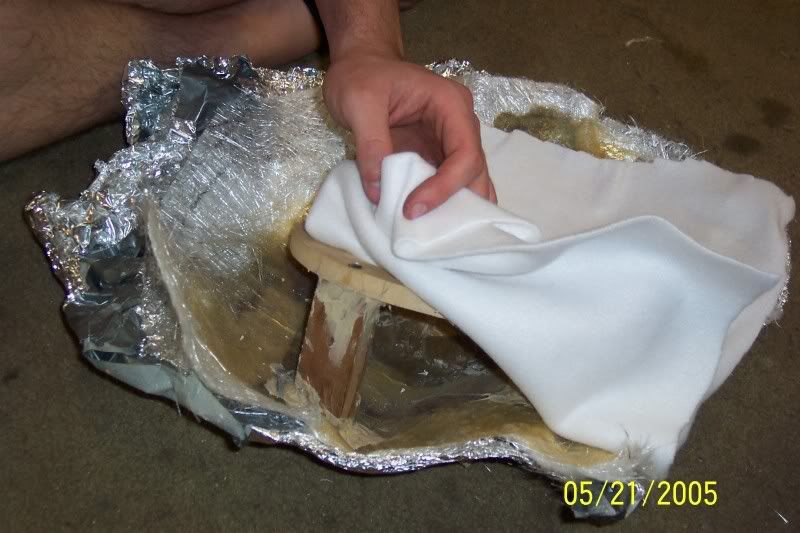
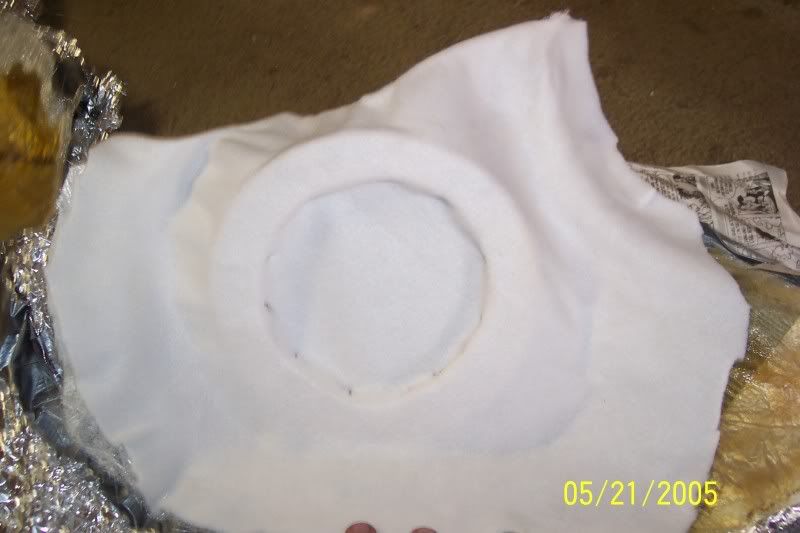
Depending what you do, you may have to enclose the back of a speaker pod (like I did on my stock doors- cutting a hole in the panel). I like to do this with the speaker in so I know it will fit. I wrap the speaker magnet in newspaper (to add some bulk so it isn't laying on the back wall)- then in foil-
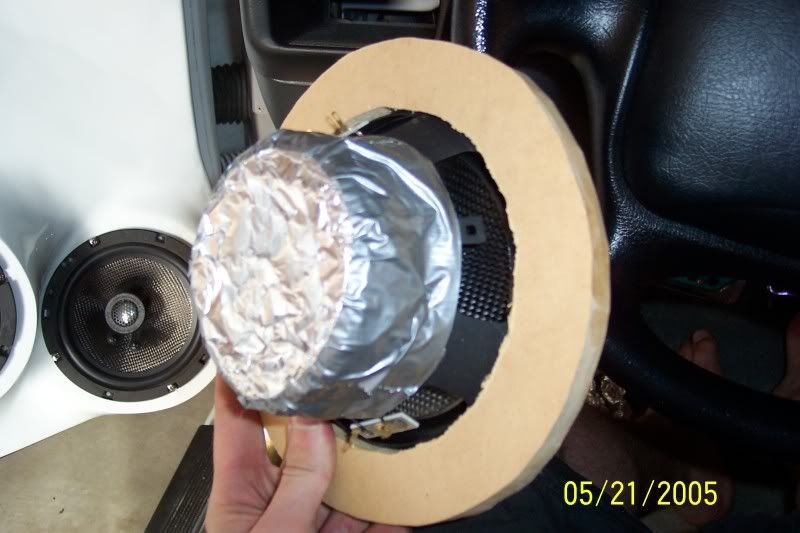
and just before I drop it in, I do one more big layer of foil over the whole speaker back. Now you can glass over the backside without worrying about speaker fitment issues later.
As a precursor- if this is your first time, START SMALL. Don't try building some crazy huge piece your first time- this is a learning process- and you can easily get a lot of money wrapped up in materials in really big parts (you'd hate to scrap it). So pick something small and doable.
Part I - Planning
This is pretty straight forward, but is a step that should not be skipped. Here is what you need to think about:
-what items will need mounted (sub, monitor, amp, etc)
-how will they be secured (mounted to wood, or have their housing incorporated)
-are you going to make a brand new piece- or use stock parts for the frame
-how will you keep it from warping during the curing process
-how will you secure the new piece
-how will you finish the piece (paint or material cover)
Go take some measurements- lay your parts out, and make some simple sketches. Mocking stuff up by setting it in place can tell you real quick what needs to go where. Try adding some measurements to your drawing to give you a rough idea of where stuff will go.
Part II - Supplies
The nice thing about fiberglassing is it is pretty cheap to do, just extremely time consuming. Here is some stuff to pick up (quantities vary based on the size of your project):
-Fiberglass resin (has catalyst tube in the lid)
-Bondo (regular weight, also comes with catalyst)
-Spot Putty tube (if you plan to paint it)
-Wood for frame, like MDF (depends on how you design it)
-Fleece (big enough to cover your piece in 1 shot)
-Fiberglass cloth/matte (if you will need extra support to add to the fleece)
-Finishing material (primer/paint/clear or material/glue)
-Can of dark sand-able primer (only if painting)
-body filler grater (nick named cheese grater)
-body filler spreader
-sand paper
-others and more tools as you will see by reading
Seems pretty easy right? The resin, bondo, and spot putty can all be picked up at any regular auto parts store, even autozone- and walmart usually has some too. I would always buy more resin, and a smaller can of bondo, and a single tube of spot putty.
Part III - Build your frame- wood or stock part as frame
Now you can start assembling your frame work. You need to make something strong enough to tightly wrap the material around, so it can't be flimsy.
Make mounts for all the different parts you need to put on (ie flat board for an amp rack, circle for speakers or subs, or headrest mount for a monitor, etc). Make your basic framework also at this time. If you're building a sub box with a custom front, you would build the entire sub box except the front panel- and you'd cut two sub/speaker rings. This is pretty straightforward- but make sure you always keep in mind how you plan to mount your frame to the car when you're done.
By mounts, I mean stuff like this:
Attach your frame or modified stock part to the car now (bolts, screws, stock clips, whatever). I know it seems stupid to bolt just your frame to the car, but it is necessary to know that it will fit perfectly when you're done, cut the parts now that don't fit right. Take a pencil and mark any special areas to be careful with (so you know what to avoid later). Once your frame fits perfectly, its time to move on.
You should only have a basic frame at this point, like this (although I did add a brace with screws to keep the angle constant just after the photo):
Now you just need to take your mounts (speaker rings, monitor mount, etc) and attach those to the frame with wood dowels, or pieces of cut flat stock, etc. When you get done, you should set your frame with all the secured mounts back in the car to get an idea for fitment. Right now is the time to find out how you want it done- if you want something moved a little or angled a bit, now is the time- its just a couple screws holding it together. When you're happy, you should have something like this:
Go over everything one more time to make sure it is 100% solid- you're about to put a ton of stress on this part, nothing can be wobbly, or only partially attached. But now you're ready to cover the part with material (please skip to part IV).
Part III B: Build your frame (all fiberglass)
There are some times where you simply can't build a wood frame (kickpod speaker mounts)- or you don't want to use a modified stock part to save weight (ie brand new door panels). I separated this section out, because it is a little different.
To build your backing- you need to take a mold of where your part will sit. This could be the floor behind your kickpod, your stock door panel, a corner of the trunk (for a hidden sub box, etc). The first thing you need to do is lay down something to protect the surface. I like aluminum foil personally (although I always use 2 layers) because it is easy to get to conform, but there are many different ways to do it. Basically- you want something to follow the form of your part- but won't let any resin through.
Keep in mind- if that resin gets on anything- it is ruined. If it gets into your stock carpet, it is ruined. It will harden into a rock, and there won't be anything to stop it (especially if you don't catch it until after it's dried)- I also lay down plastic sheeting (like a cheap $2 shower curtain) in the area between where I will be transporting the resin over the car (ie the door jamb and trim when doing kickpods, or the trunk jamb and floor when doing a hidden sub box).
Now you need to jump straight into fiberglassing. Doing a backing mold is usually easier using the chop matte fiberglass (the stuff that is random criss cross cuts)- just start with a single layer.
Put your foil down over the area to be covered (plan to go at least a couple inches out each way extra)- and lay down the chop matte over the top, trying to make it conform to the foil as much as possible.
Now you need to mix your resin- this is very simple, just follow the directions on the can. You need to put in a specific amount of catalyst per amount of resin. Too much and it will start gelling while you're applying it, and get super hot (I've seen it smoke before)- too little and it may not dry for 3 days. Just keep in mind, mix it in a separate container- however much you mix will be garbage after an hour or so weather its on your part or not- so don't try and mix it in the can- do it in a separate coffee can, or drink cup. Once you've got the right amount of catalyst and resin- stir it with a disposable stir stick, and immediately start applying it to the fiberglass matte with a paint brush. If you brush it like paint, you can pull and distort the fiberglass- so be careful to mostly just blot- you're just trying to soak through period.
Also keep in mind- the container you mixed it in is now garbage, as is your paint brush, and stir stick. After an hour or so, it will all be rock hard, and its too much of a pain to clean up. You obviously can save the container and stir stick and reuse them once the stuff is rock hard though.
Work quickly to get the resin on there- once it starts turning really thick and gelling, you're pretty much done (if you weren't done applying, then next time use less catalyst or mix a smaller batch). Once you've got it all soaked in resin, stop and let it sit a couple hours to let it harden. If it's something that will be structurally important (like the backing for a complete fiberglass door)- then a good idea once the first layer is setting is to go ahead and do a second layer of matte and resin. You can keep adding layers (make sure there are no air bubbles) to make it stronger, but it will also be heavier as well. For something like a kickpod, one or two layers is fine.
After everything is dry and cool and hard, you're done with your frame for now- give it a couple hours just in case. Should have something like this:
Once that is complete, you need to take your mounts- and attach them at the locations you want with cut up wood, wood dowel, etc. If you do this outside of the car- make sure you test fit the piece in the car, and make any adjustments to it now, because it is much harder to make changes later.
Keep in mind that this frame must be relatively strong- you're going to put it under some stress, so it can't be wobbly. When you're done, it should look like this:
You'll probably notice I always liquid nail the joints, even though they're screwed together (or nailed in some of my later projects)- I do that because sometimes if the piece warps a bit, I've had the structure lose perfect contact with the frame and end up buzzing or vibrating later on. Its not really necessary, just something I like to do.
Part IV - Fiberglass the front
This is the step that makes or breaks the project. If this is done improperly, you could turn a simple 10 hour project into a 60 hour project by having to do gobs of bodywork. You have a few main goals to follow:
-You shouldn't really have many straight/flat sections- curves give fiberglass a lot of strength, and big open flat areas are weak- and take much more reinforcement. If you have big flat areas, consider making them out of wood or doing something different with them.
-Once the piece is wrapped in material it should look 99.99% what the finished piece will look like. Any part that is low, high, wrinkly, etc will require bodywork to fix and is a pain. Take your time to get the material perfect.
-Make sure the material is taught- if it is not pulled pretty tightly, once it is soaked in resin and it doubles or triples weight, it will sag. Where it sags will have to be body filled. This adds time, money, and weight. If you can push with your finger and the material is deflecting inches, you need to attach it better.
Ok, so you're ready and happy with your frame, right? Take your fleece and lay it over the part. The fleece should be medium thickness- and you may as well buy the butt ugly color from the clearance rack at the fabric store- its going to be covered anyways. Now you need to attach the material to your backing and frame around the entire opening. With an all wood frame (like the sub box in the pictures) this is cake with an air stapler (I got the one I used for $15 w/ staples from harbor freight)- staple it every inch or so to make sure it's snug.
With a fiberglass backing like kickpods, it can become tricky- I've used screws, upholstery glue, and other methods, but it is tough. You're just going to need to be super light with the resin application- no pushing.
So now that your fleece is attached, you should have this:
I will say I had some wrinkles in my kickpods, and made some (used glue to hold the fleece down) by pushing too hard. It was bad enough that some spots had to be cut out and fiberglassed over because they would've taken too much bondo to fill.
You're now ready for the resin. Mix it as I mentioned in part III B (please go back and read the section about working with resin above) -and apply with a paint brush.
You need to be careful about one thing here- warping! If this structure isn't rock solid, the drying resin (especially on a stapled on fleece) will heavily stress the part. If you have an area that must remain flat (ie like your mount)- and its made out of thinner wood, then screw it to a hunk of 3/4" MDF until it dries. Same goes for using stock panels as part of your frame- my doors warped each side up about 1/4" (U shaped looking top down at them)- you really should screw the piece to a piece of 3/4 MDF before you add resin. I ended up having minor fiberglass cracking issues on my door panels from having to force them flat to go back in the car. Obviously if you're building a sub box that is already made from 1/2" or 3/4" MDF, its not as big of a deal. But you have been warned.
Once you get done, and it has hardened- you need to look for imperfections. Stick your hand inside (if possible) and feel the fleece to see if there are any dry patches. Feel around the corners or blow with compressed air to see if you have unsealed edges. Also, press on the piece in various places to see how strong it is. If you have any real movement at all, you'll need to reinforce (I could stand on my kickpods).
If you have dry patches inside, mix a new batch of resin, and get in there with a brush if possible. If you have unsealed edges, take some resin, pour it in, and slosh it around to coat the corners. This also fixes dry patches if you can't hit them with a brush. If you need reinforcement (pretty unlikely with fully saturated medium thick fleece)- cut some fiberglass matte, layer it on- and resin it in. I did do this in my box in the large curves above each speaker because I wanted extra thickness due to the large unsupported area. I added 2 layers of fiberglass matte on the outside and 3 layers inside. Just be careful how high you build it up on the outside because you'll need to smooth it down later- so try to avoid ridges (this is the time when it helps to actually brush the resin in like painting- you can draw the strands out and feather the edges a bit).
So now your part should be done with fiberglassing. Go put it back in the car again to make sure it fits before you get into finish work.
Test fit (obviously the box is supposed to sit up a little higher which it did when bolted in):
Depending what you do, you may have to enclose the back of a speaker pod (like I did on my stock doors- cutting a hole in the panel). I like to do this with the speaker in so I know it will fit. I wrap the speaker magnet in newspaper (to add some bulk so it isn't laying on the back wall)- then in foil-
and just before I drop it in, I do one more big layer of foil over the whole speaker back. Now you can glass over the backside without worrying about speaker fitment issues later.
Thread Starter
Joined: Feb 2008
Posts: 6,477
Part V - Rough finishing
This applies either way whether you paint or wrap your piece, you need to get the surface pretty smooth. Obviously you don't have to be as smooth with a material wrap though.
I like to start by taking a sander with some 40 or 60 grit (like a regular rotary air sander with a soft backing pad so it conforms to the surface)- and just knocking the high spots off the resin. Don't get into the actual fiberglass, you want to keep the strength of the part- you just will have some parts that gelled before they fully flowed out and such, and its easier to just knock them down now than try and fill over them.
Next its time to break out the bondo. You really are going to probably have to do a thin coat over the whole thing at least to get it all nice and level- the surface left by fleece and resin is rough at best. Try and keep the coat as thin as possible though, as it does add a lot of weight and you hate to have to sand a ton off.
This mixes like the resin, except its like a toothpaste goo instead of a honey gel like the resin. You also still have a separate catalyst (although the nice thing is, when mixed, its easier to see when you're done due to the color change). Regular bondo is gray and the catalyst is red, so you end up with pink. If you still have gray blobs, keep mixing- try not to mix in big air bubbles (by folding it over like an omelet). Once it's all mixed, start spreading- use a flexible spreader like an old credit card or something a bit larger- I usually cut the plastic lid up and use that, and I usually mix the stuff on a couple paper plates. Again, anything that touches it is pretty much garbage (although you can usually reuse your spreader by flexing it and breaking off the bondo).
Just try and do a smooth, even coat. Once it starts semi-setting up (its hard, but still a little soft and warm)- take your bondo grater (like a cheese grater) and go over all the high spots and mistakes (like bulges where you had excess off the edge of the spreader)- this cuts the bondo much quicker than waiting until its fully hard and sanding- but only do it to the parts that need major material removal- if you've got a smooth coat in areas, leave it. Keep in mind at no point should the bondo be over 1/4" thick. Honestly, I usually put it on about 1/8" thick, and sand down to almost nothing.
Let this set for quite awhile to dry. It will shrink and do all kinds of crazy stuff- so don't try working it too much, let it sit overnight if possible.
Next day, hit the whole thing with a lighter grit paper on a DA or something (obviously a small part could be hand sanded, but that sucks!)- maybe try 120 or 150 grit until you get most of it cut down as much as you want, then go over with a 220 or so lightly to make it nice and smooth.
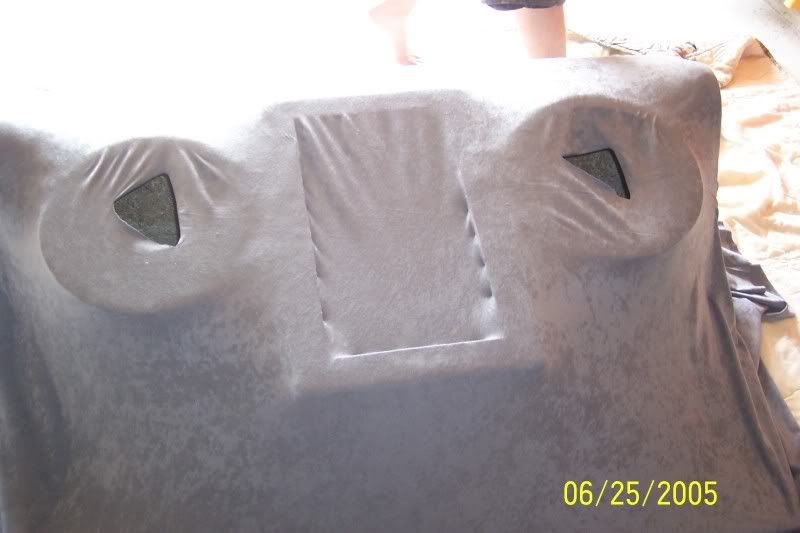
If you're going to material wrap it, then you're done- stretch your material over it, and glue/staple it and install it:

I will mention another type of filler (there are tons of types- I just used the normal medium weight bondo since its the most common)- its got a lot of different names like Tigers Hair, Kitty Hair, etc- basically its bondo with fiberglass strands. It sets up way stronger than normal filler- and can be used to fix serious screw ups in your fiberglass work. However, it is difficult to mix and work with, and is very hard to sand- so I'd only use it if you need a major repair (something that would require over 1/4" of bondo).
If you're painting it- continue on...
Part VI - Final finishing
If you've come this far, you're obviously painting it, and it needs to be perfectly smooth for it to look good, even if you rattle can it.
If you've got the shape you want and think its ready for paint- then take a high contrast sandable primer (like black or dark gray) and lightly spray the whole thing- this is called a guide coat. Get a sanding backing pad, and a piece of fine sandpaper- and try going over all your curves and all over the whole piece. If you're sanding a 6"x6" area, and you sand for a few seconds and you still have lines of primer, or you still have a circle of primer- that is a low spot that needs to be filled with bondo. If you don't fill these things, your painted part will look as wavy as the ocean (or bumpy as a fat person's legs). You just need to do a quick hand sanding over the whole part, and you will immediately see the spots that need levelled with another application of bondo.
That may take a few times to get perfectly smooth- but you'll be glad. One other thing you probably noticed is a few pinholes- that is common, you're bound to mix some air into the bondo, and its unavoidable. You CAN NOT sand through pinholes because as some go away more will expose themselves. This is what the glazing or spot putty is for. Take a compressed air nozzle and blow the whole part off- you want to blow any dust out of the pinholes.
They make spot putty in 2 kinds - direct tube application (squirt it on, let it harden) or 2 part (which mixes like bondo). Direct application is easier, but takes WAY longer to dry - and will shrink after hours and hours- even if the surface is sandable. I prefer 2 part because after a couple hours, it quits shrinking. If you do use the direct stuff, let it sit a full day after application to resand it. If you sand it once the surface gets hard- it'll be flush, but then 6 hours later it will sink in and leave a pock mark. Just do a nice very light coat over your whole part to fill all the pinholes (press harder than you did with the bondo- you want it to really get in the holes.
After it is hard, sand it smooth (the bondo will look like it has chicken pox probably- depending how bad the pinholes were)- I'd try and put a good finish on it this time.
Now I'd hit the whole thing with a sandable primer/surfacer- spray it a little thick and sand it smooth (like 400 grit smooth). Go easy on the sanding, and this will also be a double check that it is smooth- otherwise you'll notice bumps and ripples as in your guide coat.
Once this is done, you can go to a regular primer (if you need a lighter color, or just to make a uniform color)- then your color coat, then your clear.
I won't get into paint gun specifics, thats a whole different topic- nor will I get into wet sanding and buffing- thats more advanced and is a lesson in its self.
If you plan to have a body shop paint it- I would stop at the spot putty level, you don't want to put on a primer that will be incompatible with the paint they will be using, and you don't want to pay for them to strip it.
Part VII - Safety
Whenever you sand any of this stuff- dust mask is a minimum, preferably a filtered breather mask (fiberglass dust in your lungs is not a funny thing).
When working with fiberglass resin- gloves, and clothing to cover all of your skin. That stuff soaks in and does not come out for awhile (I've got it in my hair on my head, arm hair, on my fingers, etc)- its nasty stuff. Avoid touching resin with anything at all costs. Also- any clothes that get resin on them are garbage, the resin will soak in and become rock hard.
When doing painting, or any catalyzing (resin, bondo, putty)- do it outside or in a well ventilated area (I know that's hard when you're doing a backing in a car)- the fumes are bad for you.
The rest of the safety stuff is up to you- if you want to wear gloves, goggles, a full body suit- whatever- that's up to you. If you decide not to follow the safety rules for the products, its at your own risk. I just wanted to list the above 3 as 'not optional under ANY circumstances'- and I don't usually wear safety equipment, so you know its a big deal if I mention it.
Lastly, a few pictures of finished stuff I did on my own car (most of these are old, and were my first few fiberglass projects, so they're a little rougher than stuff I've done for customers at my various jobs):


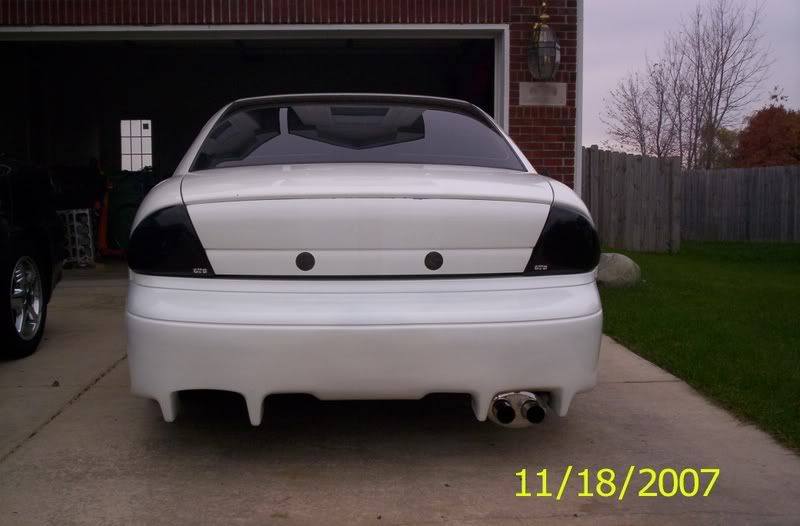
Deleted license plate holder with fiberglass & filler- deleted reflectors on bottom corners of trunk panel with filler.
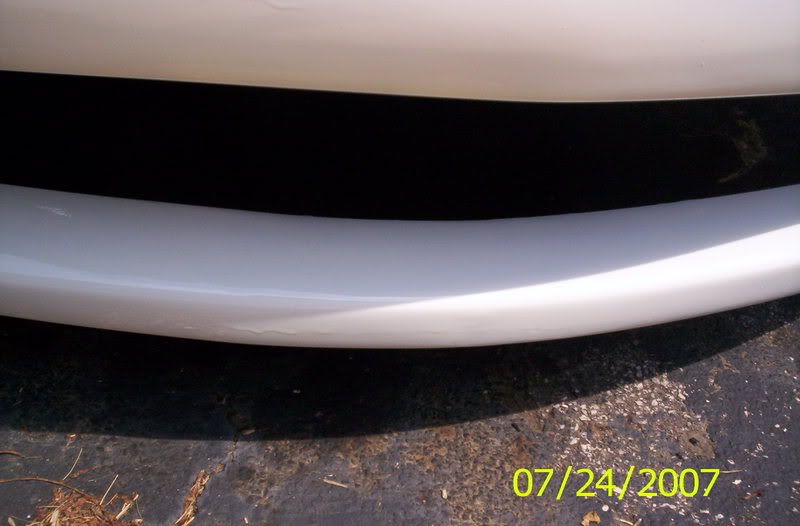
Fixed broken front lip with fiberglass (back side) & filler:

Please ignore the clear coat runs- I was just trying to show how it could go from being broken in half, to fixed again; it just needs the clear coat sanded and buffed still.
This applies either way whether you paint or wrap your piece, you need to get the surface pretty smooth. Obviously you don't have to be as smooth with a material wrap though.
I like to start by taking a sander with some 40 or 60 grit (like a regular rotary air sander with a soft backing pad so it conforms to the surface)- and just knocking the high spots off the resin. Don't get into the actual fiberglass, you want to keep the strength of the part- you just will have some parts that gelled before they fully flowed out and such, and its easier to just knock them down now than try and fill over them.
Next its time to break out the bondo. You really are going to probably have to do a thin coat over the whole thing at least to get it all nice and level- the surface left by fleece and resin is rough at best. Try and keep the coat as thin as possible though, as it does add a lot of weight and you hate to have to sand a ton off.
This mixes like the resin, except its like a toothpaste goo instead of a honey gel like the resin. You also still have a separate catalyst (although the nice thing is, when mixed, its easier to see when you're done due to the color change). Regular bondo is gray and the catalyst is red, so you end up with pink. If you still have gray blobs, keep mixing- try not to mix in big air bubbles (by folding it over like an omelet). Once it's all mixed, start spreading- use a flexible spreader like an old credit card or something a bit larger- I usually cut the plastic lid up and use that, and I usually mix the stuff on a couple paper plates. Again, anything that touches it is pretty much garbage (although you can usually reuse your spreader by flexing it and breaking off the bondo).
Just try and do a smooth, even coat. Once it starts semi-setting up (its hard, but still a little soft and warm)- take your bondo grater (like a cheese grater) and go over all the high spots and mistakes (like bulges where you had excess off the edge of the spreader)- this cuts the bondo much quicker than waiting until its fully hard and sanding- but only do it to the parts that need major material removal- if you've got a smooth coat in areas, leave it. Keep in mind at no point should the bondo be over 1/4" thick. Honestly, I usually put it on about 1/8" thick, and sand down to almost nothing.
Let this set for quite awhile to dry. It will shrink and do all kinds of crazy stuff- so don't try working it too much, let it sit overnight if possible.
Next day, hit the whole thing with a lighter grit paper on a DA or something (obviously a small part could be hand sanded, but that sucks!)- maybe try 120 or 150 grit until you get most of it cut down as much as you want, then go over with a 220 or so lightly to make it nice and smooth.
If you're going to material wrap it, then you're done- stretch your material over it, and glue/staple it and install it:
I will mention another type of filler (there are tons of types- I just used the normal medium weight bondo since its the most common)- its got a lot of different names like Tigers Hair, Kitty Hair, etc- basically its bondo with fiberglass strands. It sets up way stronger than normal filler- and can be used to fix serious screw ups in your fiberglass work. However, it is difficult to mix and work with, and is very hard to sand- so I'd only use it if you need a major repair (something that would require over 1/4" of bondo).
If you're painting it- continue on...
Part VI - Final finishing
If you've come this far, you're obviously painting it, and it needs to be perfectly smooth for it to look good, even if you rattle can it.
If you've got the shape you want and think its ready for paint- then take a high contrast sandable primer (like black or dark gray) and lightly spray the whole thing- this is called a guide coat. Get a sanding backing pad, and a piece of fine sandpaper- and try going over all your curves and all over the whole piece. If you're sanding a 6"x6" area, and you sand for a few seconds and you still have lines of primer, or you still have a circle of primer- that is a low spot that needs to be filled with bondo. If you don't fill these things, your painted part will look as wavy as the ocean (or bumpy as a fat person's legs). You just need to do a quick hand sanding over the whole part, and you will immediately see the spots that need levelled with another application of bondo.
That may take a few times to get perfectly smooth- but you'll be glad. One other thing you probably noticed is a few pinholes- that is common, you're bound to mix some air into the bondo, and its unavoidable. You CAN NOT sand through pinholes because as some go away more will expose themselves. This is what the glazing or spot putty is for. Take a compressed air nozzle and blow the whole part off- you want to blow any dust out of the pinholes.
They make spot putty in 2 kinds - direct tube application (squirt it on, let it harden) or 2 part (which mixes like bondo). Direct application is easier, but takes WAY longer to dry - and will shrink after hours and hours- even if the surface is sandable. I prefer 2 part because after a couple hours, it quits shrinking. If you do use the direct stuff, let it sit a full day after application to resand it. If you sand it once the surface gets hard- it'll be flush, but then 6 hours later it will sink in and leave a pock mark. Just do a nice very light coat over your whole part to fill all the pinholes (press harder than you did with the bondo- you want it to really get in the holes.
After it is hard, sand it smooth (the bondo will look like it has chicken pox probably- depending how bad the pinholes were)- I'd try and put a good finish on it this time.
Now I'd hit the whole thing with a sandable primer/surfacer- spray it a little thick and sand it smooth (like 400 grit smooth). Go easy on the sanding, and this will also be a double check that it is smooth- otherwise you'll notice bumps and ripples as in your guide coat.
Once this is done, you can go to a regular primer (if you need a lighter color, or just to make a uniform color)- then your color coat, then your clear.
I won't get into paint gun specifics, thats a whole different topic- nor will I get into wet sanding and buffing- thats more advanced and is a lesson in its self.
If you plan to have a body shop paint it- I would stop at the spot putty level, you don't want to put on a primer that will be incompatible with the paint they will be using, and you don't want to pay for them to strip it.
Part VII - Safety
Whenever you sand any of this stuff- dust mask is a minimum, preferably a filtered breather mask (fiberglass dust in your lungs is not a funny thing).
When working with fiberglass resin- gloves, and clothing to cover all of your skin. That stuff soaks in and does not come out for awhile (I've got it in my hair on my head, arm hair, on my fingers, etc)- its nasty stuff. Avoid touching resin with anything at all costs. Also- any clothes that get resin on them are garbage, the resin will soak in and become rock hard.
When doing painting, or any catalyzing (resin, bondo, putty)- do it outside or in a well ventilated area (I know that's hard when you're doing a backing in a car)- the fumes are bad for you.
The rest of the safety stuff is up to you- if you want to wear gloves, goggles, a full body suit- whatever- that's up to you. If you decide not to follow the safety rules for the products, its at your own risk. I just wanted to list the above 3 as 'not optional under ANY circumstances'- and I don't usually wear safety equipment, so you know its a big deal if I mention it.
Lastly, a few pictures of finished stuff I did on my own car (most of these are old, and were my first few fiberglass projects, so they're a little rougher than stuff I've done for customers at my various jobs):
Deleted license plate holder with fiberglass & filler- deleted reflectors on bottom corners of trunk panel with filler.
Fixed broken front lip with fiberglass (back side) & filler:
Please ignore the clear coat runs- I was just trying to show how it could go from being broken in half, to fixed again; it just needs the clear coat sanded and buffed still.
Last edited by bumpin96monte; Mar 29, 2010 at 03:23 AM.
Thread Starter
Joined: Feb 2008
Posts: 6,477
One thing I did leave out- your first time through, follow the directions on the can for mixing as close as possible. When you get more used to doing it, you can adjust ratios to better suit your timeframe- but starting off- mix it as is.
Another thing I didn't really get into was more advanced stuff- doing flush speaker/sub mounts; molding the face of a tv monitor in instead of the headrest bracket, etc- but that is all a little more advanced stuff- I just wanted to get the basics down so people could try it on their own first to see if they like it without trying to do a crazy complex show car piece their first time.
Another thing I didn't really get into was more advanced stuff- doing flush speaker/sub mounts; molding the face of a tv monitor in instead of the headrest bracket, etc- but that is all a little more advanced stuff- I just wanted to get the basics down so people could try it on their own first to see if they like it without trying to do a crazy complex show car piece their first time.


Thread Starter
Joined: Feb 2008
Posts: 6,477
Your crazy lol.
These were your first projects?! O_O holy cow.
You're talented.
You're talented.
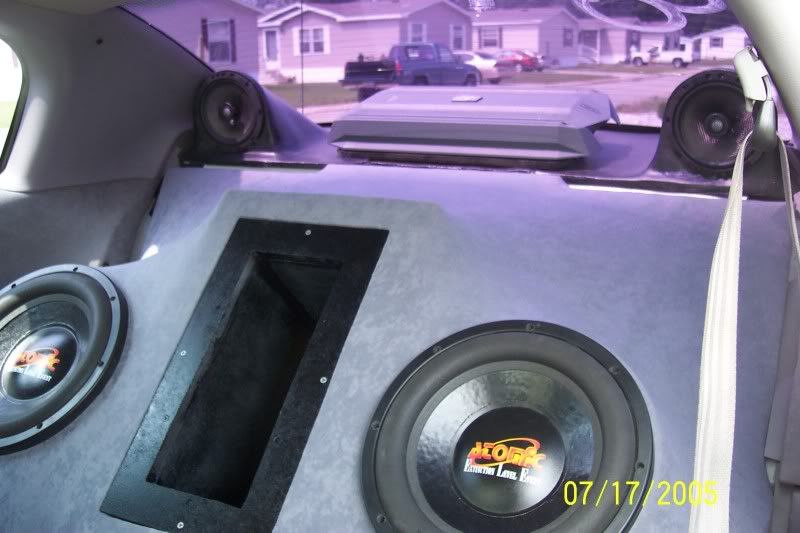
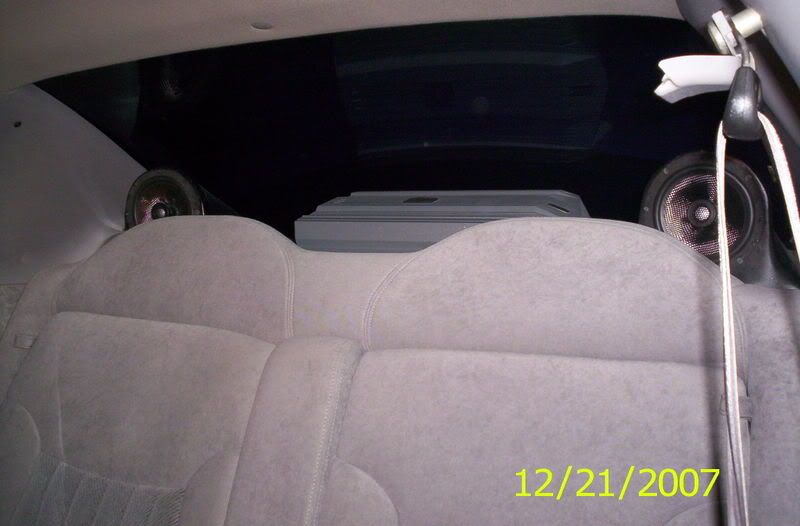
Second project was the rear deck. That worked fairly well, but it made me more conscious about how the structure will show when you pull real tight- so it taught me the trick of using window screen material pulled over the frame to force the fleece to not pull so tight. Also, it taught me incompatibility of paints; my boss primered it with a gun with one type of paint, and I cleaned it and rattle canned it semigloss black- and the paint did all kinds of weird stuff. I left it because you couldn't really see anyways, and the front didn't look bad.
My third project was my doors- that taught me to use something to keep the frame from warping, and also to slow down and make sure the material represents the final shape because it takes so much body work to correct later. Also learned a lesson on sanding and not using paper straight on your fingers w/o a backing pad (this was the last project I all- hand sanded). I have some waviness that can be seen in the flat spot of the door, and just behind the speaker pods. I learned about the guide coat after this project.
My fourth project was deleting the cup holder, and relocating the window switches- went pretty smooth, cut the bottom flat, fiberglass over it- then bondo over the top to get the surface the same height; cut the hole for the switch and done! Didn't really learn anything because it was so easy.
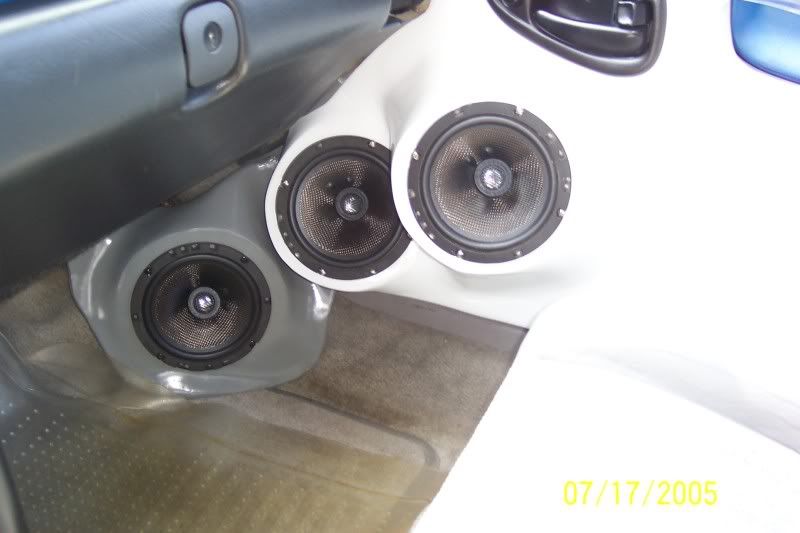
Fifth project was the kickpods, and that taught me how hard it was to work with a 100% fiberglass form- in that you can't stretch it tightly like with a more solid frame. Also taught me to put the part back in the car and try and use it a bit before you add resin. I loved the angle of the speakers and how they lined up so well with the others- but they took up so much foot room. I ended up selling them because I was so afraid of stepping on the speaker, and was tired of sitting with my legs together like I was sitting in a C4 vette.
Sixth and seventh projects I did at work with my boss.
Eight project was the sub box. While the fiberglass stuff came out dead on, there were a couple things I hated about it. 1 was the fact that I made a simple frame with the idea of building trim panels for the sides later (the top and bottom lined up with it bolted in)- I didn't realize how complex those trim panels would have to be, when I could've simply took extra time on the frame to make the thing butt up to the stock panels. The other thing I hated was that it always ran about 2.5-3 db lower than my old trunk setup, and it sounded a lot more sloppy. I made it so you could have interchangeable ports- so I could tune it, but I never could get the sound like the trunk box. It looked cool as heck, but I didn't understand subs 'loading' off something (like the back of the trunk). I also sold it in time.
What I'm trying to get at is that anybody can really do this- the more simple projects don't require air tools, or even electric tools at all, they can be totally hand sanded, and everything. I even built about 85% of my door projects at an apartment- building it inside (cutting the wood and stuff outside)- and then doing the fiberglass and curing outside. I did paint it in a garage because I used a gun, but I could've just as easily rattle canned it at the apartment.


Thread Starter
Joined: Feb 2008
Posts: 6,477
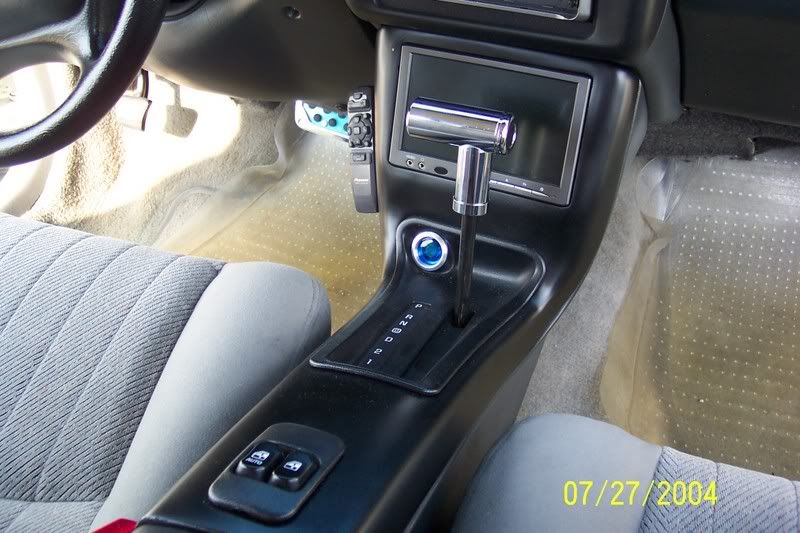
The TV behind the shifter has been done quite a bit on 5th gen's just because the size is so close. Once thing to keep in mind is that you will need to cut down the shifter shaft so that the shifter sits low enough so you can watch while in park. As you can probably tell from the pics- with the stock height shifter shaft, it does get in the way.
Also, that is the easier way to do a TV- the cooler way is to take the tv apart, take the front half of the housing- and fiberglass that into the car (make sure you don't cover up any of the holes)- and then when its done and painted, stick the 'guts' back in and screw the back cover back on. That way it looks like it came from the factory. I had just never seen it done back when I did mine.

