
The 1972 Restoration

Thread Starter
|

Joined: May 2011
Posts: 96

The list
Wheel well trim
Side trim
Dashboard
New instrument cluster panel with glovebox and front assembly.
A working analog clock
Working A/C
New interior panels
New tint
Rear seat cover and foam
Steering wheel collar lock and hidden kill switch.
and of course, Monte Carlo floor mats
1972 Monte Carlo Restoration: Part 1
I came across this Monte on the notorious Cars.com around September '10. I had been searching for classic muscle for quite awhile. Something not too sporty, but not grandma-like. This particular Monte caught my eye. I had never seen bench seats before, ever. I had been an import-freak.
This car saved me from the rice plague.
I had saved up $1200, and my father was kind enough to match it. I bought it for $2000. It was a Home-Depot orange, scourged in rust and caked in bondo. I was given a photo of the car, of what it used to look like:

*I believe the photo was taken in early 90's.
Originally this car had been blue. Ever since then, it had 4 paint jobs with 4 different owners. The man we bought it from said the transmission had been rebuilt. It had a new 350. And everything else listed in my sig. Seemed as if I had nothing mechanical to restore.
With this photo, came a red binder, listed anything and everything put into this car. From a simple oil change to a front bumper.

Pictures from the day after the title transfer:


*note, license plates are old and are in ex-owners name.
This block of bondo chipped off the rear-window-to-trunk 'panel', and it serves as a remind of how far this car has come. It was held together with fiberglass, your typical half-arsed Maaco job.

So here I am with a gigantic rust problem. This car was CAKED in bondo. I took a drill with a grind attached, and cut a hole about 3/4 inch deep, and had not hit metal. This was on the roof of the car, near the sail panel. No picture, sorry.
So my father had an idea.
We turned to a man he used to work with, he was experienced in body work, metal, and painting. We brought it up to him in the middle of October, and he proposed $2300. From filling rust holes with metal to the paint job.
You can see some of his work here:


Last edited by Zuzmaw; Jul 29, 2011 at 02:55 PM.
Thread Starter
|
Joined: May 2011
Posts: 96
1972 Monte Carlo Restoration: Part 2 (continued)


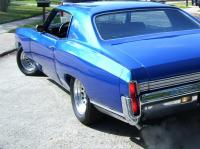
We paid the $2300 over time, and each contributed $1150. In one of the photos, you can see the paint booth where it was painted. The blue we chose was not the original, as it was near impossible to find the original code of blue. But we chose something not too dull, but not too metallic. It was not cheap paint nor primer he had used.
Here is a picture we drove it home. It had no grille nor bumpers.

We had the front and rear bumper torched off, and the grille was bent and crooked. The previous owner had ran the car into a pole and bent the bumper, grille, and even broke the A/C. The interior was blue. I painted all of it black with interior paint. Went so far to take all interior panels out and paint them on my garage floor. I plan to replace them in the coming years, but it will have to do for now.

My first project was to remove the original 40 year old seats and carpet. Could not have done it without a breathing mask.

Here you can see the front seats and back seats in the back of the Durango. We were going to have a bid on how much it would be to restore it. However it turned out to be $600. For 1/4 that price, we could do it ourselves, so we did.


After the carpet had been removed, there were multiple rust holes in the floor. I came up with the idea of using fiberglass to cover the holes. But first we brushed rust inhibitor given to us by a neighbor. Stuff works great.

We paid the $2300 over time, and each contributed $1150. In one of the photos, you can see the paint booth where it was painted. The blue we chose was not the original, as it was near impossible to find the original code of blue. But we chose something not too dull, but not too metallic. It was not cheap paint nor primer he had used.
Here is a picture we drove it home. It had no grille nor bumpers.
We had the front and rear bumper torched off, and the grille was bent and crooked. The previous owner had ran the car into a pole and bent the bumper, grille, and even broke the A/C. The interior was blue. I painted all of it black with interior paint. Went so far to take all interior panels out and paint them on my garage floor. I plan to replace them in the coming years, but it will have to do for now.
My first project was to remove the original 40 year old seats and carpet. Could not have done it without a breathing mask.
Here you can see the front seats and back seats in the back of the Durango. We were going to have a bid on how much it would be to restore it. However it turned out to be $600. For 1/4 that price, we could do it ourselves, so we did.
After the carpet had been removed, there were multiple rust holes in the floor. I came up with the idea of using fiberglass to cover the holes. But first we brushed rust inhibitor given to us by a neighbor. Stuff works great.
Last edited by Zuzmaw; Jul 26, 2011 at 05:06 AM.


Joined: Jan 2010
Posts: 259
From: charleston, south carolina
wow man that is very inspirational. its nice you actually took time and money. my main problem is time. i try rushing my project and i go broke too soon. its hard to have patience when your mind is full of dreams and plans for something you love. but congrats on all the accomplishment. you saved another monte from early graveyard
Thread Starter
|
Joined: May 2011
Posts: 96
1972 Monte Carlo Restoration: Part 3 (continued)

The trunk:


So with the last of the rust holes out of the way, I put a simple black carpet kit in.

*notice the black interior
A few days after, I begin on the seat project. I ordered a custom made seat cover for $150 and bought some simple foam from a local Home Depot.

To do this, I had a job of cutting the old cloth off the seat frame.


It gave me much hell, but nothing beats a classic skinning knife.

Here is the hatrack I made for the speakers. Later, I put black carpet over it.
*note, these dates are wrong. These were taken sometime late April. For some reason my camera likes to think it's 1/1/06.


and whoops, forgot a picture:

So those are all the pictures I could find on my HD.

So here is where it all ends, for now. 2 months ago I bought the grille and front bumper. The old ones were trashed. It still needs a rear bumper, but I ordered one off the net for $307 with shipping. Should be here Wednesday.
A close friend of mine gave me his old stereo, and bought some very cheap speakers for $26. However I plan to replace these in coming months.
(The Cars is my personal favorite, ♫"Let the good times roll"♫ )
I have had no luck in finding a job. Money is coming in slow, so this rear bumper is the last for awhile. My next project will be the rear seat cover.
I will update this thread as my work progresses, and have set a goal for December.
Thanks for reading.

FAQ:
How old are you?
16
Do you have license?
Yes
Is it an easy drive?
Easiest car I have ever driven.
Tell me you aren't going to ruin it?
Original all the way, though it is my personal car and yes, I need a simple modern stereo. No, it's not a race car either. Yeah, it will haul ****, but I did not buy it to race Civics at my school. Maybe on a track sometime.
How do you get money?
Simple jobs for people, grades, etc.
The car is a target, how do you propose defending yourself and your property?
Well since I am only 16, I have to be 18 to have a gun in the car. No license required though in Texas. I do however have a knife in each door, and one in the glovebox. Yes, I am paranoid. I've even had nightmares where it was stolen. No lie.
So you're driving this to school?
Yeah
Do you get a lot of complaints? Due to the fact a teenager drives such a car?
Many. Mostly from my dads workplace and neighbors. I'm a responsible driver and feel as if that car is made for me.
The trunk:
So with the last of the rust holes out of the way, I put a simple black carpet kit in.
*notice the black interior
A few days after, I begin on the seat project. I ordered a custom made seat cover for $150 and bought some simple foam from a local Home Depot.
To do this, I had a job of cutting the old cloth off the seat frame.
It gave me much hell, but nothing beats a classic skinning knife.
Here is the hatrack I made for the speakers. Later, I put black carpet over it.
*note, these dates are wrong. These were taken sometime late April. For some reason my camera likes to think it's 1/1/06.
and whoops, forgot a picture:
So those are all the pictures I could find on my HD.
So here is where it all ends, for now. 2 months ago I bought the grille and front bumper. The old ones were trashed. It still needs a rear bumper, but I ordered one off the net for $307 with shipping. Should be here Wednesday.
A close friend of mine gave me his old stereo, and bought some very cheap speakers for $26. However I plan to replace these in coming months.
(The Cars is my personal favorite, ♫"Let the good times roll"♫ )
I have had no luck in finding a job. Money is coming in slow, so this rear bumper is the last for awhile. My next project will be the rear seat cover.
I will update this thread as my work progresses, and have set a goal for December.
Thanks for reading.
FAQ:
How old are you?
16
Do you have license?
Yes
Is it an easy drive?
Easiest car I have ever driven.
Tell me you aren't going to ruin it?
Original all the way, though it is my personal car and yes, I need a simple modern stereo. No, it's not a race car either. Yeah, it will haul ****, but I did not buy it to race Civics at my school. Maybe on a track sometime.
How do you get money?
Simple jobs for people, grades, etc.
The car is a target, how do you propose defending yourself and your property?
Well since I am only 16, I have to be 18 to have a gun in the car. No license required though in Texas. I do however have a knife in each door, and one in the glovebox. Yes, I am paranoid. I've even had nightmares where it was stolen. No lie.
So you're driving this to school?
Yeah
Do you get a lot of complaints? Due to the fact a teenager drives such a car?
Many. Mostly from my dads workplace and neighbors. I'm a responsible driver and feel as if that car is made for me.
Last edited by Zuzmaw; Sep 21, 2011 at 09:23 PM.


Thread Starter
|
Joined: May 2011
Posts: 96
1972 Monte Carlo Restoration: Part 4 (continued)


Next project will either be rear seat foam and leather, or a dashboard. I recently discovered an oil leak and an exhaust leak. Drive-ability comes first. It may be a few months until I post more pictures. School/work/personal time only delays.
Thanks for reading.
EDIT
More pictures:


Last edited by Zuzmaw; Jul 29, 2011 at 03:04 PM.


Keep up the good work, i'm not keen on the fiberglass patching the floor but it's better than some of the stuff i've seen,