Guide: How to: 5th gen door panel removal
#1
 06-26-2009, 03:49 PM


Well I took my wood grain trim out of the interior of my car to paint it and the clips fell down into the door panel! I had to take the door panel off to get them out so you know what that means. Write-up!
This is a very simple project. I have heard many people complain about doing it and I dont know why. Ill show you how easy it is.
What you need:
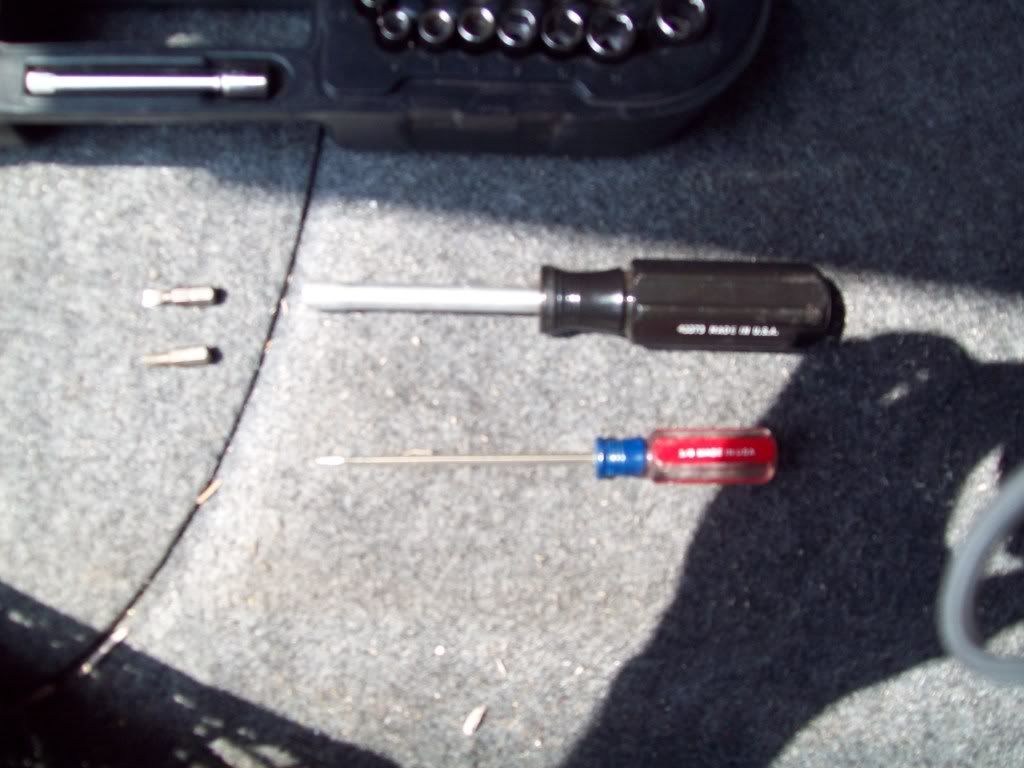
An 1/8" flat head screwdriver, a 1/4" flathead screwdriver and a phillips head screwdriver. Thats it. I didnt even use a phillips screwdriver, the 1/8" flathead fits right into the phillips head screws.
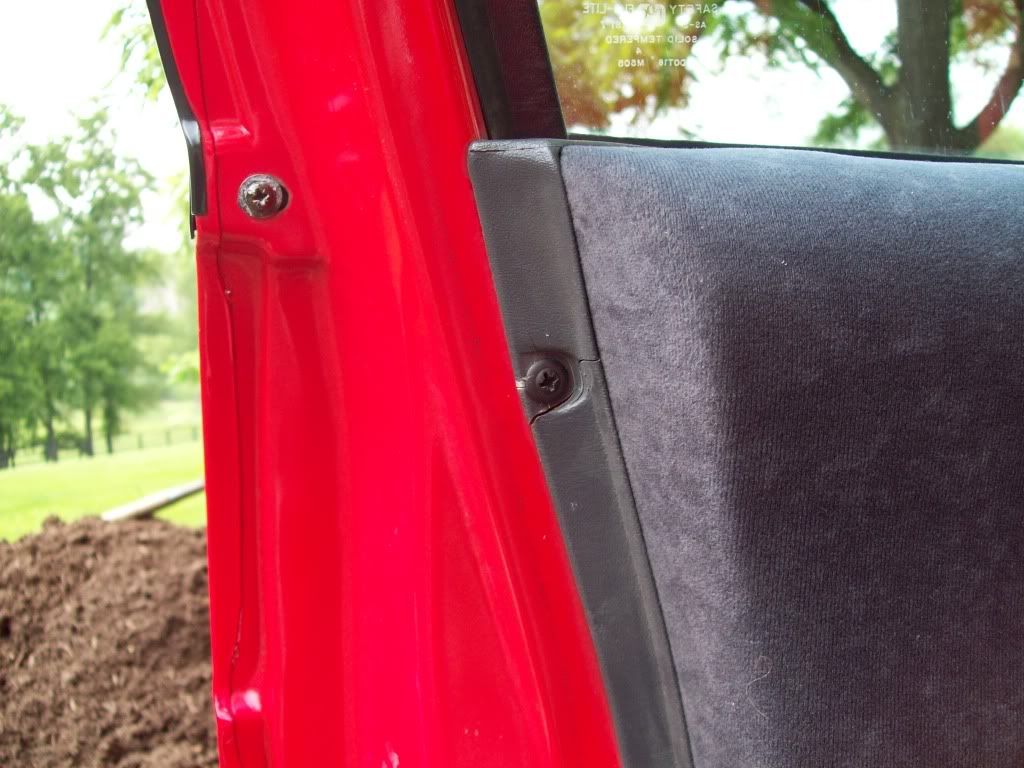
Ok lets begin. Remove the woodgrain trim on the door panel. Use the 1/8" screwdriver to get behind it and pry it out. Here is a picture of the back to give you an idea where to pry.
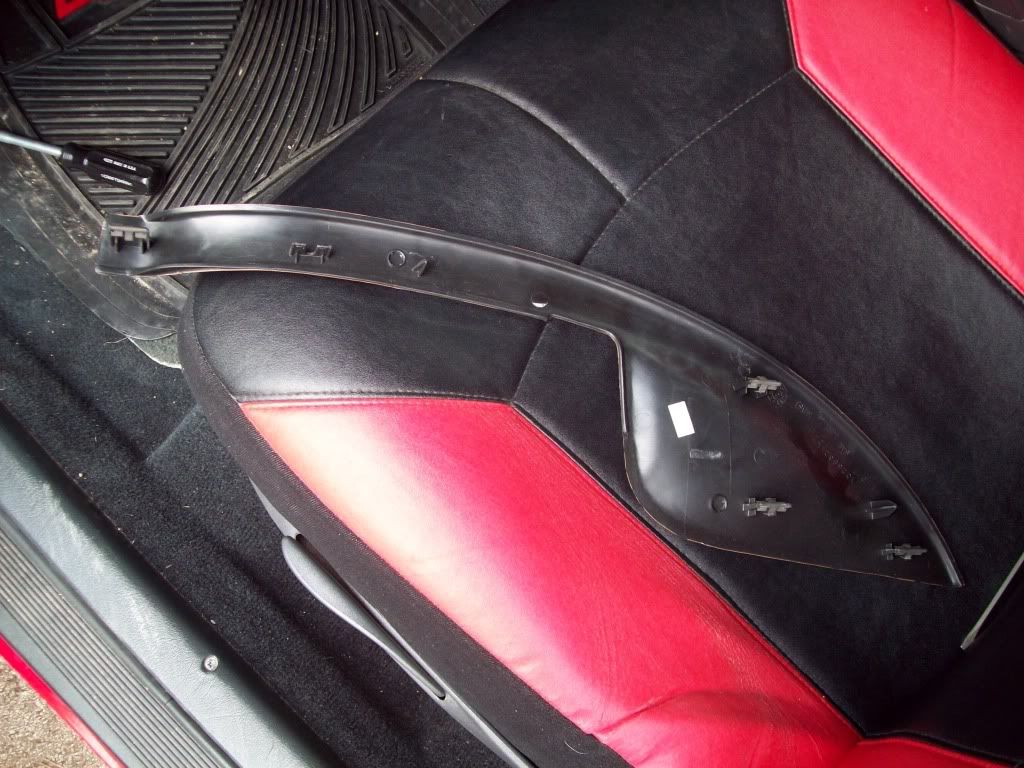
You will definately need to pry here or you risk breaking the piece:
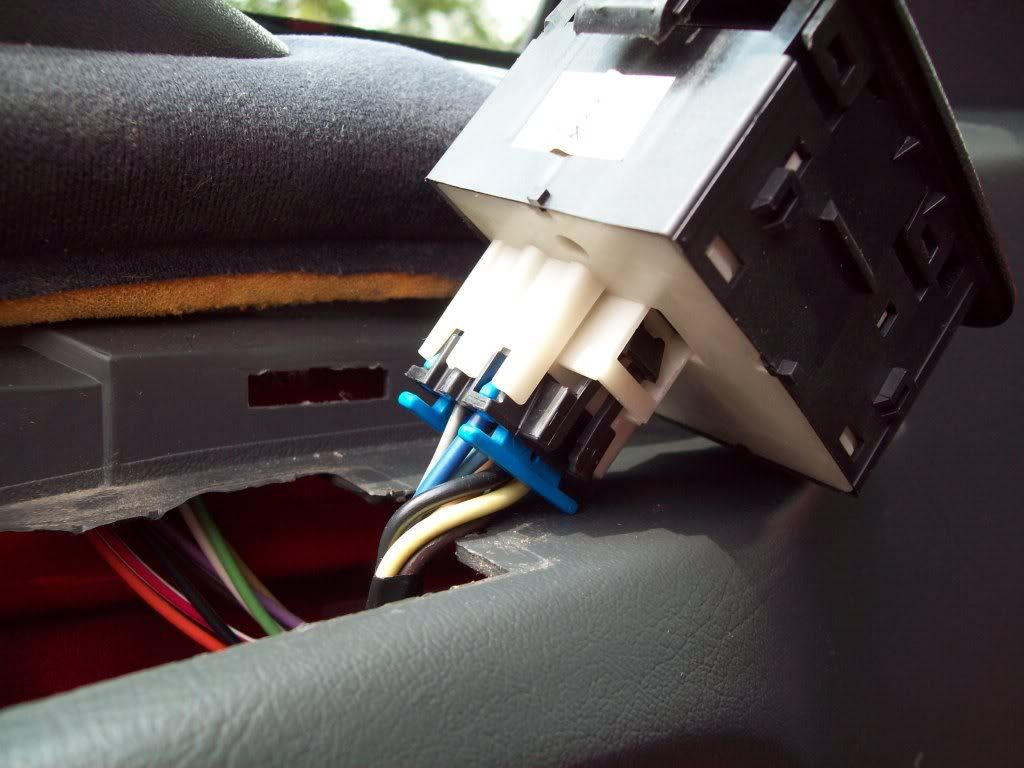
Now take out the power window switch. Put the 1/8" screwdriver in here, push in and pry up. Then do the same on the other end. The switch should slide straight up and out.
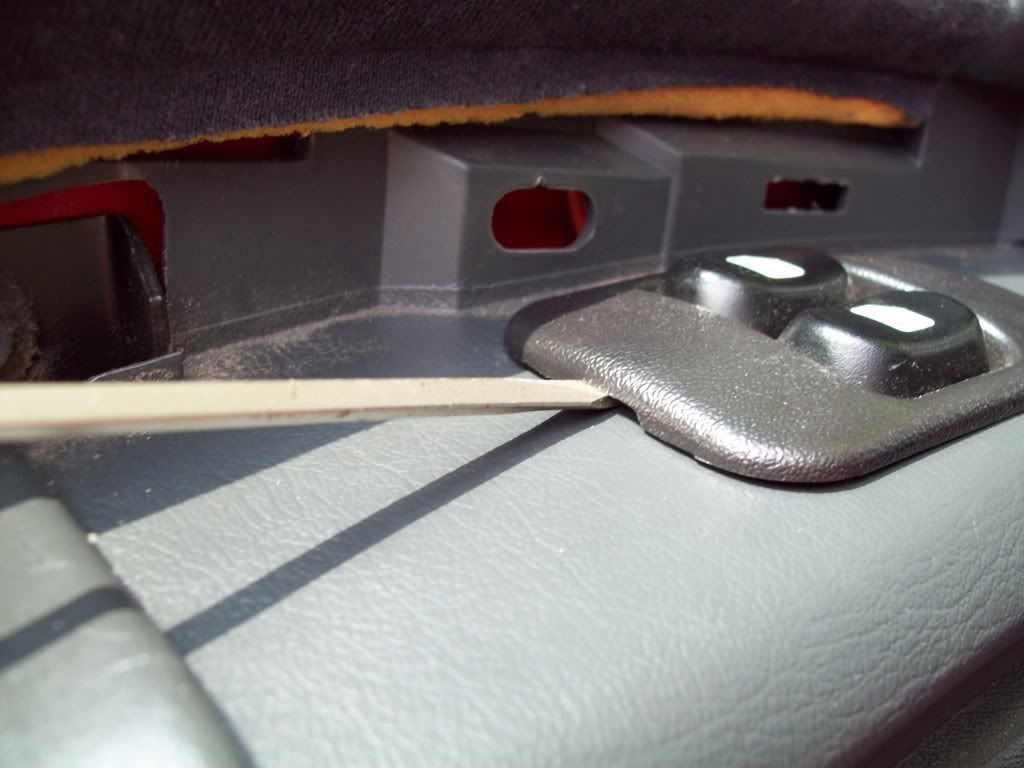
Press the tab on the plug and pull the plug out of the socket:
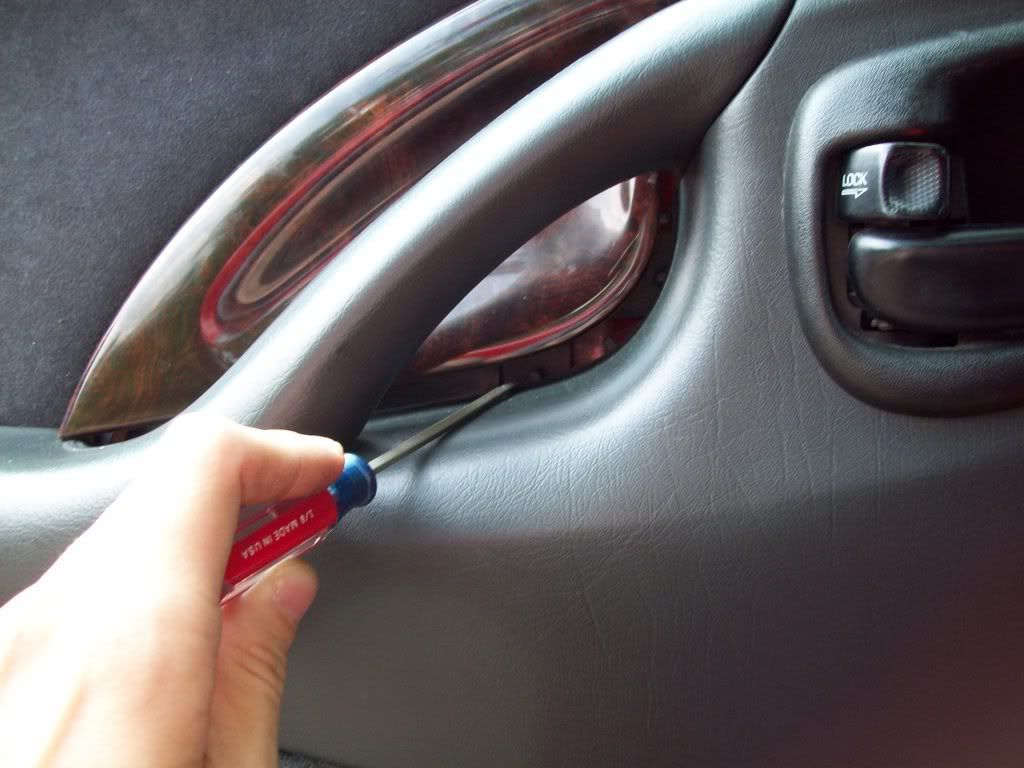
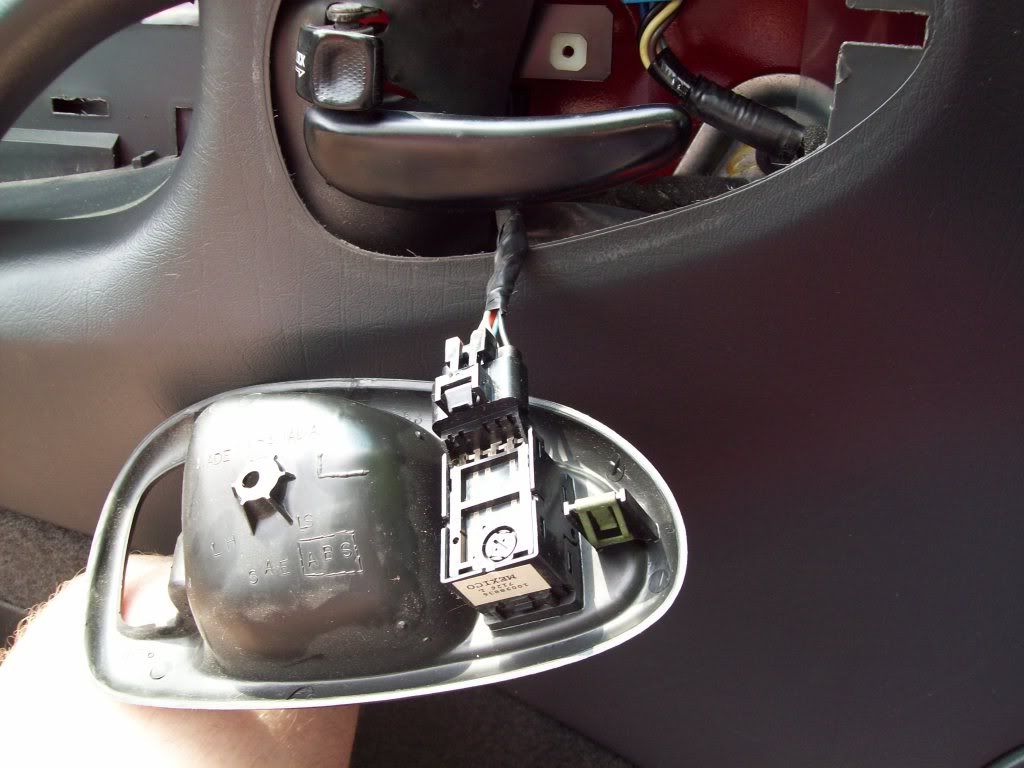
Now remove the door handle bezel. There is one screw in the center. Remove it, pull on the handle and the bezel should slide right out:

Remove the plug to the door lock button the same way you remove the plug for the window switch:
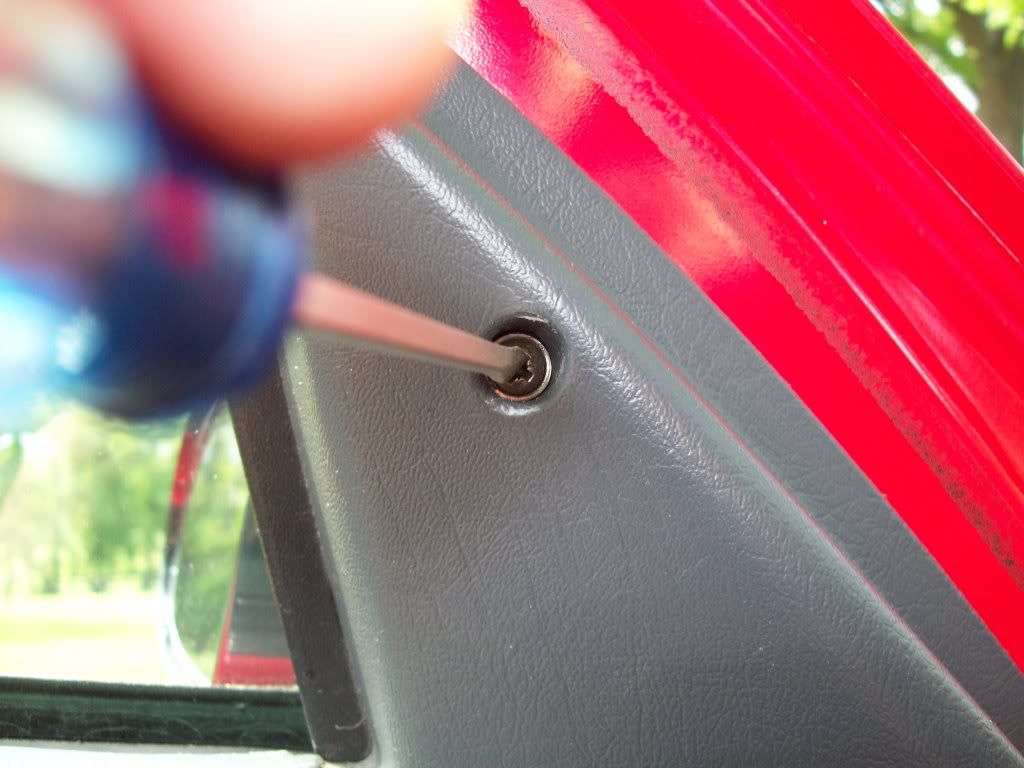
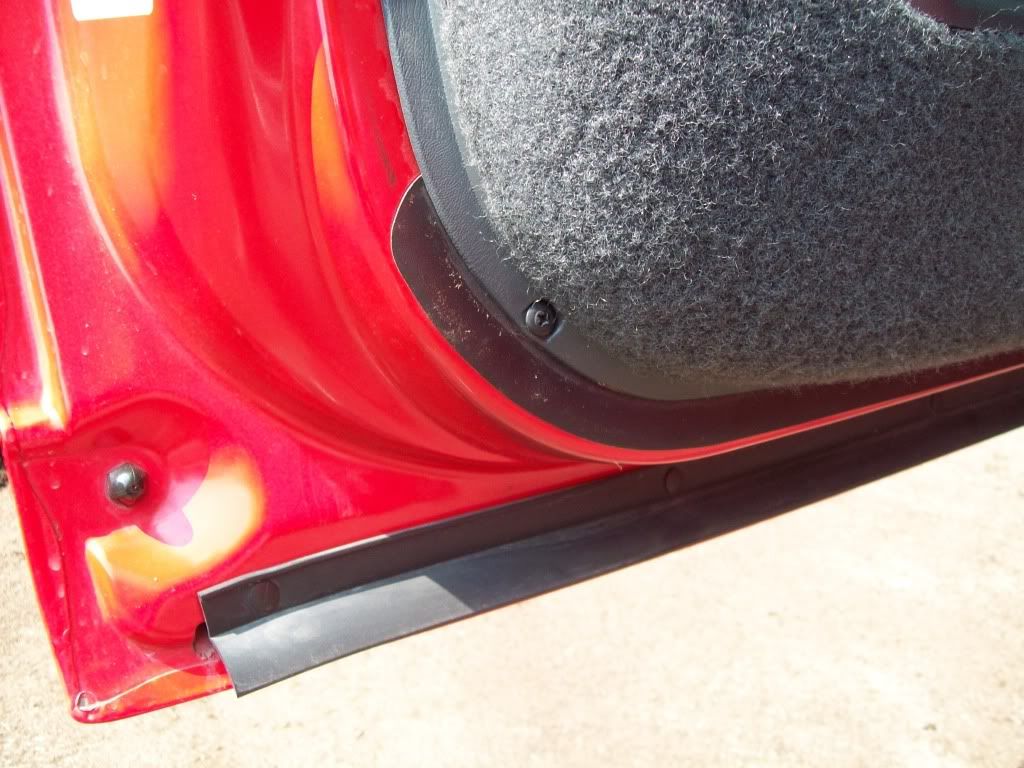
Ok, there are 7-8 screws that hold the panel on. Remove them with the phillips screwdriver. There is 1 screw at each corner of the door panel and 3-4 in the carpeting on the bottom of the door panel:
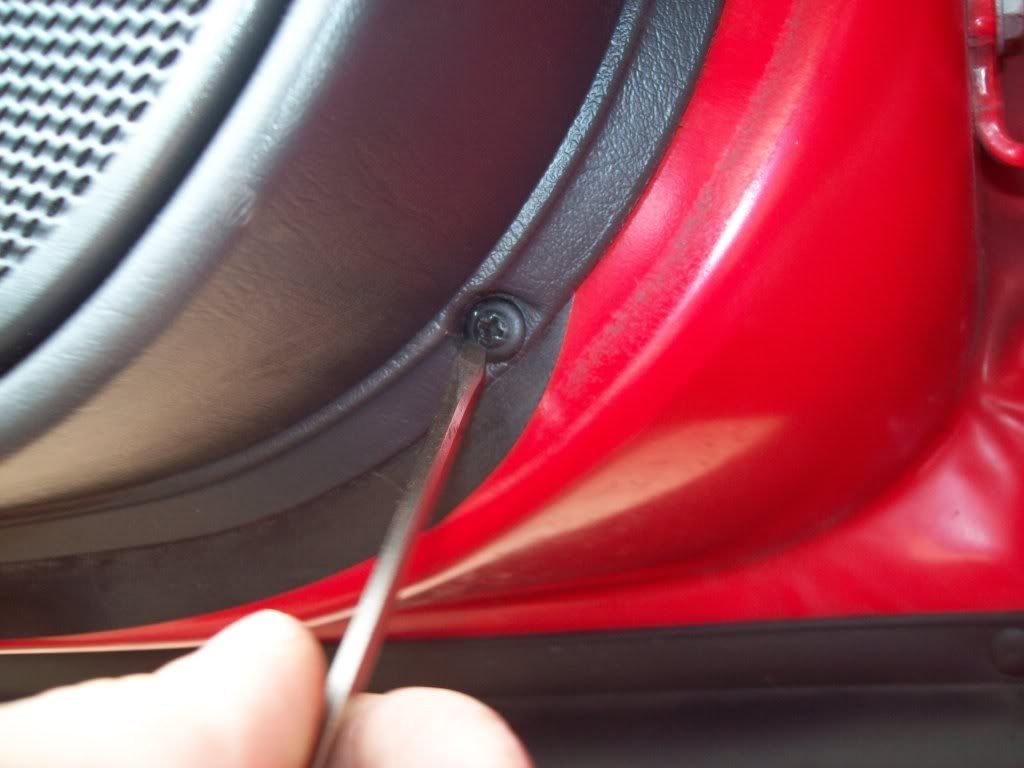
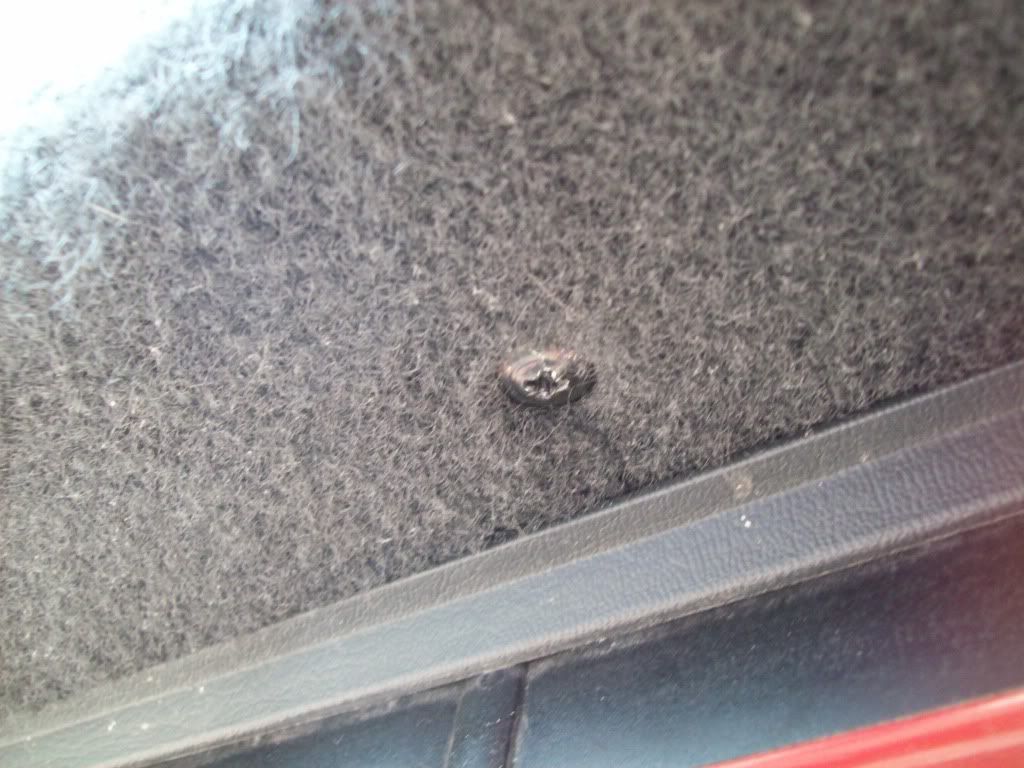
There is a torx head screw under the woodgrain trim that is the final piece that holds on the door panel. You dont need a torx bit to get it out. The 1/4" flat screwdriver fits. The screw isnt that tight so you dont have to worry about stripping the screw.
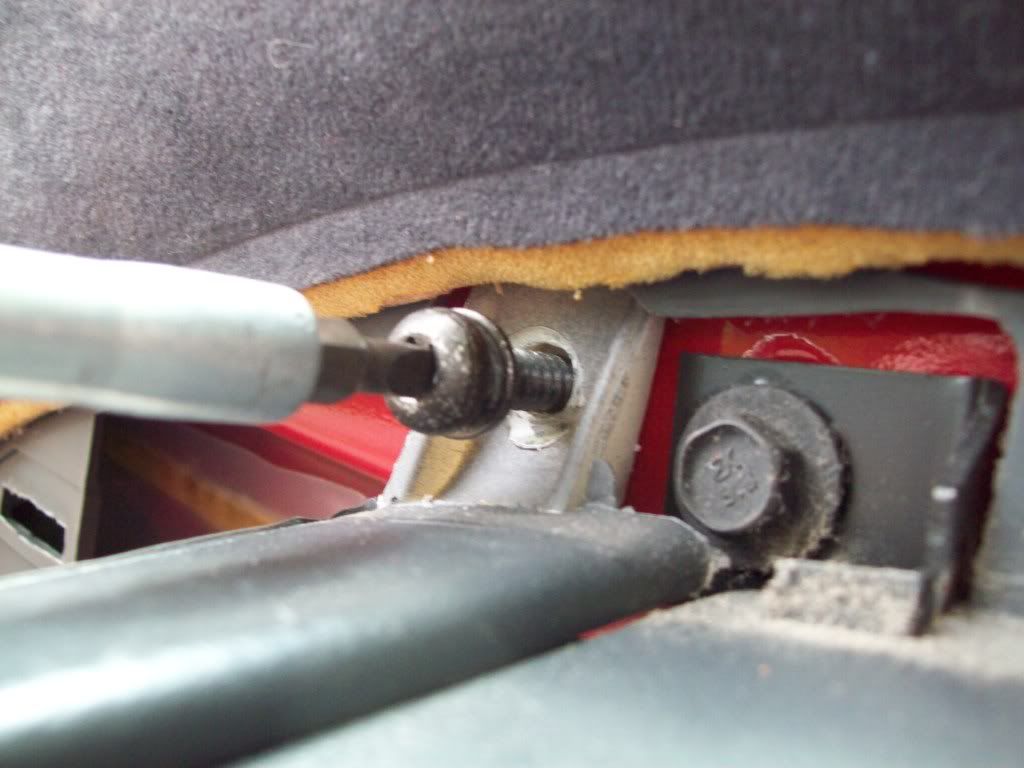
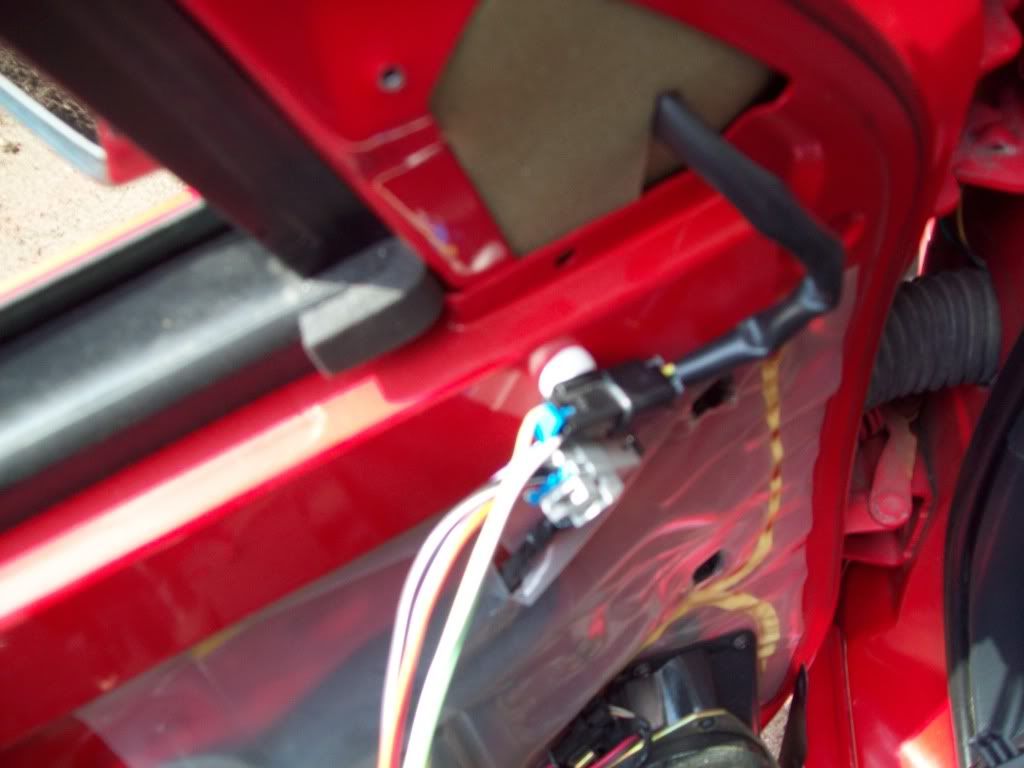
Once all the screws are out, lift up on the door panel and it detaches from the door. Unplug the two plugs for the power mirror that go from the door panel into the door. Pull the plugs off their clips so you can pull them apart. Just press the tabs on each and pull them apart.
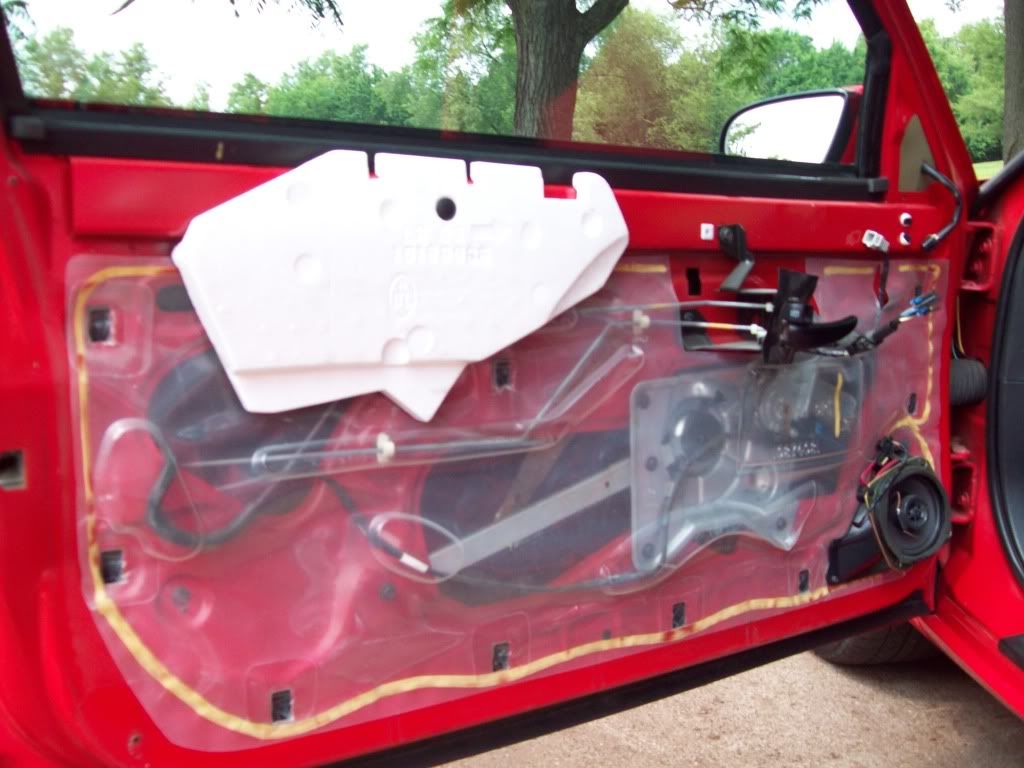
The door panel is now detached from the door. Here is a shot of the door without the panel. Pretty simple job eh.
This is a very simple project. I have heard many people complain about doing it and I dont know why. Ill show you how easy it is.
What you need:
An 1/8" flat head screwdriver, a 1/4" flathead screwdriver and a phillips head screwdriver. Thats it. I didnt even use a phillips screwdriver, the 1/8" flathead fits right into the phillips head screws.
Ok lets begin. Remove the woodgrain trim on the door panel. Use the 1/8" screwdriver to get behind it and pry it out. Here is a picture of the back to give you an idea where to pry.
You will definately need to pry here or you risk breaking the piece:
Now take out the power window switch. Put the 1/8" screwdriver in here, push in and pry up. Then do the same on the other end. The switch should slide straight up and out.
Press the tab on the plug and pull the plug out of the socket:
Now remove the door handle bezel. There is one screw in the center. Remove it, pull on the handle and the bezel should slide right out:
Remove the plug to the door lock button the same way you remove the plug for the window switch:
Ok, there are 7-8 screws that hold the panel on. Remove them with the phillips screwdriver. There is 1 screw at each corner of the door panel and 3-4 in the carpeting on the bottom of the door panel:
There is a torx head screw under the woodgrain trim that is the final piece that holds on the door panel. You dont need a torx bit to get it out. The 1/4" flat screwdriver fits. The screw isnt that tight so you dont have to worry about stripping the screw.
Once all the screws are out, lift up on the door panel and it detaches from the door. Unplug the two plugs for the power mirror that go from the door panel into the door. Pull the plugs off their clips so you can pull them apart. Just press the tabs on each and pull them apart.
The door panel is now detached from the door. Here is a shot of the door without the panel. Pretty simple job eh.
#2
06-26-2009, 04:39 PM


That is the cleanest door panel i have ever seen...mine was filthy on the inside.
Nice write-up!
Nice write-up!
#3
06-26-2009, 05:13 PM


Hi `Matt,
Thanks for your time, and sharing your knowledge with your MCF Family.
Your pictures & instructions are great & professional.
I know how much time it takes to take pic's/write `up
and post them. Thanks for being a Super/Super Member
to our Monte Carlo Forum. It is appreciated
Your Thread Topic has been made a
Sticky Thread in the
How 2 Section.
Thanks again
4-Sure
#4
06-26-2009, 05:25 PM

Join Date: Aug 2008
Location: Bushkill, PA
Posts: 3,279
nice write up, man. you should do freelance tech articles for a magazine! i cant even begin to tell you how many times ive been inside of the doors on me and my dads montes ( passenger door lach & lube window mechinizms on mine, repair window mechinizem on my dads), and i really wish id had your article to look at then!
a tip: i found it is easyer to replace the door panel if you use a razor to cut out the squares of plastic where the doorpanel clips in. the plastic is sorta the insulation for the car, but since the door panel clips take up the holes it does not make any differance.
i circled what im talking about in the last pic you put up, matt
like i said, that was a great write up, keep up the good work!
oh, let me know how painting the woodgrain peices turns out, i was thinking of doing mine.
Last edited by skylark65; 06-26-2009 at 05:29 PM.


#6
06-26-2009, 08:25 PM
Thanks guys. Ryan, I didnt have much trouble with the tabs on the door panel on this car. I have done what you said on serveral rangers that I have worked on. Cut out the plastic in the hole and put some dum dum around it to hold it down. The insulator in the rangers have a tendancy to stick to the tabs on the door panel and rip when you pull off the panel. It makes it easier the next time if you ever have to work on it again.
As for the wood grain trim, my efforts were hampered by a trip to the ER (me+ razor blades= disaster). I always seem to cut myself when I use them. I blame unsteady hands. Im halfway done painting them but I called it a night. I just have to mask off an area and spray a few more coats of black. Ill be sure to post pics when Im done.
As for the wood grain trim, my efforts were hampered by a trip to the ER (me+ razor blades= disaster). I always seem to cut myself when I use them. I blame unsteady hands. Im halfway done painting them but I called it a night. I just have to mask off an area and spray a few more coats of black. Ill be sure to post pics when Im done.
#7
06-26-2009, 10:32 PM
Join Date: Aug 2008
Location: Bushkill, PA
Posts: 3,279
i can relate to the razors + unsteady hands = ER, when i was 9 i cut my left thumb down to the bone with a dull box cutter trying to make some kind of template, and the ER is a 30 minute drive away. not fun at all, haha. i just cannot beleive there is not even a scar left anymore. hope you are alwright, i look forward to seeing the pics of the finished product ( the trim, not the cut, lol)
#8
06-26-2009, 10:57 PM
Lol Ive cut the same hand twice with the razor knife. The first time was worse, I cut the pad of my hand about 1/2" deep about 1 1/2" long while at work. They actually glued that one back together. I have a nice little valley in my hand where the scar is. This time wasnt so bad. I kinda filleted the side of my pointer finger. Wasnt too deep, only took 3 stitches but it bled like a mother.
#9
06-27-2009, 08:04 PM


Join Date: Apr 2006
Location: Wauconda, IL
Posts: 13,335
Very cool write up. I will be disassembeling my drivers side door panel on my 05 to replace the top strip of plastic that was cracked by the previous owner. I have another door panel, I just have to swap out the top plastic piece - it's held on by 4 screws.