
Mod Guide: Big 3 upgrade


Thread Starter
|

Joined: May 2005
Posts: 3,221
The Big 3 upgrade is basically upgrading the 2 main ground leads and the main power lead of your alternator to increase the current capacity of said leads. Why is this necessary? Well, it's not unless you're adding things to your car that consume more current, like a car stereo system. Doing this upgrade should result in:
1) Reduced dimming and smaller voltage drops
2) More stable voltage and better current flow
3) Less strain on your vehicle's charging system
Tools you will need:
� Wire cutters (make sure they're large enough to cut the diameter of wire you're using)
� Mini-torch or propane torch, whichever you're more comfortable using
� 60/40 Rosin core solder
� Scotch brite and/or a small wire brush.
� Heat gun (if using shrink tubing).
� Wrenches for removing bolts in your vehicle.
� DMM (Digital multi-meter)
Supplies you will need:
� Sufficient length of high-strand count high capacity power cable.
� 6 ring terminals w/rubber boots (you can use heat shrink tubing if need be)
� Zip ties
� Expandable wire sleeving (optional; gives an understated, clean look to the install)
� Heat shrink tubing (to be used w/the wire sleeving, or if you can't find rubber boots for the ring terminals)
The length required differs for every vehicle. You can measure the length of the existing cables and buy the same length, or you can do what I did; Locate the 3 wires that you're going to replace and decided if you're going to run the new wires in the same locations and if not, figure out how/where you'd like to run them and measure it out. You can use speaker wire, string, whatever you have that can be bent into the shape you need it to in order to make your measurement. Add it all up and round up to the nearest foot, you can even buy a little extra if you aren't too confident in your measurements. I, for example, wasn't able to find the chassis/engine block ground so I found and mapped out a spot for a new one to be run and measured accordingly. If you guess, make sure you over-estimate and buy too much.
Make sure you buy high strand count wire, not only is it more flexible than low strand count wire, but it will handle the vibrations of your car without fatiguing and possibly breaking like low strand can.
The gauge of wire you need depends on the total current draw of your audio system, and/or the current generating capacity of your alternator. Never use smaller cable than you use to power your amps; never use smaller cable than what already exists in your vehicle; never use smaller cable than the generating capacity of your alternator; never use smaller than 4 AWG (it's just not worth the time to use anything smaller); if in doubt, always use higher gauge cable than you think you need. If you look at the Power and Ground charts and your amplifier current draw corresponds to 2 AWG cable, use no smaller than 2 AWG cable, and use 1/0 if you can that way should you decided to upgrade your system even further in the future, you won't have to redo this.
Now that we've gotten all that out the way, you're ready to get busy.
1.) Make sure your engine is cool before you get started
2.) Determine the length needed for each wire and cut to length, I generally cut it about 1" longer just to give additional slack. Use your judgement on if that's necessary or not.
3.) Using your ring terminal as a guide, strip just enough of the wire jacket to allow the wire to fit in the terminal to the end of the opening.
4.) Twist the ends of the wires just enough to make nice, neat, compact twist and then using your torch of choice, tin the wire with your solder so the wire stays twisted together and to allow for a perfect solder joint with the ring terminal.
5.) Put the ring terminal on one end of the wire and proceed to fill the opening with solder, making sure to draw the solder down all the way through the opening.
6.) After you solder one terminal on, mock it up in it's location in the engine bay so you can figure out how to solder the other terminal on and then solder the other terminal on as needed.
7.) Repeat steps 3-6 for the other two leads
8.) After the cables have cooled you can slide on your rubber ring terminal boots and are ready to install them.
9.) Disconnect the battery and discharge any and all caps you may have in your system.
10.) Add/replace the leads as needed, making sure to secure them with zip ties as needed to prevent them from coming in contact with moving and/or hot parts.
One issue I had when doing mine was with the battery/chassis ground. The OEM boot on the negative terminal was quite large and would not allow my ring terminal to reach the terminal lug, and the opening of my ring terminal was too small for the lug to fit even if it did reach. I simply drilled it out opening to the appropriate size and then notched the OEM boot so the terminal could fit in there.

11.) When you replace the chassis grounds, make sure to it's bare metal you're bolting them too, if it's not then use your wire brush and/or scotch brite to take it down so it is.
12.) Once you're all done with that, double check all your connections to ensure they are tight and make sure your wires are routed so as to avoid hot and/or moving parts.
13.) At this point, you should take ohm readings of each lead to make sure you aren't getting anything over an ohm on either of them. If you're getting a reading more than an ohm, recheck your connections.
THE MOST IMPORTANT STEP, READ BEFORE PROCEEDING!!!
The absolute ground of the electrical system is not the the battery negative terminal or the vehicle chassis, but is the case of the alternator itself. This is why perhaps the most important lead of the Big 3 upgrade is the engine block/chassis lead as that's what connects the alternator ground to the chassis. Make sure the resistance or ohm level reading is minimal on this lead.
14.) If everything checks out, go ahead and reconnect your battery, positive first and start her up!
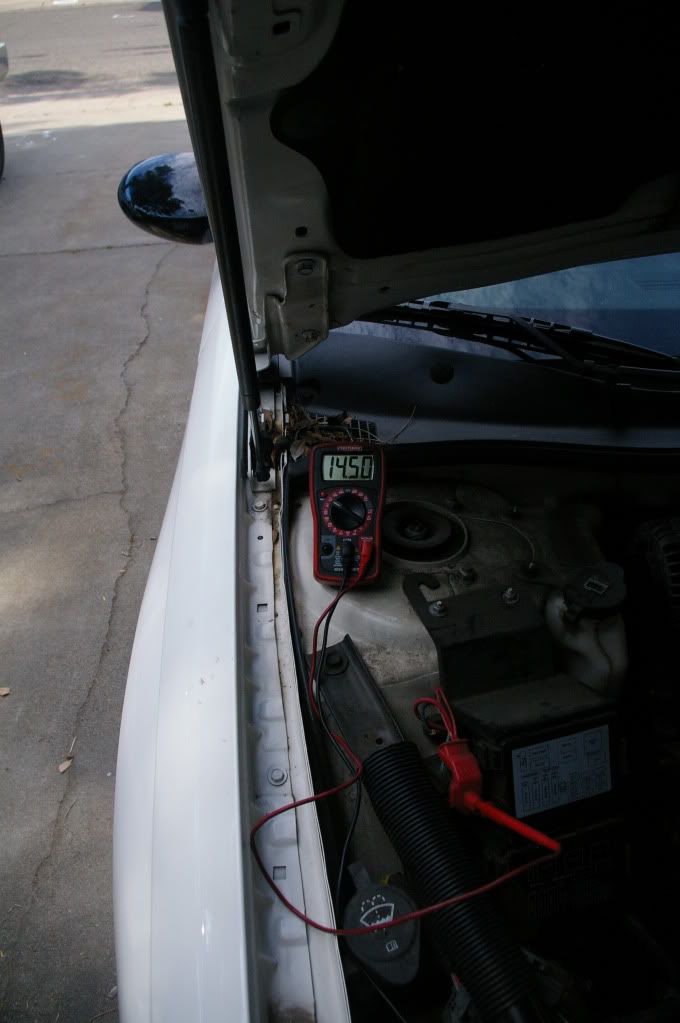
15.) Check voltage at your battery and again at your amp to make sure you're getting at least 14 volts. I was getting 14.5-14.7 with no load, 13.8-14.5 with the headlights on and system bumping.
Enjoy!
1) Reduced dimming and smaller voltage drops
2) More stable voltage and better current flow
3) Less strain on your vehicle's charging system
Tools you will need:
� Wire cutters (make sure they're large enough to cut the diameter of wire you're using)
� Mini-torch or propane torch, whichever you're more comfortable using
� 60/40 Rosin core solder
� Scotch brite and/or a small wire brush.
� Heat gun (if using shrink tubing).
� Wrenches for removing bolts in your vehicle.
� DMM (Digital multi-meter)
Supplies you will need:
� Sufficient length of high-strand count high capacity power cable.
� 6 ring terminals w/rubber boots (you can use heat shrink tubing if need be)
� Zip ties
� Expandable wire sleeving (optional; gives an understated, clean look to the install)
� Heat shrink tubing (to be used w/the wire sleeving, or if you can't find rubber boots for the ring terminals)
The length required differs for every vehicle. You can measure the length of the existing cables and buy the same length, or you can do what I did; Locate the 3 wires that you're going to replace and decided if you're going to run the new wires in the same locations and if not, figure out how/where you'd like to run them and measure it out. You can use speaker wire, string, whatever you have that can be bent into the shape you need it to in order to make your measurement. Add it all up and round up to the nearest foot, you can even buy a little extra if you aren't too confident in your measurements. I, for example, wasn't able to find the chassis/engine block ground so I found and mapped out a spot for a new one to be run and measured accordingly. If you guess, make sure you over-estimate and buy too much.
Make sure you buy high strand count wire, not only is it more flexible than low strand count wire, but it will handle the vibrations of your car without fatiguing and possibly breaking like low strand can.
The gauge of wire you need depends on the total current draw of your audio system, and/or the current generating capacity of your alternator. Never use smaller cable than you use to power your amps; never use smaller cable than what already exists in your vehicle; never use smaller cable than the generating capacity of your alternator; never use smaller than 4 AWG (it's just not worth the time to use anything smaller); if in doubt, always use higher gauge cable than you think you need. If you look at the Power and Ground charts and your amplifier current draw corresponds to 2 AWG cable, use no smaller than 2 AWG cable, and use 1/0 if you can that way should you decided to upgrade your system even further in the future, you won't have to redo this.
Now that we've gotten all that out the way, you're ready to get busy.
1.) Make sure your engine is cool before you get started
2.) Determine the length needed for each wire and cut to length, I generally cut it about 1" longer just to give additional slack. Use your judgement on if that's necessary or not.
3.) Using your ring terminal as a guide, strip just enough of the wire jacket to allow the wire to fit in the terminal to the end of the opening.
4.) Twist the ends of the wires just enough to make nice, neat, compact twist and then using your torch of choice, tin the wire with your solder so the wire stays twisted together and to allow for a perfect solder joint with the ring terminal.
5.) Put the ring terminal on one end of the wire and proceed to fill the opening with solder, making sure to draw the solder down all the way through the opening.
6.) After you solder one terminal on, mock it up in it's location in the engine bay so you can figure out how to solder the other terminal on and then solder the other terminal on as needed.
7.) Repeat steps 3-6 for the other two leads
8.) After the cables have cooled you can slide on your rubber ring terminal boots and are ready to install them.
9.) Disconnect the battery and discharge any and all caps you may have in your system.
10.) Add/replace the leads as needed, making sure to secure them with zip ties as needed to prevent them from coming in contact with moving and/or hot parts.
One issue I had when doing mine was with the battery/chassis ground. The OEM boot on the negative terminal was quite large and would not allow my ring terminal to reach the terminal lug, and the opening of my ring terminal was too small for the lug to fit even if it did reach. I simply drilled it out opening to the appropriate size and then notched the OEM boot so the terminal could fit in there.
11.) When you replace the chassis grounds, make sure to it's bare metal you're bolting them too, if it's not then use your wire brush and/or scotch brite to take it down so it is.
12.) Once you're all done with that, double check all your connections to ensure they are tight and make sure your wires are routed so as to avoid hot and/or moving parts.
13.) At this point, you should take ohm readings of each lead to make sure you aren't getting anything over an ohm on either of them. If you're getting a reading more than an ohm, recheck your connections.
THE MOST IMPORTANT STEP, READ BEFORE PROCEEDING!!!
The absolute ground of the electrical system is not the the battery negative terminal or the vehicle chassis, but is the case of the alternator itself. This is why perhaps the most important lead of the Big 3 upgrade is the engine block/chassis lead as that's what connects the alternator ground to the chassis. Make sure the resistance or ohm level reading is minimal on this lead.
14.) If everything checks out, go ahead and reconnect your battery, positive first and start her up!
15.) Check voltage at your battery and again at your amp to make sure you're getting at least 14 volts. I was getting 14.5-14.7 with no load, 13.8-14.5 with the headlights on and system bumping.
Enjoy!


") ..Hi `Rich, great to see your post. Super Information for sure. Thanks for posting/sharing. How's life going ?
..Hi `Rich, great to see your post. Super Information for sure. Thanks for posting/sharing. How's life going ?Are you still detailing ? Sure hope we see more of you on the MCF...Oh, Happy Father's Day...EnJoy your Day...
p.s. Hows your Monte ? Look 4ward 2 seeing you soon.
Thread Starter
|
Joined: May 2005
Posts: 3,221
..Hi `Rich, great to see your post. Super Information for sure. Thanks for posting/sharing. How's life going ?Are you still detailing ? Sure hope we see more of you on the MCF...Oh, Happy Father's Day...EnJoy your Day...
p.s. Hows your Monte ? Look 4ward 2 seeing you soon.
I'm currently in the process of installing my SQ system so i'm thinking about posting a build log so I might be around more.
And thanks for the warm wishes, my family took me out to breakfast this morning. When we got home I prepared some marinade for some Carne Asada that I'll be grilling this evening, did some yard work, tried to figure out the issue with my radio but I still can't locate the fuse so i'm not sure what's going on there.


Joined: Aug 2008
Posts: 722
From: Philadelphia, PA
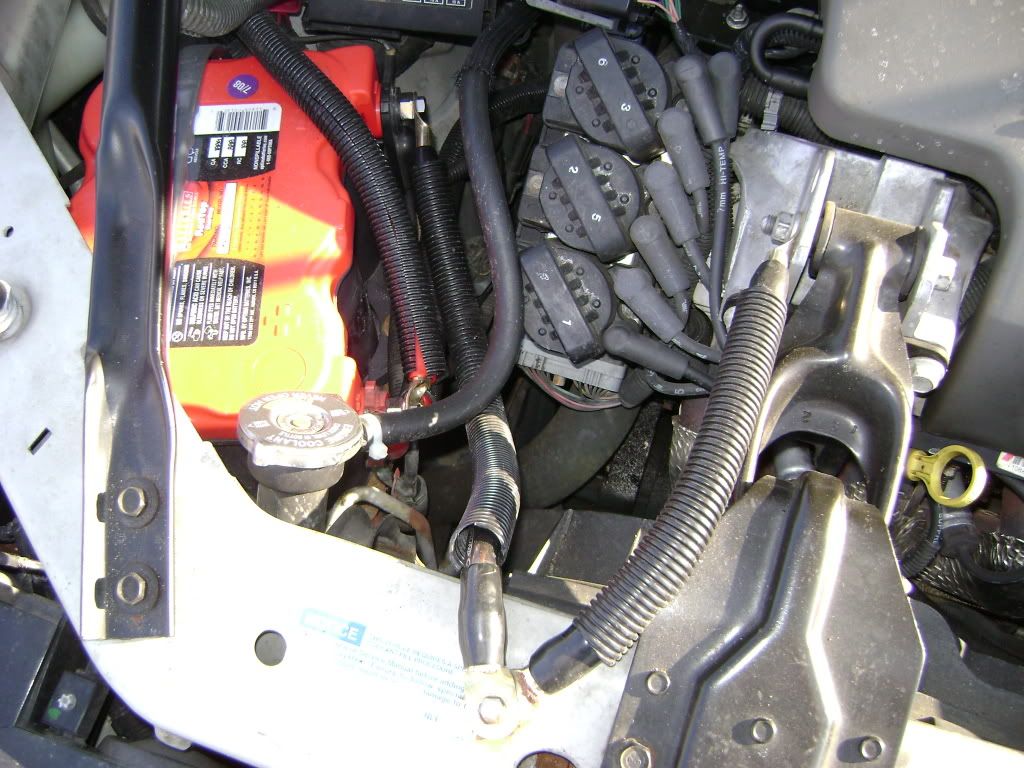
I haven't done this yet, but here are a few pics that someone else sent me.
For the positive cable, they went from the alt to a fuse to the battery positive terminal.
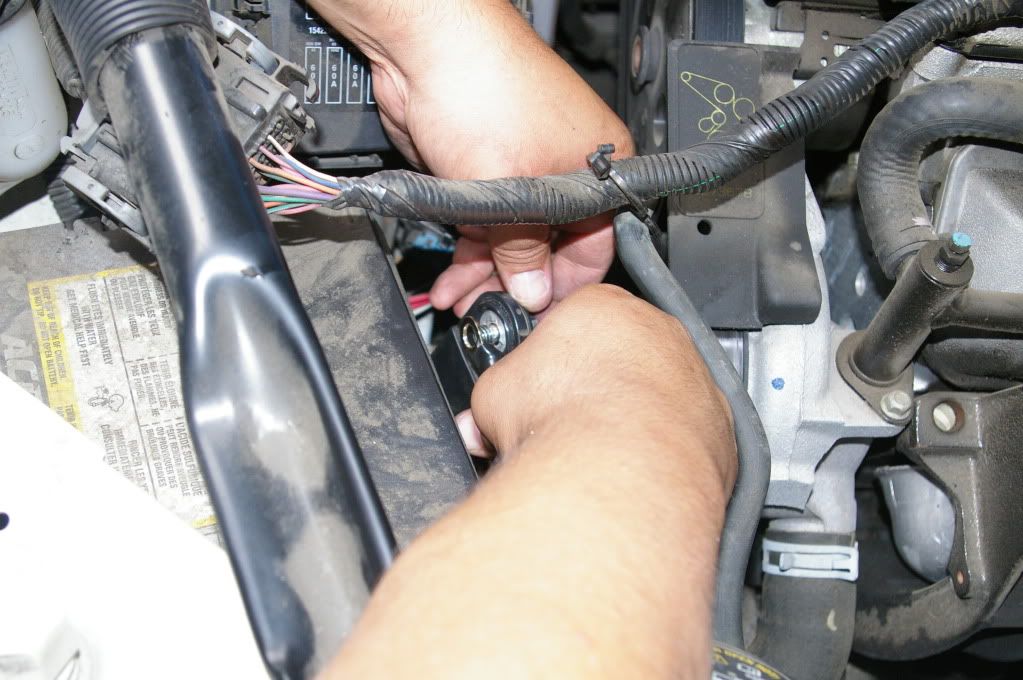
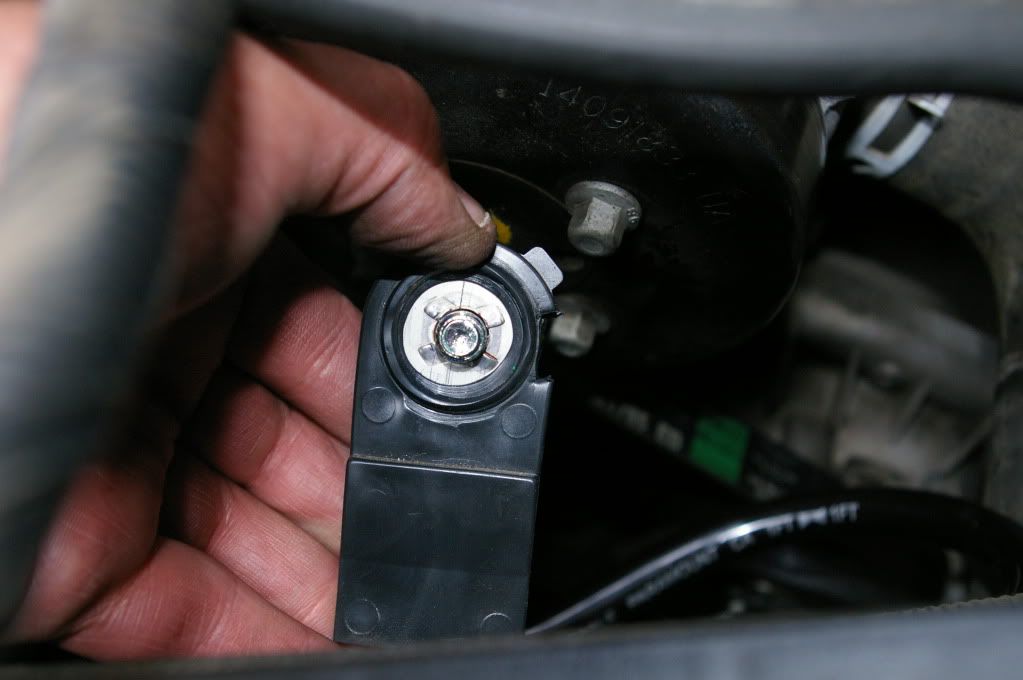
For the ground, they went from battery negative to the radiator support (chassis ground), and from the radiator support to the dogbone bolt on the ICM bracket (engine ground).
Looks pretty easy, as you only need to supply one nut/bolt yourself this way, and the holes are alreay drilled for you.
PICS:
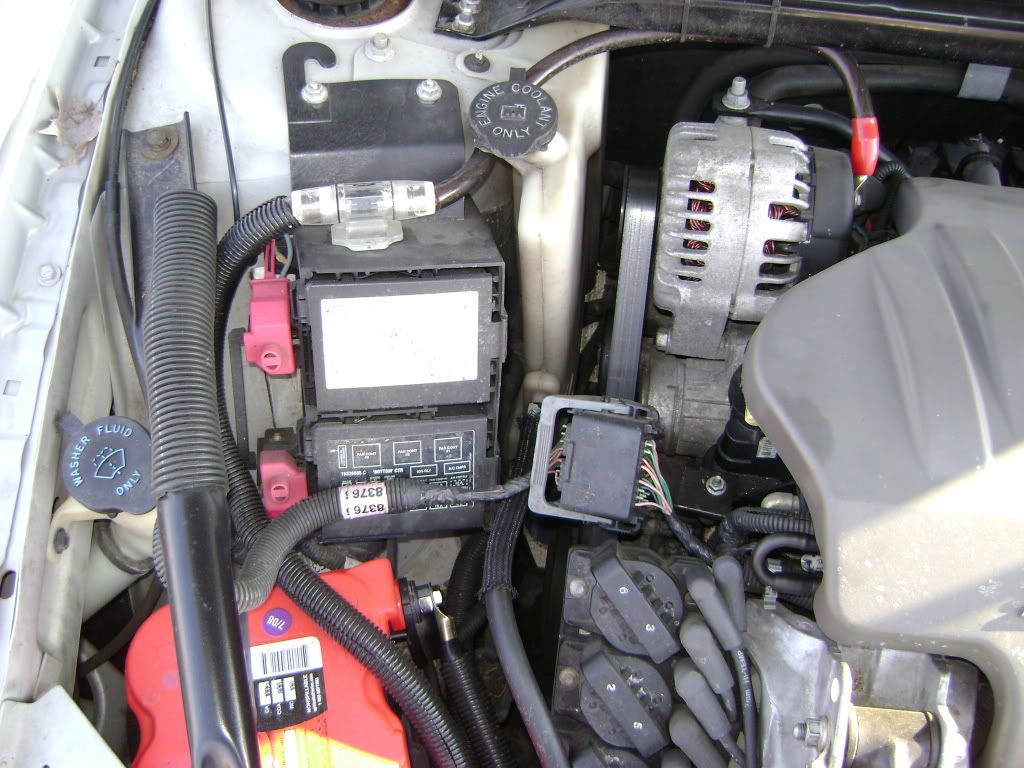
For the positive cable, they went from the alt to a fuse to the battery positive terminal.
For the ground, they went from battery negative to the radiator support (chassis ground), and from the radiator support to the dogbone bolt on the ICM bracket (engine ground).
Looks pretty easy, as you only need to supply one nut/bolt yourself this way, and the holes are alreay drilled for you.
PICS:


Monte Of The Month -- July 2009
I'M NOT OLD, I'M JUST WELL MARINATED.

Joined: Dec 2007
Posts: 6,996
From: Henderson, NV
Great write up man. I know that a few of the members have asked about the Big 3.
going to sticky this cause it has valuable information for ALL gens.
going to sticky this cause it has valuable information for ALL gens.


Thread Starter
|
Joined: May 2005
Posts: 3,221
Any "audio person" worth their weight knows what the Big 3 is, it's that common. Every car is different, just like putting the same equipment in different cars will result in different sound, doing the same mods to different cars can also lead to different results. The only way to find out is to do it.
Thread Starter
|
Joined: May 2005
Posts: 3,221
I highly suggest www.knukonceptz.com
They have great quality products, all of my rca's and speaker wire are from them. The only reason I didn't get my amp kit from them is because I got a deal I couldn't refuse for a JL Audio kit.
Get 4ga or bigger, anything less than 4ga and you might as well not even do the mod.


