Mod Guide: How To: Install LED Interior Lights (with pictures)
#1
 07-18-2011, 11:27 PM


So I've been on the forum for a couple weeks now, and I've done a lot of asking questions, not answering them. So I decided I'd TRY to help some people with LED tube light installation! This is by no means perfect and I'm sure that I did something wrong. If so, somebody please correct me!
The lights that I bought were the 7 color 4pc set from LEDUnderbody.com
7 Color 4pc Expandable LEDGlow LED Interior Lights Lighting Kit
It's a great deal and they work fine! $40 you can't go wrong
So here's what you will need for the installation besides what comes in the kit:
-Scissors/Wire cutter
-Duct (or very powerful) tape
-Power drill (optional)
-Some time
-A cool place to work (it was 105 degrees when I installed these :/)
I took some pictures, but they were just on my phone, so they aren't spectacular quality. Sorry about that...
Step 1: Test the power connection
-Take off the cover to the driver side fuse panel. It will snap right off. On the back of the cover will be a diagram of what each fuse is. Take out the cig/aux fuse. You will need to strip some of the plastic wax off both the positive (red) and negative (black) wires so that more silver is actually showing. Then wrap the red wire around one prong of the thing you took out. Then push it back in its slot. It might stick out a little, but get it in as far as you can without crushing anything.
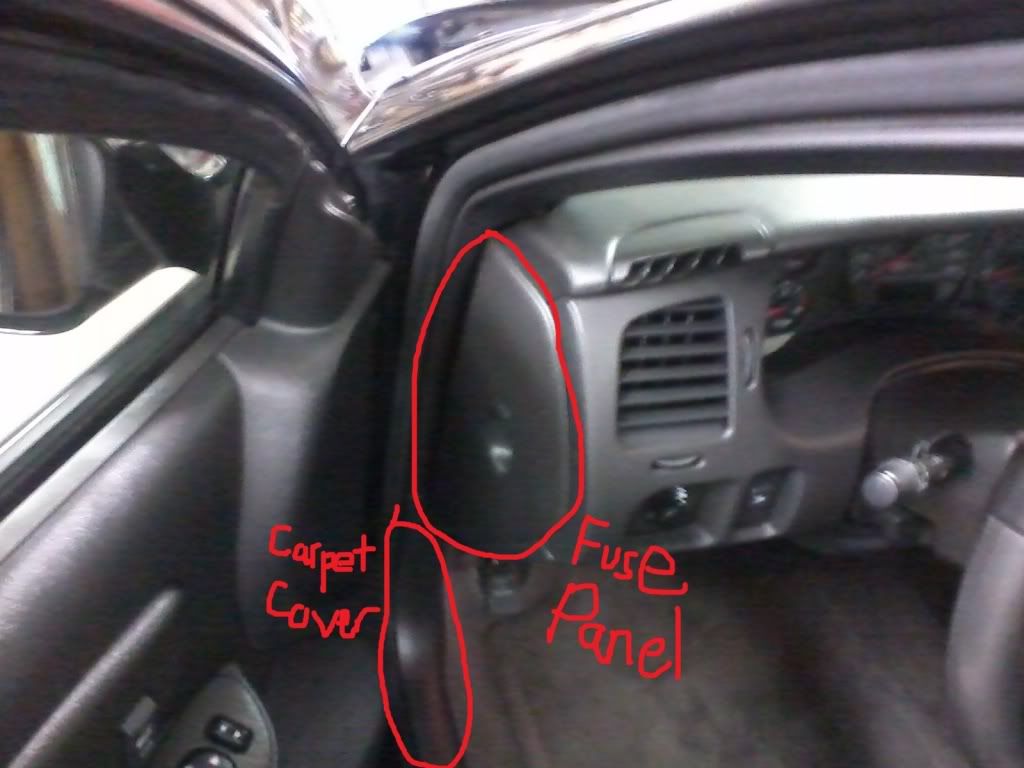
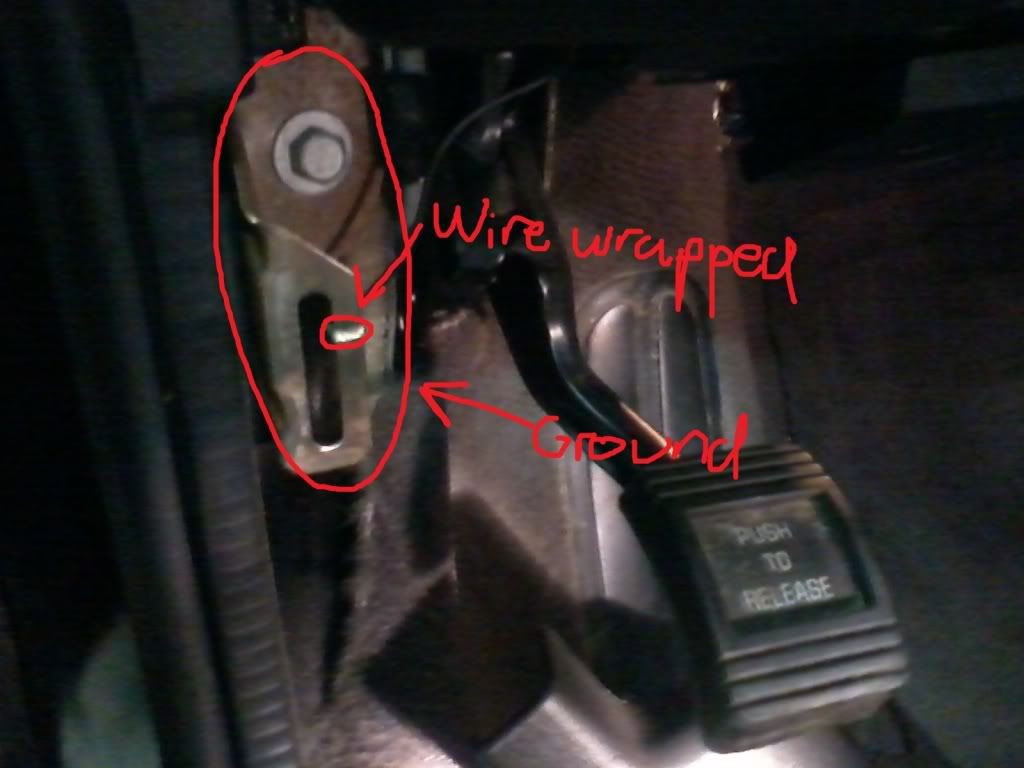
-Then take off the panel that covers the edge of the carpet by the door. Pull it out and set it to the side. The black wire will need to be grounded to any source of metal on the car. Near the fuse box, under the panel you just took off, there is a metal slot that the panel will snap back into. Wrap the black wire through this slot.

-Plug all 4 of the tube lights into the box connected to the remote.
-Turn the car to "on" (the engine doesn't need to run. even "acc" will work) And the lights should come on! If they don't, re-check how you wired everything, and try again. If they still don't come on, well,, you're screwed. Nah just call the 800 number lol.
Step 2: Arrange the remote and box.
-There is some flexibility with this step. After you unplug everything, you need to set it up in the car how you want it. First we are going to look at the remote and box. You can put these two wherever you want, as long as the wires reach the fuse box. Personally (and as I advise you to do) I put the remote down on the side of the center console by the shifter. Don't glue/tape/screw anything in yet. This is still just setting it up. Make sure everything fits before you do something permanent. The wires from the remote should go under the center console and run to the front of the car/dash. There will be an opening in the middle of the car where these wires will come out. This is also where you should put the box that all the lights will be plugged into. It is out of sight and yet easily accessible.


-The positive and negative power wires (red and black) need to get to the fuse box without being seen. This is easy to accomplish. The dash by the pedals comes off with two little hinges and it will just fall down. Run the wires through the dash and they will come out by the fuse box. This is where the journey ends for the red wire. Now you can plug the positive (red) wire back into the cig/aux fuse. The black wire will continue a little farther down the the place you want to ground it to. Once both of the wires are secure, pull the excess wire (there isn't much at all) back through the dash and tie it up by the box. Now you can put the fuse box cover and carpet cover back in place. When you put the carpet panel back in, don't be afraid to push it right in where the black wire is. It won't hurt anything, it will actually help secure it, if you wrapped it tight enough.


-The box should still be behind/in front of the center console thingermabobber. You can now probably tape/screw that into the carpet. You can do the same to the remote, once you position it where it is most convenient for you.
Step 3: Lay out the LED tubes.
-The kit I bought came with 2 tubes with short wiring, and 2 tubes with longer wiring. The tubes with the longer wires go in the back, and the shorter goes in the front. Position these as such.
-For the front tubes, since they are so close to the box, you don't need to un-twisty-tie the whole bundle. Just put the wire end closer to the box and take as much as you need to get it plugged in. Once you have done that for the front two, you can just tuck the extra bundle of wire behind the carpet, which should just come right up with ease.


-For the rear tubes, put them behind the front seats, with the wire ends pointing towards the middle. You can untie the bundles, but save the twisty-tie. You are going to run these wires up BY the middle console and BY the front seats, until you get to a point where you can tuck the wire under the middle console. No wire needs to be visible, it can tuck under much before the front of the front seats. Pull all of the wire through, the re-twisty-tie the excess wire once it is plugged into the box.


Step 4: Secure the LED tubes
-This part was the one that took me the most time, mostly because I was unsure how to go about it. Trial and error... lots of it.
-Ok soooo... for the driver's seat, you are going to have to find a place where the bulbs aren't visible, it illuminates the area well, and doesn't interfere with the pedals. I put the tube behind the brake pedal but on top of the gas pedal. It has to be high enough up to not interfere with either. Basically, I just used the double sided 3M tape that came with the kit to secure the lights. They aren't too secure, honestly, but it was the best I could come up with for the time being. I plan on getting some super-powerful tape or something to get them in permanently.
-For the passenger seat, I taped the lights to the bottom of the dashboard, under and farther in than the glove-box.
-For the rear seats, I really really really tried to get the bulbs to a place that wasn't visible. It just isn't possible. I ordered the 15" tubes, and they are honestly 2" too long to fit under the front seats I tried screwing them into the bottom of the seats, screwing them under the seats, taping them under, EVERYTHING. And yet nothing worked. It just isn't possible to screw these dang things in. Anywhere! So I simply had to tape them to the floor, as far back as possible. In the future, I might purchase the 9" tubes for the rear so that I can put them under the seat. Otherwise, if I find some awesome glue or tape or other solution, I will try to attach them to the bottom of the seat.
-Step 5: Test and Enjoy

Ok errrrybody I really hope that helped. I honestly typed this up as idiot-proof as possible. I think I went overboard on that part haha.. I did this whole process with no real instructions. Seriously you just have to buy the kit and everything will make more sense.
Also for the future: I am going to replace the cig/aux fuse with a 15 instead of a 10, and I am going to buy some 14 gauge wire with an inline fuse for the positive wire, just to be safe. It should be fine without, but I don't want my car to blow up. Hah. That was a joke.
The lights that I bought were the 7 color 4pc set from LEDUnderbody.com
7 Color 4pc Expandable LEDGlow LED Interior Lights Lighting Kit
It's a great deal and they work fine! $40 you can't go wrong
So here's what you will need for the installation besides what comes in the kit:
-Scissors/Wire cutter
-Duct (or very powerful) tape
-Power drill (optional)
-Some time
-A cool place to work (it was 105 degrees when I installed these :/)
I took some pictures, but they were just on my phone, so they aren't spectacular quality. Sorry about that...
Step 1: Test the power connection
-Take off the cover to the driver side fuse panel. It will snap right off. On the back of the cover will be a diagram of what each fuse is. Take out the cig/aux fuse. You will need to strip some of the plastic wax off both the positive (red) and negative (black) wires so that more silver is actually showing. Then wrap the red wire around one prong of the thing you took out. Then push it back in its slot. It might stick out a little, but get it in as far as you can without crushing anything.
-Then take off the panel that covers the edge of the carpet by the door. Pull it out and set it to the side. The black wire will need to be grounded to any source of metal on the car. Near the fuse box, under the panel you just took off, there is a metal slot that the panel will snap back into. Wrap the black wire through this slot.
-Plug all 4 of the tube lights into the box connected to the remote.
-Turn the car to "on" (the engine doesn't need to run. even "acc" will work) And the lights should come on! If they don't, re-check how you wired everything, and try again. If they still don't come on, well,, you're screwed. Nah just call the 800 number lol.
Step 2: Arrange the remote and box.
-There is some flexibility with this step. After you unplug everything, you need to set it up in the car how you want it. First we are going to look at the remote and box. You can put these two wherever you want, as long as the wires reach the fuse box. Personally (and as I advise you to do) I put the remote down on the side of the center console by the shifter. Don't glue/tape/screw anything in yet. This is still just setting it up. Make sure everything fits before you do something permanent. The wires from the remote should go under the center console and run to the front of the car/dash. There will be an opening in the middle of the car where these wires will come out. This is also where you should put the box that all the lights will be plugged into. It is out of sight and yet easily accessible.
-The positive and negative power wires (red and black) need to get to the fuse box without being seen. This is easy to accomplish. The dash by the pedals comes off with two little hinges and it will just fall down. Run the wires through the dash and they will come out by the fuse box. This is where the journey ends for the red wire. Now you can plug the positive (red) wire back into the cig/aux fuse. The black wire will continue a little farther down the the place you want to ground it to. Once both of the wires are secure, pull the excess wire (there isn't much at all) back through the dash and tie it up by the box. Now you can put the fuse box cover and carpet cover back in place. When you put the carpet panel back in, don't be afraid to push it right in where the black wire is. It won't hurt anything, it will actually help secure it, if you wrapped it tight enough.
-The box should still be behind/in front of the center console thingermabobber. You can now probably tape/screw that into the carpet. You can do the same to the remote, once you position it where it is most convenient for you.
Step 3: Lay out the LED tubes.
-The kit I bought came with 2 tubes with short wiring, and 2 tubes with longer wiring. The tubes with the longer wires go in the back, and the shorter goes in the front. Position these as such.
-For the front tubes, since they are so close to the box, you don't need to un-twisty-tie the whole bundle. Just put the wire end closer to the box and take as much as you need to get it plugged in. Once you have done that for the front two, you can just tuck the extra bundle of wire behind the carpet, which should just come right up with ease.
-For the rear tubes, put them behind the front seats, with the wire ends pointing towards the middle. You can untie the bundles, but save the twisty-tie. You are going to run these wires up BY the middle console and BY the front seats, until you get to a point where you can tuck the wire under the middle console. No wire needs to be visible, it can tuck under much before the front of the front seats. Pull all of the wire through, the re-twisty-tie the excess wire once it is plugged into the box.
Step 4: Secure the LED tubes
-This part was the one that took me the most time, mostly because I was unsure how to go about it. Trial and error... lots of it.
-Ok soooo... for the driver's seat, you are going to have to find a place where the bulbs aren't visible, it illuminates the area well, and doesn't interfere with the pedals. I put the tube behind the brake pedal but on top of the gas pedal. It has to be high enough up to not interfere with either. Basically, I just used the double sided 3M tape that came with the kit to secure the lights. They aren't too secure, honestly, but it was the best I could come up with for the time being. I plan on getting some super-powerful tape or something to get them in permanently.
-For the passenger seat, I taped the lights to the bottom of the dashboard, under and farther in than the glove-box.
-For the rear seats, I really really really tried to get the bulbs to a place that wasn't visible. It just isn't possible. I ordered the 15" tubes, and they are honestly 2" too long to fit under the front seats
I tried screwing them into the bottom of the seats, screwing them under the seats, taping them under, EVERYTHING. And yet nothing worked. It just isn't possible to screw these dang things in. Anywhere! So I simply had to tape them to the floor, as far back as possible. In the future, I might purchase the 9" tubes for the rear so that I can put them under the seat. Otherwise, if I find some awesome glue or tape or other solution, I will try to attach them to the bottom of the seat.-Step 5: Test and Enjoy
Ok errrrybody I really hope that helped. I honestly typed this up as idiot-proof as possible. I think I went overboard on that part haha.. I did this whole process with no real instructions. Seriously you just have to buy the kit and everything will make more sense.
Also for the future: I am going to replace the cig/aux fuse with a 15 instead of a 10, and I am going to buy some 14 gauge wire with an inline fuse for the positive wire, just to be safe. It should be fine without, but I don't want my car to blow up. Hah. That was a joke.
#2
09-17-2011, 11:34 PM

First, I'd like to say, "Thank you for making this write-up". I think it looks like nice. It looks like you went through a lot of trouble trying to get this install as correct as possible and I commend you for it.
However, anyone else that is going to run electronics in their car, try not to use existing fuses in the fuse box. Try to add another fuse into the box, I think you can do this on our fuse boxes, I'm not sure, as I haven't looked. If you must tap into an existing wire, then by all means, do so, but use a relay to drive the circuit. There is a 10A fuse on the cigarette lighter circuit for a reason.
CAUTION: OUT OF THIN AIR THEORY AHEAD:
There can be times that the wire being used on that specific circuit could be rated for 12 amps and by hitting 11 amps, you blow the 10A fuse, resulting in protected wire and protected devices.
SPDT and SPST Automotive Relays
Also, make sure you have a spot in the fuse box for it's own circuit or have an in-line fuse prior to installation. It only takes that 2 seconds of over-drawn current to fry your electronics or wire. Another good idea is to use a self-tapping screw, star washer, metal sanded down to bare metal, then covered in some sort of rust barrier (IE Paint) to make your ground connection OR use an existing ground.
The piece of metal you used to ground with, is a good spot, however using a 10MM and using the bolt and the chassis to make your ground is a better idea than simply wrapping it like that. Also, you don't have to run that ground through the dash, you can ground it on the chassis, also cutting the wire can make for a more simple installation, so you don't have to hide larger amounts of wire.
Like I said, I think you did a great job during the installation and making the write-up, just a few tips to keep you and your car safe.

#4
02-06-2012, 04:52 PM

So I am absolutely, completely electronically challenged, but you made this seem easy. Just a question though, if you tie into the cig/aux fuse, can you still use the aux to charge ipods and such? Or does all that juice go into the lights now? Sorry if that's a really dumb question...
#5
02-07-2012, 08:46 AM

69Deville, you would still be able to use your aux like normal but like 02LS said, the 10 amp fuse is only meant for 10 amps, running both the lights and the aux outlet will most likely blow the fuse and possibly cause damage to any electronics. By the way, there is no such thing as a dumb question.
#6
08-01-2012, 03:09 AM
Hey everyone! Sort of a mini-bump/real post here. I haven't posted on the forum in quite some time, but I recently finished another LED installation in my air vents (for which I should probably do another BETTER how-to because honestly it looks SICK)! But as I looked back on this thread for fun, I realized just how dumb I really was. Since doing these foot well LEDs, I have also installed 2 Kicker Comp 12s, a Kicker ZX-400 Amp, and a Pioneer Head Unit, as well as the aforementioned air vent LEDs. So I have definitely learned a lot! The subs I obviously wired straight to the battery. But for the LEDs, I changed the ground to the chassis under the dash (before I even read 02LS's post) but I ran stuck with the power wire. I ended up also running that to the CIG/AUX fuse, so now I am very scared of blowing the fuse, though I did throw in a 15a fuse, not sure if that will help haha.
But for anyone who sees this: is there any way to add a fuse to our fuse box? I have an 04 L67, and there are simply open slots with nothing in them and no way to add another fuse, which really angers me. Anybody have a suggestion?
But for anyone who sees this: is there any way to add a fuse to our fuse box? I have an 04 L67, and there are simply open slots with nothing in them and no way to add another fuse, which really angers me. Anybody have a suggestion?
#7
08-01-2012, 10:01 AM

thats pretty dope. i would never use ducktape on any install but ii mean.. for using ducktape i think it looks pretty legit @ the end result.
#8
08-02-2012, 12:30 AM
I'll try to post some pics or video of the foot-well LEDs along with the air vent LEDs. Together they look quite amazing and definitely makes the interior of the car much better.


#10
11-12-2012, 04:38 PM


how do i take down the dome light on the roof im wanting to put a led light in there and not sure which end comes down and what bulb us up there