Mod Guide: How To: Sleeper Intake Modfication/ Stock Intake Modification - 5th gen
#1
 10-23-2010, 02:54 PM


Starting off, I'm not too sure if this would work on any other generation, but this is so far meant for the 5th gen
Description of a sleeper intake:
This mod provides power of a cold air intake without the noise nor appearance of a CAI.
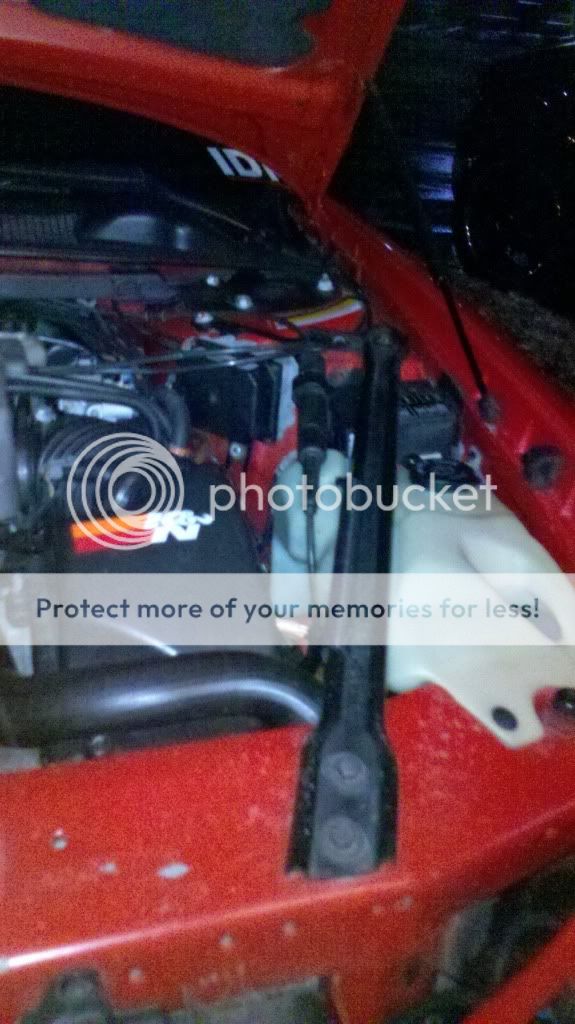
This image was taken from the inside of my air box, the port on the right is from the stock induction (1 1/2"), the port on the left is added by me as my intake mod (3").

As I have promised for a couple of months now, I am finally going to tell how to modify your stock intake to bring in more/cold air.
I actually have done this to my past two vehicles and it worked so well, I did it to this one. Unfortunately, I don't have any pics of the monte one I have done, but will soon and when this how to gets actually posted, I'll add those pics accordingly.
Tools to get started:
1) Stock intake, I always suggest you go to a junkyard and get the spare parts before yo modify one for he first time. In case you mess up, you still have one to use until you get it right.
2) Dremel
3) Flex hose (you can get this for 20.00 at auto zone from the ricer section, or just use one from home depot. If you have done a battery relocation, you actually don't need a flex hose, you can also just use a straight 3" ID pipe that would be about 6" long along with a silicone coupler.)
4) 13mm socket
5) something to remove the plastic rivets holding the washer fluid reservoir.
6)10 MM socket
Start by opening the hood
remove the three bolts holding the cradle brace in place

unscrew the four screws to the intake box and remove the lid

If you haven't done the battery relocation nor ever intend to, using the flex tube as a stencil, trace around it on the back side of the air box keeping in mind to make sure you have room for the air filter. I did all of my cutting on the bottom most part of the side of the box, to further ensure I have space. (if you have done a relocation, do so on the front most part of the left side *side facing the fender*)
The pic shows the routing used for both the side and rear of the box

Using a cutting wheel, cut out the tracing on the inside edge, then using a grinding wheel, grind just to the line you traced. (you can always remove more material, not add material) The reason to not fully cut out the entire tracing is to "screw" the flex tube into the box making more an air tight seal.)
Note: you my also need to cut a bit out of the inside ribbing of the box to make room for the hose to fit into its slot.
Notice the hose is screwed in to ensure its locked into place.

if you want to make a block off plate for the fender, just measure and trace on a piece of cardboard to fit the area to block off, then make it out of metal or plastic (I used 1/4" plastic for mine)
Run the hose into the fender, anywhere you want ensuring you have the most of the air flow. If you haven't relocated the battery, you will have a horrible time squeezing the hose through where it needs to go, but it will fit with little forcing, more pressure than anything else, but it WILL work I first did this mod to mine before relocating the battery (you may have to pull the battery out to get the hose to fit into place, then put the battery right back in. )
Pic taken from inside the fender to show ample space. I simply guided the hose just to the inside of the fender as I have found it works best

Put everything back together, and you are finished. For best results, use K&N air filter.
I hope this helps all of you, and like I have said before, I'll come back and post plenty of pics when I take them.
questions/ comments are always welcome
Description of a sleeper intake:
This mod provides power of a cold air intake without the noise nor appearance of a CAI.
This image was taken from the inside of my air box, the port on the right is from the stock induction (1 1/2"), the port on the left is added by me as my intake mod (3").
As I have promised for a couple of months now, I am finally going to tell how to modify your stock intake to bring in more/cold air.
I actually have done this to my past two vehicles and it worked so well, I did it to this one. Unfortunately, I don't have any pics of the monte one I have done, but will soon and when this how to gets actually posted, I'll add those pics accordingly.
Tools to get started:
1) Stock intake, I always suggest you go to a junkyard and get the spare parts before yo modify one for he first time. In case you mess up, you still have one to use until you get it right.
2) Dremel
3) Flex hose (you can get this for 20.00 at auto zone from the ricer section, or just use one from home depot. If you have done a battery relocation, you actually don't need a flex hose, you can also just use a straight 3" ID pipe that would be about 6" long along with a silicone coupler.)
4) 13mm socket
5) something to remove the plastic rivets holding the washer fluid reservoir.
6)10 MM socket
Start by opening the hood
remove the three bolts holding the cradle brace in place
unscrew the four screws to the intake box and remove the lid
If you haven't done the battery relocation nor ever intend to, using the flex tube as a stencil, trace around it on the back side of the air box keeping in mind to make sure you have room for the air filter. I did all of my cutting on the bottom most part of the side of the box, to further ensure I have space. (if you have done a relocation, do so on the front most part of the left side *side facing the fender*)
The pic shows the routing used for both the side and rear of the box
Using a cutting wheel, cut out the tracing on the inside edge, then using a grinding wheel, grind just to the line you traced. (you can always remove more material, not add material) The reason to not fully cut out the entire tracing is to "screw" the flex tube into the box making more an air tight seal.)
Note: you my also need to cut a bit out of the inside ribbing of the box to make room for the hose to fit into its slot.
Notice the hose is screwed in to ensure its locked into place.
if you want to make a block off plate for the fender, just measure and trace on a piece of cardboard to fit the area to block off, then make it out of metal or plastic (I used 1/4" plastic for mine)
Run the hose into the fender, anywhere you want ensuring you have the most of the air flow. If you haven't relocated the battery, you will have a horrible time squeezing the hose through where it needs to go, but it will fit with little forcing, more pressure than anything else, but it WILL work I first did this mod to mine before relocating the battery (you may have to pull the battery out to get the hose to fit into place, then put the battery right back in. )
Pic taken from inside the fender to show ample space. I simply guided the hose just to the inside of the fender as I have found it works best
Put everything back together, and you are finished. For best results, use K&N air filter.
I hope this helps all of you, and like I have said before, I'll come back and post plenty of pics when I take them.
questions/ comments are always welcome
Last edited by augi; 01-26-2011 at 10:18 PM. Reason: pics finally added


#4
01-26-2011, 09:57 AM
I know I promised pics when I made this how to, but things really went crazy for me. I should have them up by the end of next week (hopefully sooner)
I need to disassemble it and take pics of the unassembly/ reassembly.
I need to disassemble it and take pics of the unassembly/ reassembly.


#8
03-05-2012, 10:54 AM

 http://www.flickr.com/photos/75797678@N03/?savedsettings=6956255571#photo6956255571
#9
03-24-2012, 11:14 AM


So the basic idea of this is adding another hose into the stock box from a colder pocket of air instead of making a HAI (hot air intake, just filter in place of the airbox that robs power by sucking in hot air). I had a little difficult of a time following your steps from your description, but I get the basics of it I believe. I am definitely interested in creating something like this, as I can't justify relocating my battery.
#10
03-24-2012, 01:30 PM

So the basic idea of this is adding another hose into the stock box from a colder pocket of air instead of making a HAI (hot air intake, just filter in place of the airbox that robs power by sucking in hot air). I had a little difficult of a time following your steps from your description, but I get the basics of it I believe. I am definitely interested in creating something like this, as I can't justify relocating my battery.

If you can live with relocating your washer fluid tank, you can just turn your battery sideways and allow enough room for a FWI.