Repair Guide: 5th, 6th, 7th Gen Rear Strut Replacement
#1
 06-16-2011, 03:50 PM


as promissed... sorry took so long
Step1: Loosen up Lugnuts
(you will have to do this twice, once for each side)
Step2: Jack up the car and place it on jack stands
Safety First

I just slid my jack under the car so it is out of the way while workin (one less thing to trip over)
Step 3 Fully removes wheel/tire
(you will have to do this twice, once for each side)

(please excuse my rust(will be fixing soon) and sand covered undercarriage i didn't have a chance to clean it out good before this was done)
Step4
Jump in the trunk and get comfortiable
(i actually was i had my son jack's rubber ball as a pillow lol)
(you can actually do this from the top if you wanted to pull the rear seat, hat shelf and crap where the speakers are (but i figure thats alot more work)

Step 5 pull down your carpet that covers up tour mounting bolts
(you will have to do this twice, once for each side)

Step 6: remove the 3 bolts holding your strut onto your body,
you will want a deep socket, short socket and wrench in the size you need mine where 15mm replacements where 14mm
(you will have to do this twice, once for each side)

Step7:Undo the sway bar link
(you will have to do this twice, once for each side)


Step8:go to the knuckle and remove the 2 nuts that connect the strut to the knuckle
I sugest a impact or 1/2in ratchet with a piece of pipe to get them off
(you will have to do this twice, once for each side)


Step 9 pound out your bolts, i leave the nut on enought so you don't mar the end of it(they are splined and don't actually have a head on them so you NEED to pound them out they will NOT TURN OUT! if they do you have problems! )
(you will have to do this twice, once for each side)


step:10 pull the strut out compleatly
(you will have to do this twice, once for each side)


Step1: Loosen up Lugnuts
(you will have to do this twice, once for each side)
Step2: Jack up the car and place it on jack stands
Safety First
I just slid my jack under the car so it is out of the way while workin (one less thing to trip over)
Step 3 Fully removes wheel/tire
(you will have to do this twice, once for each side)
(please excuse my rust(will be fixing soon) and sand covered undercarriage i didn't have a chance to clean it out good before this was done)
Step4
Jump in the trunk and get comfortiable
(i actually was i had my son jack's rubber ball as a pillow lol)
(you can actually do this from the top if you wanted to pull the rear seat, hat shelf and crap where the speakers are (but i figure thats alot more work)
Step 5 pull down your carpet that covers up tour mounting bolts
(you will have to do this twice, once for each side)
Step 6: remove the 3 bolts holding your strut onto your body,
you will want a deep socket, short socket and wrench in the size you need mine where 15mm replacements where 14mm
(you will have to do this twice, once for each side)
Step7:Undo the sway bar link
(you will have to do this twice, once for each side)
Step8:go to the knuckle and remove the 2 nuts that connect the strut to the knuckle
I sugest a impact or 1/2in ratchet with a piece of pipe to get them off
(you will have to do this twice, once for each side)
Step 9 pound out your bolts, i leave the nut on enought so you don't mar the end of it(they are splined and don't actually have a head on them so you NEED to pound them out they will NOT TURN OUT! if they do you have problems! )
(you will have to do this twice, once for each side)
step:10 pull the strut out compleatly
(you will have to do this twice, once for each side)
Last edited by Budsjlm; 10-17-2011 at 03:28 PM.
#2
06-16-2011, 04:30 PM
Step 11: let the fun begin!! Compress your spring

Step12: even if you think it's compressed enought keep compressing!!!!
Step13: Remove the nut that holds the top plate on to the strut
(if you don't have it compressed enough it will go flying)
(a Impact makes this step sooo much easier i suggest using one)


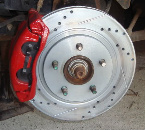
step:14 you should really only be keeping your spring, spring issolator and dust cover(if in reusiable condition) so get your new parts together and compair new to old my new strut top plate(strut mounds) did not have the 3 nibs sticking out to center the strut rod but it did have a metal bushing


Step 15: put old spring isolater on new strut(if in good condition) and make sute it is lined up exactly like it was on your old one)
step 16: put spring back in place and get your top plate in place
(must be the exact way it was on the old one otherwise it will not go back in the car)
and start the nut then tighten it down!
step 17 uncompress the spring
and reverse step 10-1
when put the strut back in i put the botom in first then used my jack to push the whole knuckle and strut up into it's resting place
i didn't actually do my strut they where replace about 10 k befor i bought the car but when they did that they didn't replace the strut top plates, and was making noise over bumps, mainly on city streets and corners well thats becuase the top plate(stut mount, bearing plate) was toast....

Step12: even if you think it's compressed enought keep compressing!!!!
Step13: Remove the nut that holds the top plate on to the strut
(if you don't have it compressed enough it will go flying)
(a Impact makes this step sooo much easier i suggest using one)
step:14 you should really only be keeping your spring, spring issolator and dust cover(if in reusiable condition) so get your new parts together and compair new to old my new strut top plate(strut mounds) did not have the 3 nibs sticking out to center the strut rod but it did have a metal bushing
Step 15: put old spring isolater on new strut(if in good condition) and make sute it is lined up exactly like it was on your old one)
step 16: put spring back in place and get your top plate in place
(must be the exact way it was on the old one otherwise it will not go back in the car)
and start the nut then tighten it down!
step 17 uncompress the spring
and reverse step 10-1
when put the strut back in i put the botom in first then used my jack to push the whole knuckle and strut up into it's resting place
i didn't actually do my strut they where replace about 10 k befor i bought the car but when they did that they didn't replace the strut top plates, and was making noise over bumps, mainly on city streets and corners well thats becuase the top plate(stut mount, bearing plate) was toast....
Last edited by Budsjlm; 10-17-2011 at 03:17 PM.


#5
04-27-2012, 08:56 AM
see below
and i'm not sure what brand they went with when replaced
i didn't actually do my strut they where replace about 10 k befor i bought the car but when they did that they didn't replace the strut top plates, and was making noise over bumps, mainly on city streets and corners well thats becuase the top plate(stut mount, bearing plate) was toast....
#6
04-27-2012, 09:32 AM


I noticed u missed 1 very important step...........
Always be sure u have enough room on the work bench!!!
you must be a busy man to have that much stuff on it !!!!
Or it was the maids day off........... Just kidding...........
Thanks for the detailed photos and info....!!!!!!!!!!
Well done!
Thanks!
Always be sure u have enough room on the work bench!!!
you must be a busy man to have that much stuff on it !!!!
Or it was the maids day off........... Just kidding...........
Thanks for the detailed photos and info....!!!!!!!!!!
Well done!
Thanks!
#7
04-27-2012, 09:37 AM
I noticed u missed 1 very important step...........
Always be sure u have enough room on the work bench!!!
you must be a busy man to have that much stuff on it !!!!
Or it was the maids day off........... Just kidding...........
Thanks for the detailed photos and info....!!!!!!!!!!
Well done!
Thanks!
Always be sure u have enough room on the work bench!!!
you must be a busy man to have that much stuff on it !!!!
Or it was the maids day off........... Just kidding...........
Thanks for the detailed photos and info....!!!!!!!!!!
Well done!
Thanks!


#10
04-27-2012, 04:39 PM

Could that be whats wrong with mine? When I go over bumps and some corners and stuff, it sounds like the rear tires rumble.

