Home Stretch for the Whipple Build
#1
 01-13-2015, 10:36 PM


Well, over the holiday break and last few weekends, I've got it down to the final stretch to start her up again with the new setup. I figured I would just start a new thread since the others were a bit long. The goal is still to finish this before it gets hot out again (since I took out the AC), so worst case target is end of March to fire her up again.
Recent progress includes:
-Installed new TOG Extreme headers
-Finished and installed fuel pump trap door cover (aluminum cover with bolts sticking through from the bottom and nuts to hold it in place)
-Mounted both fuel filters (in the correct flow direction as opposed to how a lot of the GP people run them)- one back right behind the tank close to the stock location, the other up inside of the subframe rail- kind of under the driver's seat. The filters are for a flex fuel GM SUV.
-Ran the fuel hard line from the tank up to the base of the firewall on the driver's side. Built aluminum brackets with rubber grommets to secure the lines under the car.
-Ran AN braided line from the rails to the hard lines.
-Notched front bumper for IC clearance and airflow, mounted it.
-Continued electrical work.
-Notched bottom of whipple case to allow for boost bypass hose to attach to IC.
-Cut up aluminum tubing for boost bypass, going to shop tomorrow to have it welded.
-Marked up TB adapter with what needs to be done, also going to shop tomorrow to have it cut/welded/drilled/tapped/etc etc etc
Some pictures:
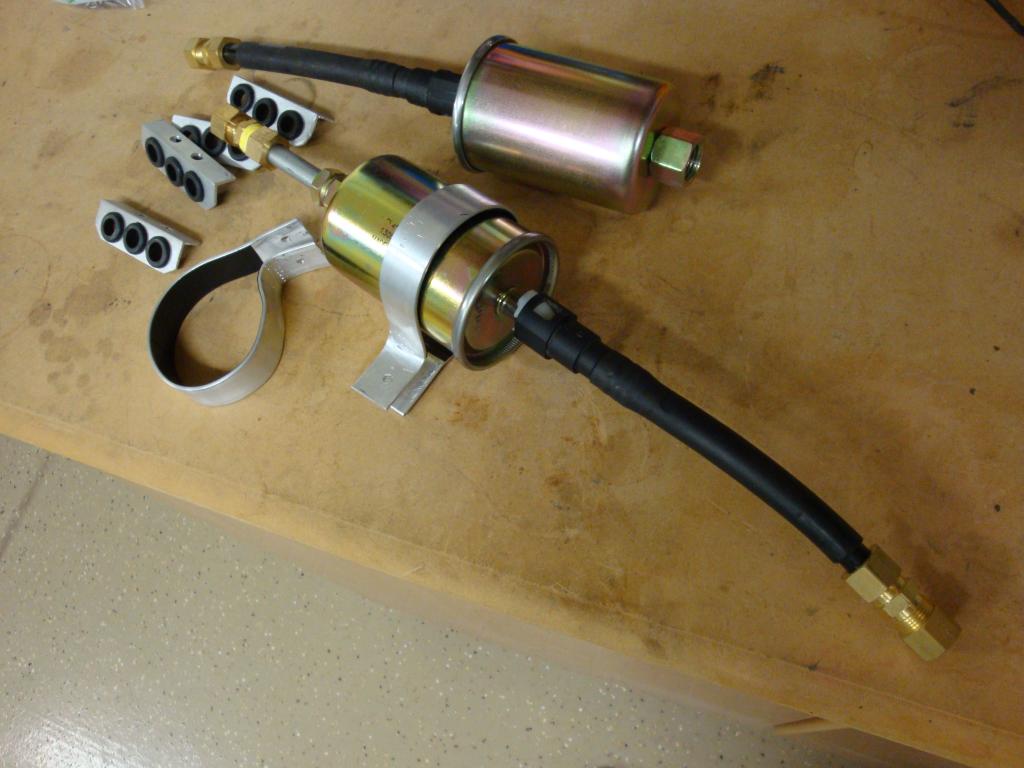
Fuel filters, filter mounts, and hard fuel line brackets:
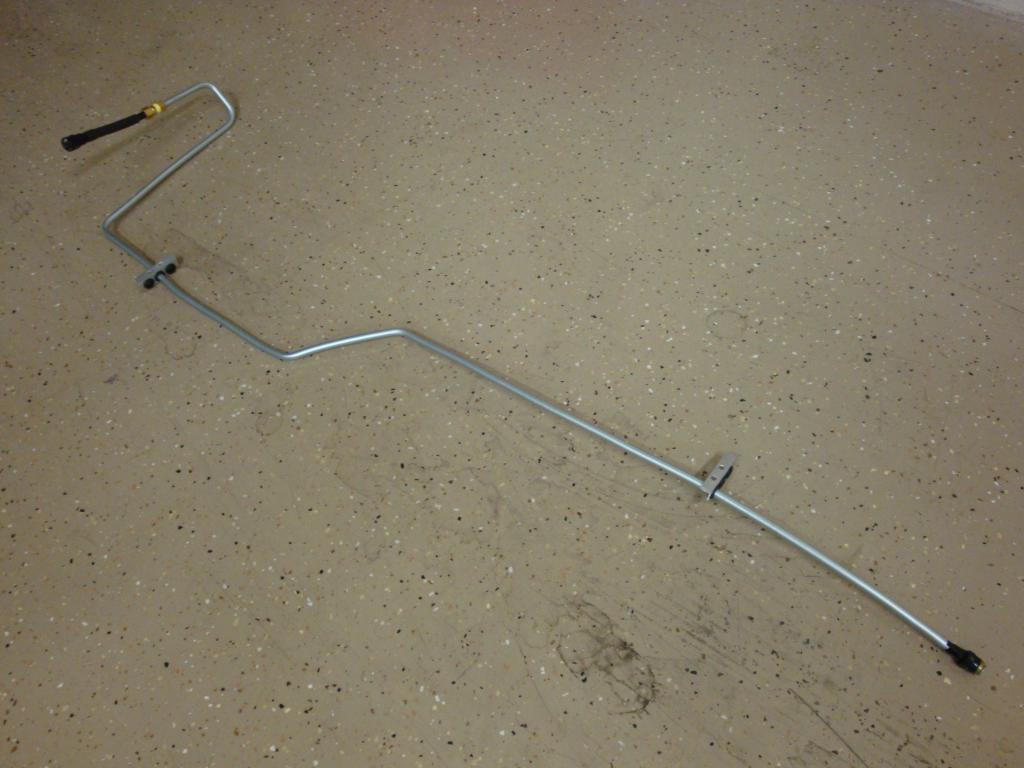
One section of hard line almost finished (this is the one with the filter behind the tank):
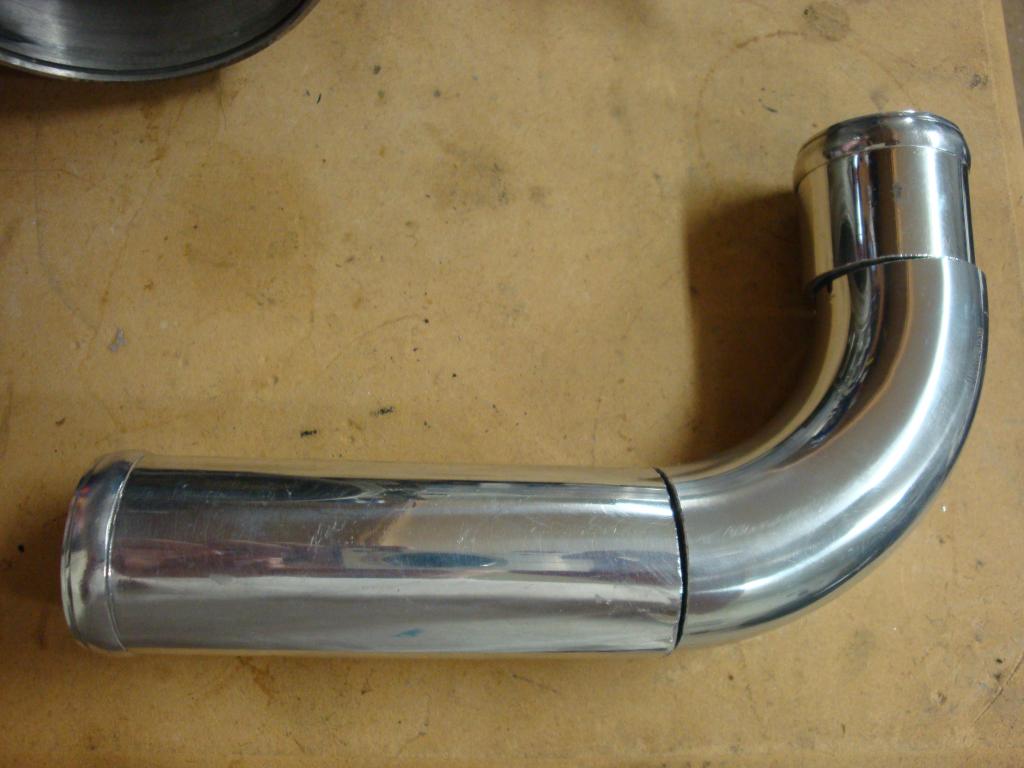
Boost bypass tube cut up and ready to weld:
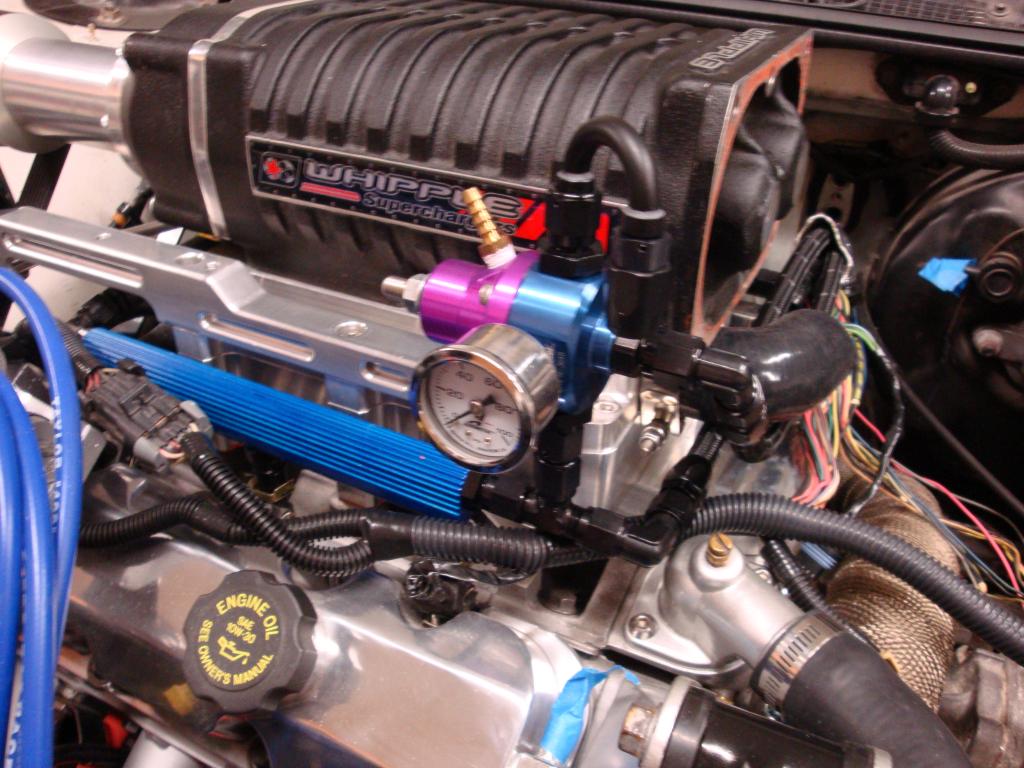
Messing with FPR mounting. Still unsure what to do about the top port. Since the two rails are connected at the opposite end of the rail, I could theoretically just plug the top port off. However, I'm thinking about connecting the opposite end of the rails together also to add more volume and help with consistency. It'll look a little more ugly (see U shaped fitting on top of the FPR, plus it'll need a T on the back rail connection).
Ignore the wire mess, I've got the harness opened up so I can clean up the TB connections (shorten wires, solder in adapters, etc).
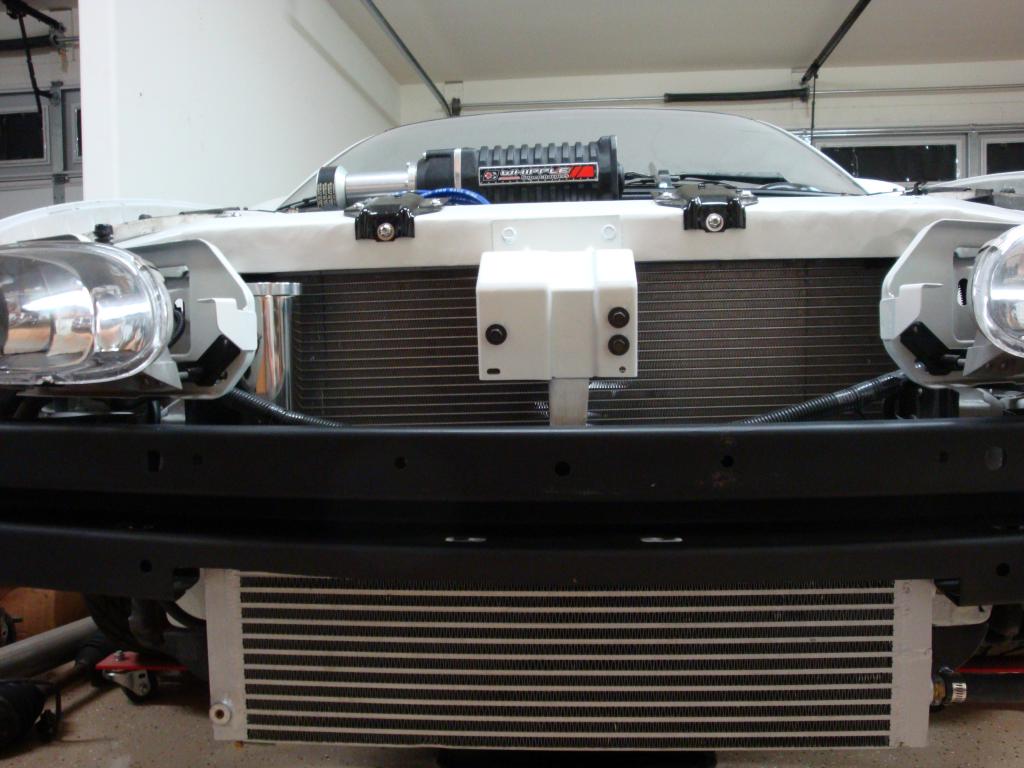
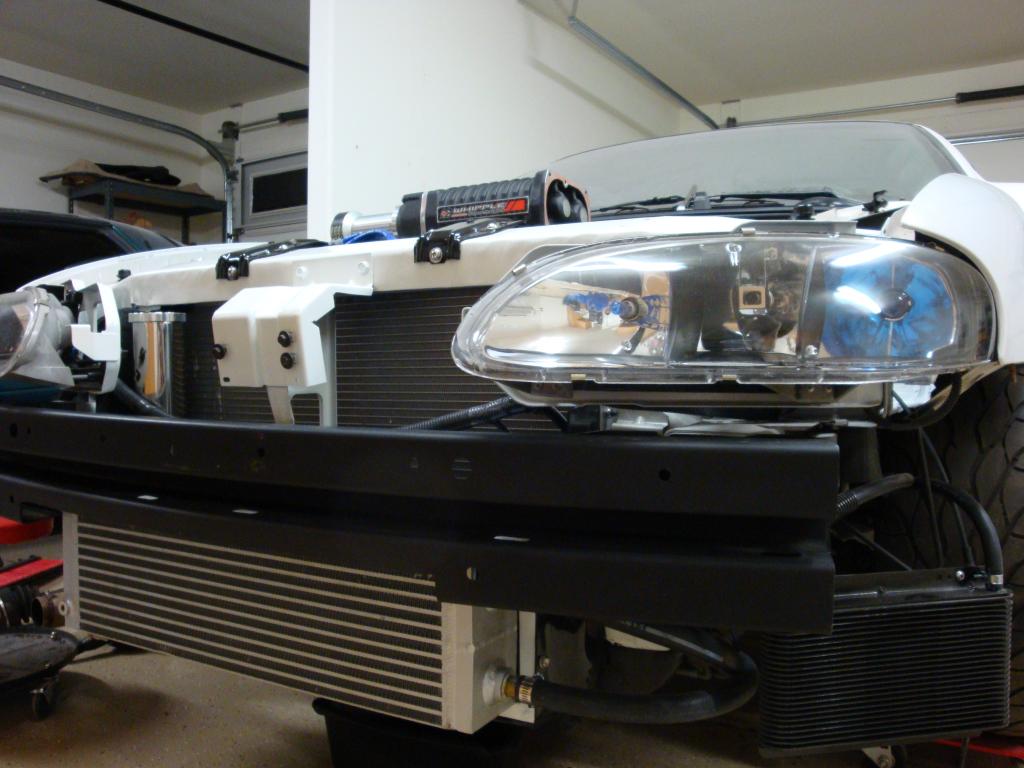
A couple of shots of the bumper installed:
What's left to be able to start it again:
-Finish wiring (IC pump, fuel pumps / speed controller, etc).
-Install catch cans (you can see the fittings on the side of the valve covers with painters tape on it).
-Get boost bypass tube welded up, get TB adapter modified.
-Fab throttle cable brackets, FPR mount.
-Install some kind of exhaust since it currently ends mid-firewall (right now all I have is a 6" piece of downpipe to bolt to it, lol).
-Finish running vacuum lines, other misc parts.
-Upload tune (base tune is already done, just need to flash it over)
Obviously there are a few other things on the list before I drive it:
-Replace wheel studs.
-Change trans pan gasket (leaks a lot of fluid right now).
-Replace axles (already have replacement parts, just need to make 'new' ones and swap them).
But I'm going to back burner that stuff until I can get the engine up again. I'll try and update this thread as I make progress.
Recent progress includes:
-Installed new TOG Extreme headers
-Finished and installed fuel pump trap door cover (aluminum cover with bolts sticking through from the bottom and nuts to hold it in place)
-Mounted both fuel filters (in the correct flow direction as opposed to how a lot of the GP people run them)- one back right behind the tank close to the stock location, the other up inside of the subframe rail- kind of under the driver's seat. The filters are for a flex fuel GM SUV.
-Ran the fuel hard line from the tank up to the base of the firewall on the driver's side. Built aluminum brackets with rubber grommets to secure the lines under the car.
-Ran AN braided line from the rails to the hard lines.
-Notched front bumper for IC clearance and airflow, mounted it.
-Continued electrical work.
-Notched bottom of whipple case to allow for boost bypass hose to attach to IC.
-Cut up aluminum tubing for boost bypass, going to shop tomorrow to have it welded.
-Marked up TB adapter with what needs to be done, also going to shop tomorrow to have it cut/welded/drilled/tapped/etc etc etc
Some pictures:
Fuel filters, filter mounts, and hard fuel line brackets:
One section of hard line almost finished (this is the one with the filter behind the tank):
Boost bypass tube cut up and ready to weld:
Messing with FPR mounting. Still unsure what to do about the top port. Since the two rails are connected at the opposite end of the rail, I could theoretically just plug the top port off. However, I'm thinking about connecting the opposite end of the rails together also to add more volume and help with consistency. It'll look a little more ugly (see U shaped fitting on top of the FPR, plus it'll need a T on the back rail connection).
Ignore the wire mess, I've got the harness opened up so I can clean up the TB connections (shorten wires, solder in adapters, etc).
A couple of shots of the bumper installed:
What's left to be able to start it again:
-Finish wiring (IC pump, fuel pumps / speed controller, etc).
-Install catch cans (you can see the fittings on the side of the valve covers with painters tape on it).
-Get boost bypass tube welded up, get TB adapter modified.
-Fab throttle cable brackets, FPR mount.
-Install some kind of exhaust since it currently ends mid-firewall (right now all I have is a 6" piece of downpipe to bolt to it, lol).
-Finish running vacuum lines, other misc parts.
-Upload tune (base tune is already done, just need to flash it over)
Obviously there are a few other things on the list before I drive it:
-Replace wheel studs.
-Change trans pan gasket (leaks a lot of fluid right now).
-Replace axles (already have replacement parts, just need to make 'new' ones and swap them).
But I'm going to back burner that stuff until I can get the engine up again. I'll try and update this thread as I make progress.
Last edited by bumpin96monte; 01-13-2015 at 10:39 PM.


#3
01-14-2015, 08:21 AM


") Hi 'Chad,
Hi 'Chad,Attention 2 detail 4-Sure. Your Monte & your modifications are just Amazing
 Thanks for posting/sharing >Enjoyed<

#6
01-14-2015, 09:12 PM
Join Date: Jan 2008
Location: Mountains of Utah
Posts: 4,903
Wish I had your mechanical aptitude, your really going for it, such a sick power level your going for. Really nice to see your build finally reach this level of completion. Your obviously have been very meticulous engineering and assembling this monster of Whipple S/C powered engine.
So your using standard OEM fuel filters? Different microns or the same for filtering? My builder used 100m and 10m and they tend to be spendy. Your use of OEM filters seems greatly simplified and cost efficient.
We ended up deadheading my fuel rails and putting dampener's on. Seems like fuel always ends up being a sticky point on builds, gets to hot, not enough pressure, injectors etc. We ended up moving my Monte's fuel lines again, totally away from any heat source and also making a fuel cooler with the A/C condenser. Went through 3 different fuel pump configurations. On the frame rail, in the tank and now back on the frame. Went from Aeromotive to Weldon and also 2 different speed controllers. What fuel pump set up you trying to do, OEM or aftermarket one? Nice bending job for the rigid fuel lines, best choice for the fuel line under the car too, smart move.
The Intercooler your using looks to be more than adequate, just "WOW" nice job with this setup.
Everything just looks organized, clean and oh so shiny. Best of luck to you as the journey towards completion continues.
Last edited by ZIPPY02; 01-14-2015 at 09:41 PM.


#9
01-16-2015, 10:05 AM
It will definitely be nice to easily/cheaply swap them out. I've read some articles that say your fuel system is never more dirty than when it's first installed (debris left over from manufacturing and subsequent fab work, etc). So I'll probably swap them at the first oil change for good measure. I do plan to disconnect the lines at the rails once I add fuel and run a little through to clean out anything I might've missed- but anything in the return line or tank is going to flush out when I actually start it up.
What fuel pump set up you trying to do, OEM or aftermarket one?
Everything just looks organized, clean and oh so shiny. Best of luck to you as the journey towards completion continues.
That looks pretty good. What kind of hp numbers do you think you'll have once this is done?
However, I do have a few benefits over that car when it made this run:
-E85 (vs 50/50 mix of 91 pump gas and MS109).
-110# injectors (vs 57# to support the above).
-9.5:1 compression (vs 8.5:1)
-102mm TB (vs Northstar)
-100mm TSP MAF (vs LS1 MAF)
-Reworked LIM, cut and rewelded to better match whipple/IC outlet (vs stock width LIM)
-Yella Terra Adapter/IC with PRJ extra tall core (vs a TEP IC, although the car now has the same IC setup I have)
The rest of the parts are pretty much the same between the two cars.
Last edited by bumpin96monte; 01-16-2015 at 11:04 PM.
#10
01-16-2015, 07:10 PM
jonbobs car is spraying nitrous and is at prj getting the finishing touches done to it. There estimating 620-640whp
I don't know if you know this or not but Jonbob sold this car and I know the new owner pretty well, I actually seen this car in person.
I don't know if you know this or not but Jonbob sold this car and I know the new owner pretty well, I actually seen this car in person.