? How 2 Wash & Dry your Car (+more) ?
#1
 09-13-2014, 12:59 PM


Ask a Pro Detailer Blog <Click
by Todd CooperiderWithout Causing Swirls.
We all enjoy the feeling of driving a freshly washed car. The cleanliness of the vehicles we drive says a lot about the type of person we are. It�s no different than how we care for our houses, our landscaping, or our personal appearances. Beautifully prepared cars project confidence, professionalism, and just makes us feel good when driving (or admiring) them! And the act of car washing can be therapeutic and relaxing as well.
But as we engage in the ritualistic weekend activity, are we doing more damage than good? Although most car owners have spent countless hours over the years washing their vehicles, chances are it is being done incorrectly and/or with the improper materials which in the long run results in paint that is full of swirls. Not only do they make the paint look bad, but they also reduce the overall value of the car as well.
What are swirls and what causes them?
Swirls or spider webs on the surface of the car are thousands of micro-scratches that have a negative impact on the overall appearance. They are more noticeable on darker colored vehicles, and can easily be seen in direct sunlight or under the lights at night while in a parking lot.
While there are many causes of swirls, the biggest culprit is improper washing and drying techniques. They can be avoided for the most part once you learn how to properly wash and dry a vehicle, as well as which materials to use. One trip to the automatic car wash (also referred to as swirl-o-matics), or a quick wipe down with the wrong kind of towel can quickly destroy 15 hours of machine polishing. Even if the local car wash or dealership offers a hand-wash, it doesn�t mean that they are using proper methods or materials, and in many cases can do more harm than good.
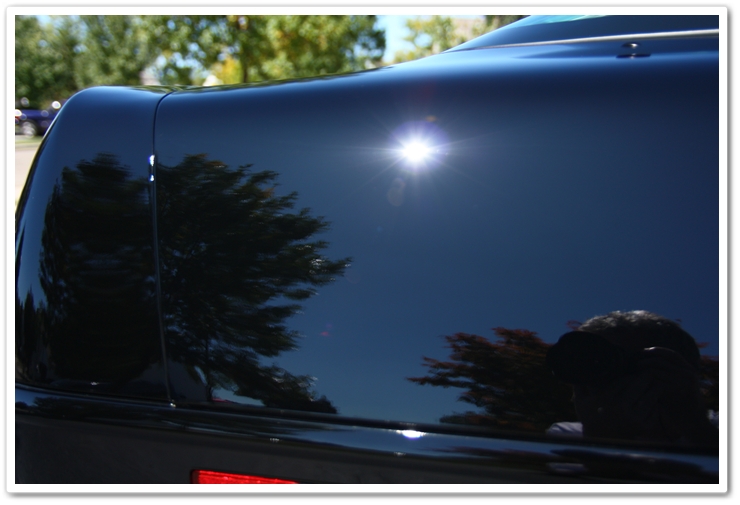
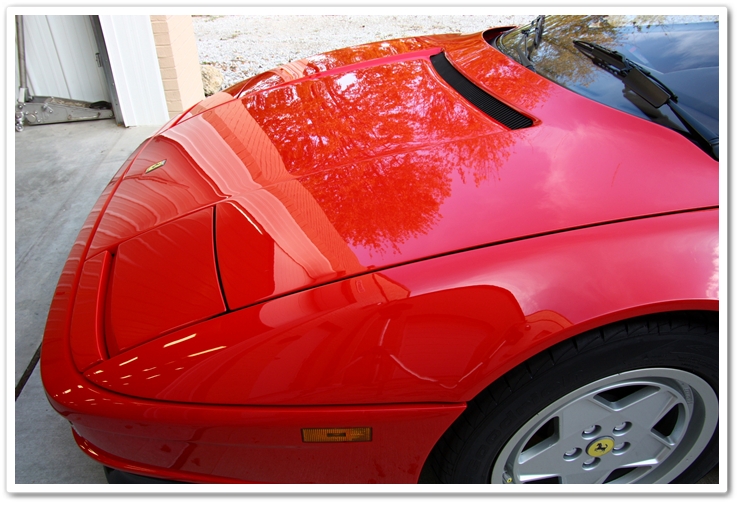
This is what paint should look like.
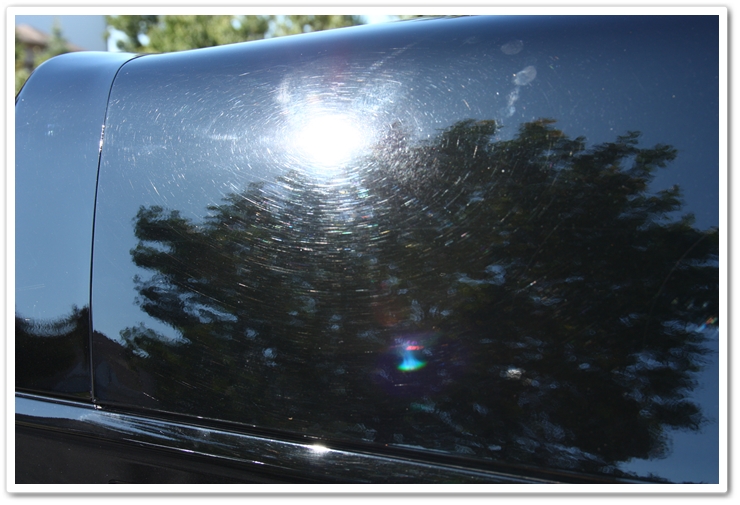
This is what it looks like after years of improper care.
What materials and products are needed?
My first advice is to say that you should keep your kitchen supplies where they belong�in the kitchen! Kitchen towels (or any household towels or rags) are very abrasive and easily scratch the delicate painted surfaces of your car. Dish soap over time can damage rubber trim, and it can strip off any wax from the finish as well.
We all enjoy the feeling of driving a freshly washed car. The cleanliness of the vehicles we drive says a lot about the type of person we are. It�s no different than how we care for our houses, our landscaping, or our personal appearances. Beautifully prepared cars project confidence, professionalism, and just makes us feel good when driving (or admiring) them! And the act of car washing can be therapeutic and relaxing as well.
But as we engage in the ritualistic weekend activity, are we doing more damage than good? Although most car owners have spent countless hours over the years washing their vehicles, chances are it is being done incorrectly and/or with the improper materials which in the long run results in paint that is full of swirls. Not only do they make the paint look bad, but they also reduce the overall value of the car as well.
What are swirls and what causes them?
Swirls or spider webs on the surface of the car are thousands of micro-scratches that have a negative impact on the overall appearance. They are more noticeable on darker colored vehicles, and can easily be seen in direct sunlight or under the lights at night while in a parking lot.
While there are many causes of swirls, the biggest culprit is improper washing and drying techniques. They can be avoided for the most part once you learn how to properly wash and dry a vehicle, as well as which materials to use. One trip to the automatic car wash (also referred to as swirl-o-matics), or a quick wipe down with the wrong kind of towel can quickly destroy 15 hours of machine polishing. Even if the local car wash or dealership offers a hand-wash, it doesn�t mean that they are using proper methods or materials, and in many cases can do more harm than good.
This is what paint should look like.
This is what it looks like after years of improper care.
What materials and products are needed?
My first advice is to say that you should keep your kitchen supplies where they belong�in the kitchen! Kitchen towels (or any household towels or rags) are very abrasive and easily scratch the delicate painted surfaces of your car. Dish soap over time can damage rubber trim, and it can strip off any wax from the finish as well.
You�ll need:
- At least 2, but preferably 3 buckets (they�re inexpensive, and stack to save space)
- At least 2, but preferably 4 Grit Guards
- A Waffle Weave microfiber towel for drying, and a supply of various plush microfiber towels for final buffing.
- A mild auto washing detergent.
- A plush sheepskin wash mitt (it�s always good to have a spare!)
- EZ Detail brushes for cleaning wheels and wheel wells
- A quick detailer spray and/or spray wax.
- A mild degreaser/all-purpose cleaner to help break down heavily soiled areas such as bird droppings, tar, sap, or other stubborn forms of contamination.
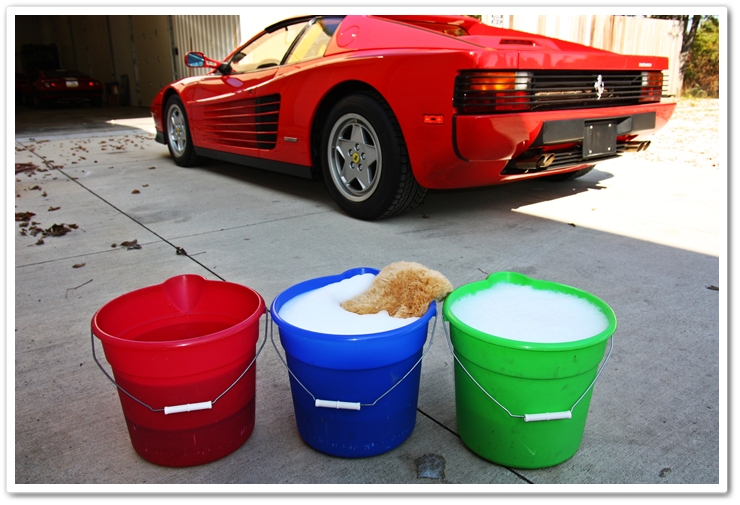
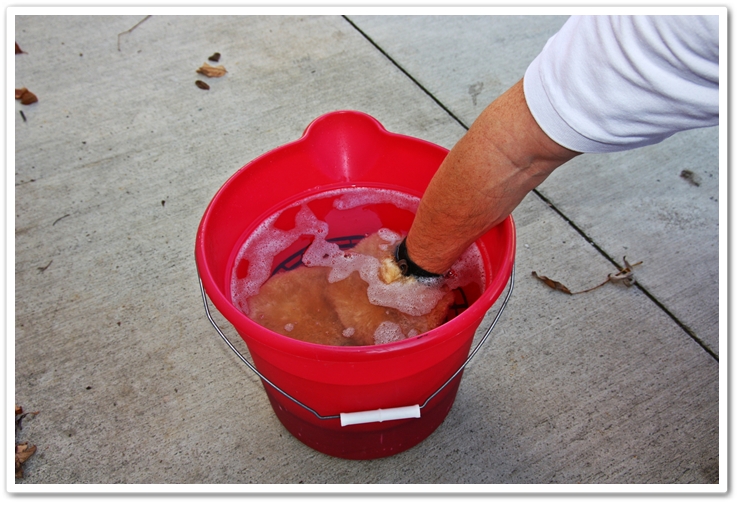
Now you�re ready to prepare your wash buckets. Yes, that was plural, as in more than one bucket! Ultimately you want 3 buckets. One is your wash bucket, one is your rinse bucket, and one is dedicated for wheel cleaning. You could get away with just two, but then you�d have to stop and clean out a bucket after you finish your wheels before you started on the rest of the car. Notice too that I use Grit Guards in both my rinse bucket and my wash bucket (for best results, use two Grit Guards per bucket!). For the rinse bucket in particular, this helps dislodge dirt and debris from the wash mitt, and then keeps the abrasive sediment at the bottom where it is away from the cleaner water at the top. The reason you need a rinse bucket is because you want the water in your wash bucket to remain clean throughout the entire process. If you use just one bucket that means you�re introducing dirt into your wash water, then using that same dirt to wash your car with�hence all the swirls!
Note: When you add your car wash detergent to your wash bucket, be sure to closely follow the manufacturer�s recommendation for how much product to use. More isn�t always better, and in fact you may strip any existing coats of wax by using too much detergent.
Grit Guards are placed at the bottom of both the wash and rinse buckets.
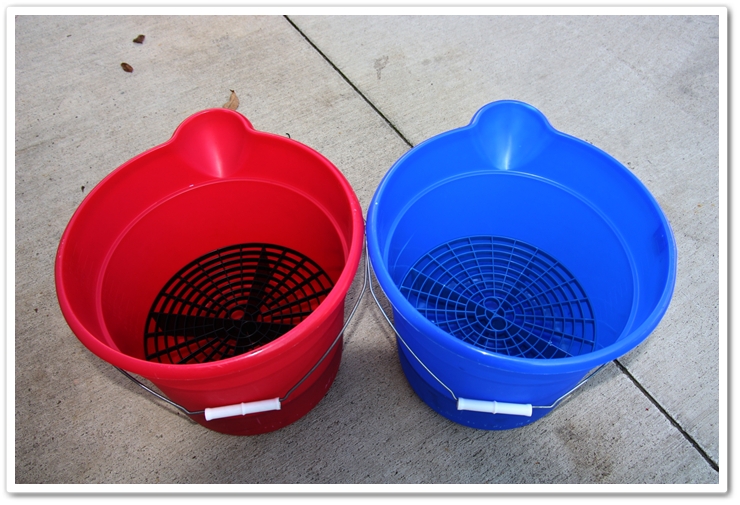
All 3 buckets are filled and ready to go.
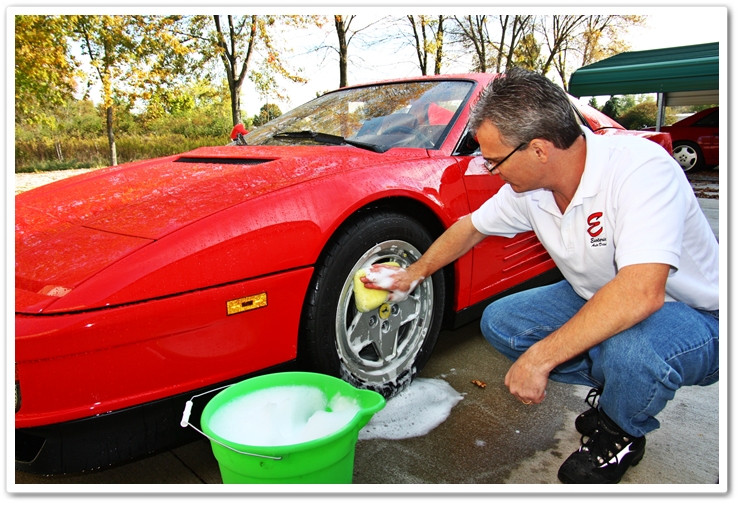
Wash your wheels first!
One thing to keep in mind for wheel cleaning is that you always want to start the car washing process with the wheels first. The reason we do this is because the wheels are typically the dirtiest parts of the car, and we don�t want to risk overspray from the wheels getting all over a clean painted surface.
Make sure that you have a dedicated bucket and wash media strictly for wheels! Never use your wheel washing materials on painted surfaces. Ever! There are too many abrasive contaminants on the wheels, and if you were to use it on the paint afterwards, you�ll most likely damage the finish.
Use your Mini EZ Detail brush to get inside the tight areas and to reach the inner barrels of the wheels.
Note: When you add your car wash detergent to your wash bucket, be sure to closely follow the manufacturer�s recommendation for how much product to use. More isn�t always better, and in fact you may strip any existing coats of wax by using too much detergent.
Grit Guards are placed at the bottom of both the wash and rinse buckets.
All 3 buckets are filled and ready to go.
Wash your wheels first!
One thing to keep in mind for wheel cleaning is that you always want to start the car washing process with the wheels first. The reason we do this is because the wheels are typically the dirtiest parts of the car, and we don�t want to risk overspray from the wheels getting all over a clean painted surface.
Make sure that you have a dedicated bucket and wash media strictly for wheels! Never use your wheel washing materials on painted surfaces. Ever! There are too many abrasive contaminants on the wheels, and if you were to use it on the paint afterwards, you�ll most likely damage the finish.
Use your Mini EZ Detail brush to get inside the tight areas and to reach the inner barrels of the wheels.
Then use a sponge or soft cloth to clean the face of the wheels.
Make sure that you thoroughly rinse out your wheel brushes and sponges before dipping them back into your wheel wash bucket! If not you will contaminate the water, and by the time you get to the final wheel you would be washing with mud!
For more detailed information on how to properly wash wheels and wheel wells, please refer to my wheel detailing tutorial.
Proper washing for a swirl-free finish!
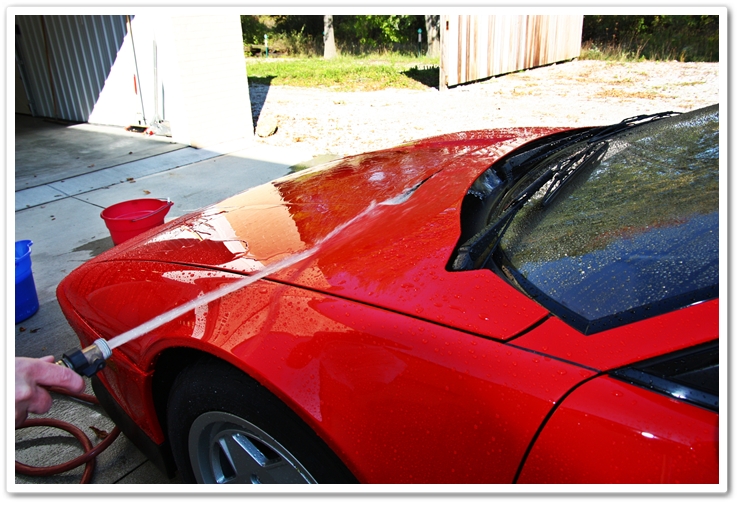
To avoid water spots and streaking, you want to make sure that the surface of the vehicle is cool to the touch, and preferably in the shade.
First you want to pre-rinse the surface to remove as much of the dirt and debris as possible. Try to avoid using a strong stream of water as the pressure on heavy particles can potentially scratch the paint.
If you have any heavy contamination, now is the time to pre-soak it with an all-purpose cleaner. Follow the manufacturer�s instructions on how long to allow it to dwell. Here I am using P21S Total Auto Wash.
Make sure that you thoroughly rinse out your wheel brushes and sponges before dipping them back into your wheel wash bucket! If not you will contaminate the water, and by the time you get to the final wheel you would be washing with mud!
For more detailed information on how to properly wash wheels and wheel wells, please refer to my wheel detailing tutorial.
Proper washing for a swirl-free finish!
To avoid water spots and streaking, you want to make sure that the surface of the vehicle is cool to the touch, and preferably in the shade.
First you want to pre-rinse the surface to remove as much of the dirt and debris as possible. Try to avoid using a strong stream of water as the pressure on heavy particles can potentially scratch the paint.
If you have any heavy contamination, now is the time to pre-soak it with an all-purpose cleaner. Follow the manufacturer�s instructions on how long to allow it to dwell. Here I am using P21S Total Auto Wash.
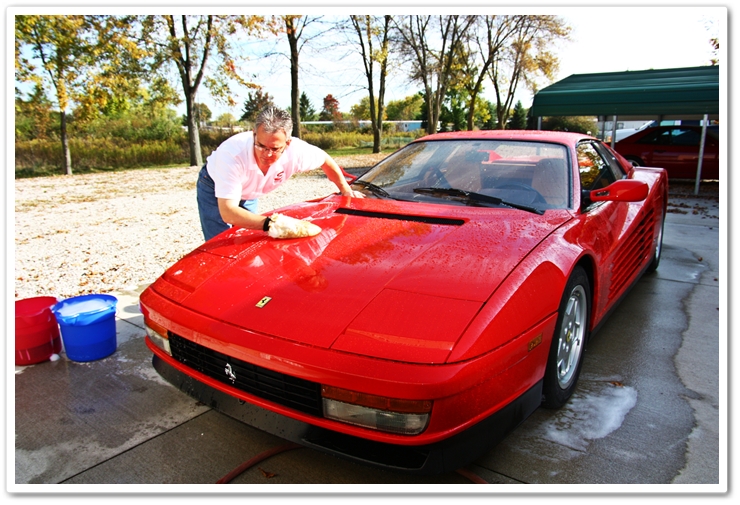
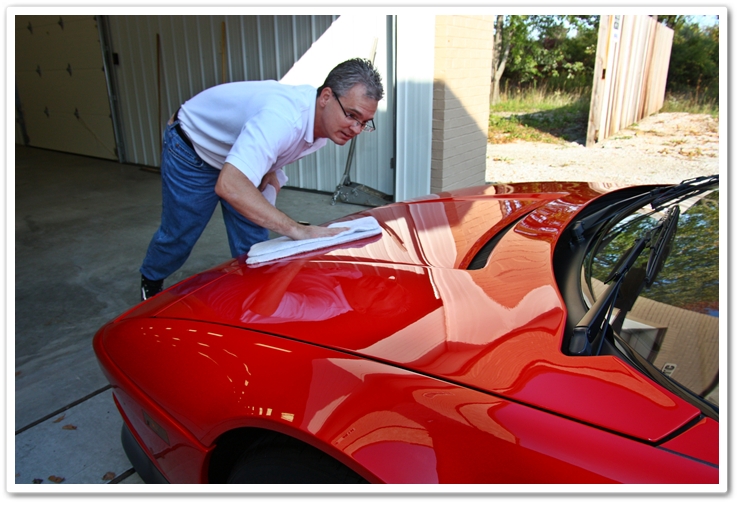
When washing the vehicle, start at the top and work your way down. Wash the roof, windshields, hood, trunk lid, and then move down to the sides.
Dip your sheepskin mitt into the wash bucket, and then clean one small section at a time using little to no pressure. You�re merely trying to float away dirt and debris from the surface. When washing the horizontal surfaces on top, use a straight arm motion from front to back. I�ll typically work a section roughly 3�x3�, and then thoroughly clean out my wash mitt in the rinse bucket before moving on.
Wash horizontal surfaces in front to back motion.
After washing each small section, dip your dirty mitt into the rinse bucket and agitate against the Grit Guard at the bottom of the bucket. This will help to dislodge the dirt and debris from the mitt and keep it at the bottom of the bucket. After rinsing, then dip it back into the wash bucket (agitate against Grit Guard in wash bucket also) to start the process over again. Rinse the vehicle frequently and don�t allow soap to dry on the surface.
Note: When you finish washing the vehicle, your wash bucket should be as clean as when you started. Never introduce dirt into your wash bucket!
Agitate wash mitt against Grit Guard.
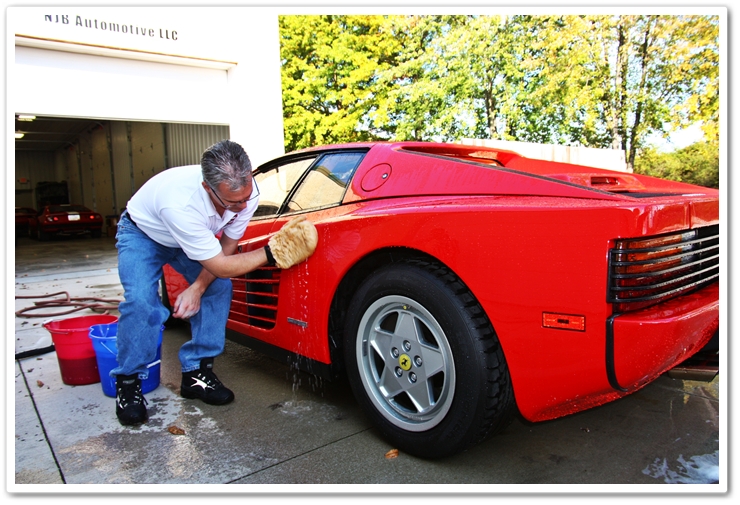
Now that you�ve finished the horizontal surfaces, move on to the vertical surfaces and work your way around the car. Here you want to wash in straight up and down motions and in small sections the same as you did on top. Rinse your wash mitt frequently, and I would recommend using a completely separate wash mitt or sponge for the lower areas if they are exceptionally dirty.
Wash vertical surfaces in up and down motion.
As you make your way around to the back of the vehicle, take a moment to wash the exhaust tips using your wheel bucket and Mini EZ Detail brush.
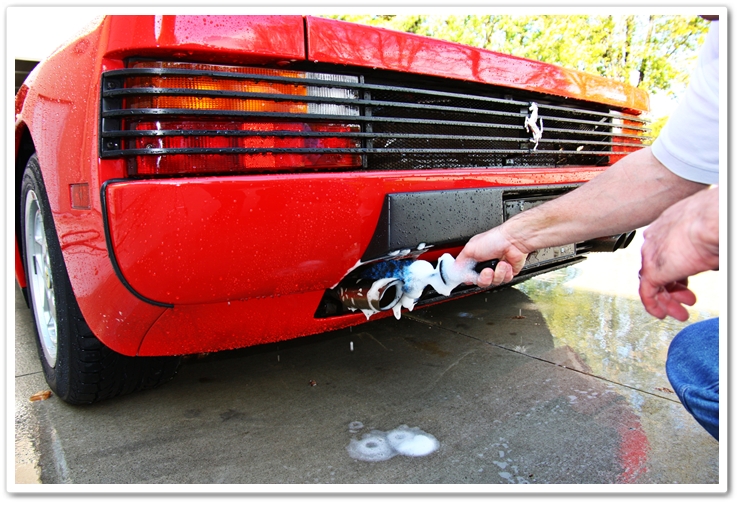
For more detailed information on how to properly clean your exhaust tips, please refer to my exhaust tip detailing tutorial.
Note: After every time you wash your car, be sure to thoroughly clean out all of your buckets and wash media. While cleaning your wash mitts in particular (I wash mine by hand in the sink), carefully inspect them to make sure there are no foreign objects imbedded into them that could cause damage to your paint. Also allow them to dry completely before storing them so they last longer. Should you ever drop your wash media on the ground during the washing process, then grab a spare to finish the job�one small piece of debris could wreak havoc on your car!
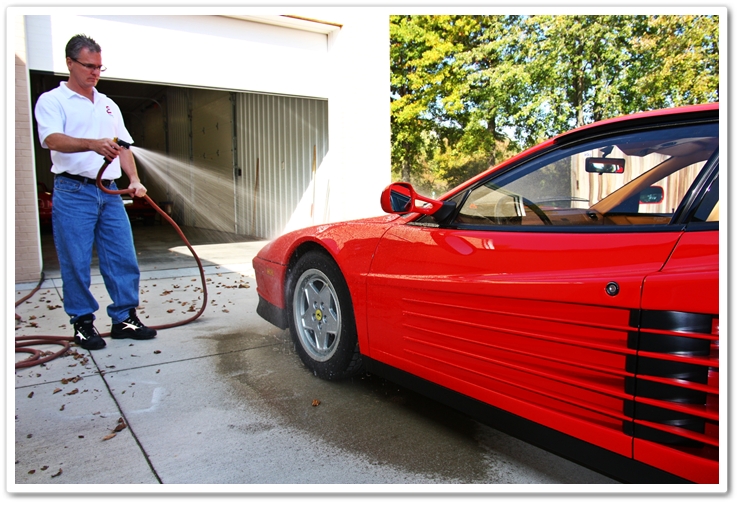
When doing your final rinse, take the nozzle off of the hose and allow it to flow freely over the surface. This sheeting action will prevent water droplets (that cause spots), and will reduce the amount of actual drying required.
Time to dry and shine!
We�re done with the wash process now, so let�s move on to the proper way to dry it to keep from marring the finish.
Just because you�re armed with some microfiber towels it doesn�t mean that you�re not going to induce swirls in your paint. You also need to have the right kind of microfiber, and care for it properly as well. You have to use a very high quality microfiber towel, and use light pressure. For drying I use the DI Waffle Weave Towels, and for buffing I will use the DI Great White or Ultra Plush towels.
The first thing I do after washing is to use compressed air to blow off all of the standing water, and water that hides in all of the cracks and crevices. The less you have to touch the vehicle the better. If you don�t have access to compressed air then don�t worry because you can still get it done the old fashioned way.
Now that you�re ready to dry it off, first take your microfiber towel (lightly spritzed with your instant detailer for added lubrication to prevent marring) and gently drag it across the finish to remove the majority of the water. Here I am using the Waffle Weave microfiber that is capable of absorbing up to 5 times its weight in water.
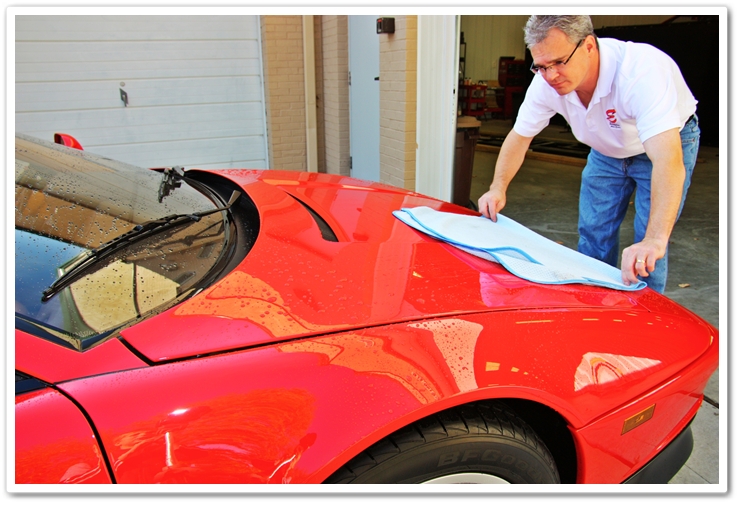
Or if you have very little standing water you can use a blotting method.
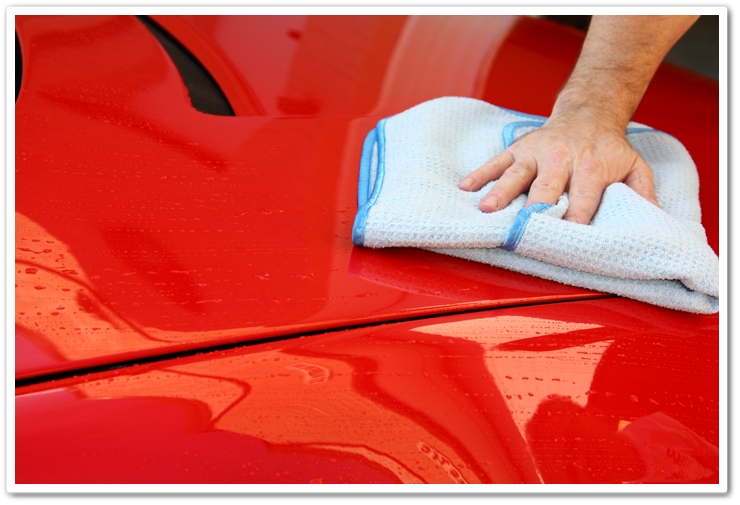
This will leave a little bit of water on the finish, and you want to get that wiped down to avoid streaking. If you just buff that out with a plush, dry microfiber, you still run the risk of marring the finish. For this step, you want to add some lubrication using either a Quick Detailer or a Spray Wax . Use a fine mist either on the surface or directly onto the towel, and lightly buff to a brilliant finish. If you spray directly onto the surface, and end up with streaking or smearing, then try misting a little bit directly on the towel instead. With today�s spray waxes, they�re very easy to use and can be applied to all surfaces without fear of staining trim. By using this method, you�re also drying and waxing all in one quick step! This method is quick, easy, and it is very safe for the finish of your car.
First apply Quick Detailer or Spray Wax.
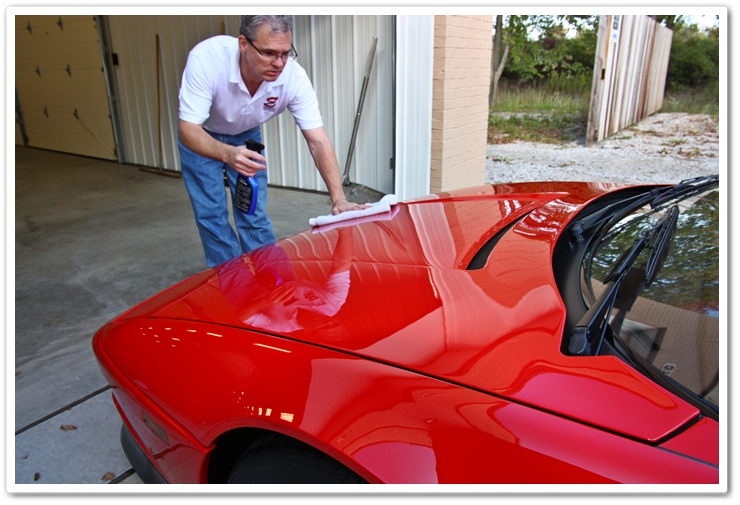
Then lightly buff to a brilliant finish.
Once this step is completed you should reach for a general purpose microfiber towel for the finishing touches. I reserve my most plush microfiber towels for exterior painted surfaces, and then I keep a set of general purpose (less expensive) towels for cleaning areas like the door jambs, behind the fuel filler lid, and drying the wheels. Never mix your plush towels with your general purpose ones.
Dip your sheepskin mitt into the wash bucket, and then clean one small section at a time using little to no pressure. You�re merely trying to float away dirt and debris from the surface. When washing the horizontal surfaces on top, use a straight arm motion from front to back. I�ll typically work a section roughly 3�x3�, and then thoroughly clean out my wash mitt in the rinse bucket before moving on.
Wash horizontal surfaces in front to back motion.
After washing each small section, dip your dirty mitt into the rinse bucket and agitate against the Grit Guard at the bottom of the bucket. This will help to dislodge the dirt and debris from the mitt and keep it at the bottom of the bucket. After rinsing, then dip it back into the wash bucket (agitate against Grit Guard in wash bucket also) to start the process over again. Rinse the vehicle frequently and don�t allow soap to dry on the surface.
Note: When you finish washing the vehicle, your wash bucket should be as clean as when you started. Never introduce dirt into your wash bucket!
Agitate wash mitt against Grit Guard.
Now that you�ve finished the horizontal surfaces, move on to the vertical surfaces and work your way around the car. Here you want to wash in straight up and down motions and in small sections the same as you did on top. Rinse your wash mitt frequently, and I would recommend using a completely separate wash mitt or sponge for the lower areas if they are exceptionally dirty.
Wash vertical surfaces in up and down motion.
As you make your way around to the back of the vehicle, take a moment to wash the exhaust tips using your wheel bucket and Mini EZ Detail brush.
For more detailed information on how to properly clean your exhaust tips, please refer to my exhaust tip detailing tutorial.
Note: After every time you wash your car, be sure to thoroughly clean out all of your buckets and wash media. While cleaning your wash mitts in particular (I wash mine by hand in the sink), carefully inspect them to make sure there are no foreign objects imbedded into them that could cause damage to your paint. Also allow them to dry completely before storing them so they last longer. Should you ever drop your wash media on the ground during the washing process, then grab a spare to finish the job�one small piece of debris could wreak havoc on your car!
When doing your final rinse, take the nozzle off of the hose and allow it to flow freely over the surface. This sheeting action will prevent water droplets (that cause spots), and will reduce the amount of actual drying required.
Time to dry and shine!
We�re done with the wash process now, so let�s move on to the proper way to dry it to keep from marring the finish.
Just because you�re armed with some microfiber towels it doesn�t mean that you�re not going to induce swirls in your paint. You also need to have the right kind of microfiber, and care for it properly as well. You have to use a very high quality microfiber towel, and use light pressure. For drying I use the DI Waffle Weave Towels, and for buffing I will use the DI Great White or Ultra Plush towels.
The first thing I do after washing is to use compressed air to blow off all of the standing water, and water that hides in all of the cracks and crevices. The less you have to touch the vehicle the better. If you don�t have access to compressed air then don�t worry because you can still get it done the old fashioned way.
Now that you�re ready to dry it off, first take your microfiber towel (lightly spritzed with your instant detailer for added lubrication to prevent marring) and gently drag it across the finish to remove the majority of the water. Here I am using the Waffle Weave microfiber that is capable of absorbing up to 5 times its weight in water.
Or if you have very little standing water you can use a blotting method.
This will leave a little bit of water on the finish, and you want to get that wiped down to avoid streaking. If you just buff that out with a plush, dry microfiber, you still run the risk of marring the finish. For this step, you want to add some lubrication using either a Quick Detailer or a Spray Wax . Use a fine mist either on the surface or directly onto the towel, and lightly buff to a brilliant finish. If you spray directly onto the surface, and end up with streaking or smearing, then try misting a little bit directly on the towel instead. With today�s spray waxes, they�re very easy to use and can be applied to all surfaces without fear of staining trim. By using this method, you�re also drying and waxing all in one quick step! This method is quick, easy, and it is very safe for the finish of your car.
First apply Quick Detailer or Spray Wax.
Then lightly buff to a brilliant finish.
Once this step is completed you should reach for a general purpose microfiber towel for the finishing touches. I reserve my most plush microfiber towels for exterior painted surfaces, and then I keep a set of general purpose (less expensive) towels for cleaning areas like the door jambs, behind the fuel filler lid, and drying the wheels. Never mix your plush towels with your general purpose ones.
All Finished!
If you follow those key steps in washing and drying, you should be able to keep your vehicle looking its absolute best without inducing swirls in the washing and drying process. Once you get this system down, you should be able to complete the entire process in an hour or less.
If you follow those key steps in washing and drying, you should be able to keep your vehicle looking its absolute best without inducing swirls in the washing and drying process. Once you get this system down, you should be able to complete the entire process in an hour or less.
Last edited by Space; 09-14-2014 at 01:11 PM.
#2
09-13-2014, 05:41 PM


Hay Space,
OL Yella is going to the Detailer sometime between when I get her back and th last Hi Point Meet next month. She has not had a bath since last October. She had some water marks and dull spots on her the last time I waxed her. I use Mothers 3 Step wax and wash. I wash and dry her down in sections. I use a Terry cloth towel to wash her and a shamy to dry her. But it's time for her to get detailed with a clay bar. Since I have no experience with this, I'm going to leave it to the pro's. She looks good when I do her so she is going to shine when they do her. But first things first. Gotta get her back from the trans shop. One step at a time Right!
OL Yella is going to the Detailer sometime between when I get her back and th last Hi Point Meet next month. She has not had a bath since last October. She had some water marks and dull spots on her the last time I waxed her. I use Mothers 3 Step wax and wash. I wash and dry her down in sections. I use a Terry cloth towel to wash her and a shamy to dry her. But it's time for her to get detailed with a clay bar. Since I have no experience with this, I'm going to leave it to the pro's. She looks good when I do her so she is going to shine when they do her. But first things first. Gotta get her back from the trans shop. One step at a time Right!
#3
09-14-2014, 05:58 AM
") Hi J.C., it's great to go to the Pro's `if you can afford (?)
Hi J.C., it's great to go to the Pro's `if you can afford (?)I've learned a lot on the web about detailing and cleaning cars.
The above article is just one of many that have good tip's & methods on how to do a good job. We have several member's that are detailer's and their Monte's reflect their talents...(Like Zach the Shocker) + +

Look 4ward to seeing your Monte when it ready for the Meet/Show
#4
09-14-2014, 01:05 PM
Tutorial: how to wash your car (best car wash methods by Auto Obsessed) 
===============================================
Top Ten Detailing Mistakes - /DRIVE CLEAN
===============================================
Top Ten Detailing Mistakes
- /DRIVE CLEAN
#7
09-16-2014, 03:41 PM


Join Date: Jul 2009
Location: New Orleans
Posts: 3,215
Hi J.C., it's great to go to the Pro's `if you can afford (?)I've learned a lot on the web about detailing and cleaning cars.
The above article is just one of many that have good tip's & methods on how to do a good job. We have several member's that are detailer's and their Monte's reflect their talents...(Like Zach the Shocker) + +
Look 4ward to seeing your Monte when it ready for the Meet/Show
Just kidding lol
#8
04-04-2016, 01:11 PM


Hi Member's,

your Monte Carlo ?

Post your tips and how you do it ?
your Monte Carlo ?
Post your tips and how you do it ?
Last edited by BeachBumMike; 04-04-2016 at 01:15 PM.


Thread
Thread Starter
Forum
Replies
Last Post
ChibiBlackSheep
Detailing
17
01-09-2013 03:46 PM